Monday, November 29, 2010

Get in Shape

The 38th challenge at the Shabby Tea Room is to "Get in Shape": to make a shaped project that uses no squares or rectangles.  Every year I make some ornaments for our Christmas tree, so I decided to use the Spellbinder's Fleur de Lis pendant to make snowflake ornaments.  Here are 2 examples:


Briefly, I diecut a circle out of blue cardstock, overstamped it in white ink with the snowflake circle, then stamped the trees in green ink.  The snow is a torn piece of a white diecut circle, glued to the blue circle.  The log cabin was stamped on kraft cardstock, and colored in with colored pencils, adding white gel pen for the snow and popped up for a little dimension.  I added glitter with a glue pen, then dipped into prisma glitter.  I used 2 pendant diecuts, 1 turned 45 degrees from the first behind the finished scene, and then put another finished scene on the reverse side, so that if it turns you still see the main image.

Supplies: blue, white, kraft cardstocks, colored pencils, glue pen and glitter, Glossy Accents on some windows, Hero Arts CG100 Snowflake Circle, CL462 Magic of Christmas (added snowflakes), CL464 Sending Holiday Cheer (cabin and trees), Colorbox Frost White, pine needles distress, and Versafine onyx black inks, Spellbinders Fleur de Lis Pendant diecut, circle diecut

Sunday, November 28, 2010

Brown, silver and grey

Hello, everyone!  I really missed you all over the holiday.......I hope you had a lovely together time with your loved ones and lots of yummy turkey and all the other traditional foods, too!  We were away for a little over a week visiting family.  Loved being with them, but I'm glad to get back to normal.  We arrived last night with a few neighbors' Christmas lights to welcome us home, and I was instantly switched over to Christmas mode!  So I've changed my blog a bit to reflect that.  This week we will put up our tree, decorate a bit inside, and put our Christmas candles in all the windows - love the welcoming feel they give at this time of year.

The Play Date Cafe challenge has given us another challenging set of colors: brown, grey and silver.  I almost didn't try, but I'm glad I did......once again, I really like the results once I played a little with these colors; they are so calming together, and I hope I chose the right theme to reflect this.  Here is my submission for this week:


Supplies:  2 shades of grey, kraft and brown cardstock, Hero Arts K5256 Winter Pine, CL459 Merry Christmas Trees (sentiment), CL462 Magic of Christmas (smallest snowflake), Our Daily Bread Peace and Joy (large and medium snowflakes), Ranger Super Fine Detail silver embossing powder, clear embossing powder (sentiment), Hero Arts Clear Mixed Gemstones, dark burgundy embroidery floss

Thursday, November 18, 2010

Play Date Cafe challenge #56

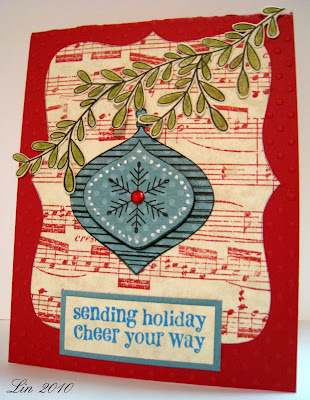
I didn't think I'd get a chance to play this week at the Play Date Cafe challenge, but an idea came to me and I ran with it!  The colors we are to use are red, olive, and turquoise and here is my submission:


Supplies: parchment and red cardstock, BoBunny ocean dot dp, Adirondack cranberry, Versamark onyx black, and Versacraft Cerulean Blue inks, Hero Arts CG222 Music Background, CL462 Magic of Christmas, CL464 Sending Holiday Cheer, Sizzix swiss dot embossing folder, SU topnotch die, red metallic decor, olive prismacolor watercolor pencil

Tuesday, November 16, 2010

Really Reasonable Ribbon

The challenge at Really Reasonable Ribbon this time is Christmas.  I pulled out a digital image from the Graphics Fairy that I've used before and built my card around it, being sure to make the ribbon a prominent feature. 


I started by stamping the music background on parchment paper, distressing around the edges with tea dye distress ink.  I also distressed the sentiment panel and the angel image.  The ribbon is from Kath - it appears to be organdy bordered in satin and it glimmers so beautifully!  After assembling everything I thought it needed a little something down in the corner, so I added the holly sticker.

Supplies: red and parchment cardstock, digital image from the Graphics Fairy (look under the angel category), Hero Arts CG222 Music Background, CL460 Joy to All, Anita's Teddy Bear brown, tea dye distress and Adirondack cranberry inks, K&Company sticker, gold ribbon

Monday, November 15, 2010

Lucy's Old and New challenge


Lucy has challenged us to use some old as dirt supplies :) and something new.  I followed her lead and used as my old this K&Company Tim Coffey Grand Adhesions birdhouse sticker.  And my new item is the Cosmo Cricket Togetherness dp I used as my background.  It was a gift from Tiffany a few months ago.  Stickers sure do make for a fast card - lesson learned!  Thanks, Lucy!

Supplies: kraft and creamy parchment cardstocks, Cosmo Cricket Togetherness Mini Deck dp, K&Company Grand Adhesions Stickers #554276 Garden Kitty, Hero Arts CL272 All Occasion Messages, Versafine onyx black ink, nesties scalloped oval dies, twine, heart button

May your joys be countless

Another Thanksgiving card for the challenge at The Shabby Tea Room, using a vintage image that I found on Google.  I think this is a real keeper of an image - the sentiment is exactly right:

For love present,
ills past,
and good to come,
may our hearts rejoice
this Thanksgiving Day.

May your joys be as countless
as the golden grains


I stamped the background grains on kraft cardstock using tea dye distress ink and Hero's Silhouette Grass stamp, added that to a darker brown card, then framed my printed image on brick red to bring out the barn in the image.  Added some lace edging and the very, very last of a spool of this golden ribbon and a button, to reflect the sunset.

Supplies: kraft, brick and brown cardstocks, Hero Arts S5316 Silhouette Grass, tea dye distress ink, scrap of lace, golden ribbon, button

Thanksgiving

The challenge at the Shabby Tea Room this week is to make something that reflects thankfulness.  This couldn't have come at a better time, as I needed some ideas for a few very special Thanksgiving cards.   I loved dt members Debbie and Cathy's examples using vintage images, so that's the direction I went.


I found this adorable image at the Clearly Vintage blog.  I love the bright autumn leaves against the blue sky.  I framed it with part of a doily, and added some autumnal paper scraps, a ribbon I dyed to match, and my sentiment. 

Supplies: pumpkin cardstock, scraps of autumnal design papers, doily, Hobby Lobby ribbon dyed with Versacolor Paprika ink, Hero Arts CL119 Happy Thanksgiving (sentiments)

Sunday, November 14, 2010

More holly cards


Just sharing more Christmas cards using this classic holly stamp, all on various green cardstock bases and using different backgrounds and shapes. 

Supplies: Hero Arts CG229 Classic Holly, S5213 Dots and Flowers, S4878 Old Letter Writing, sentiments from CL343 Holiday Sayings, CL464 Sending Holiday Cheer, versafine onyx black and tea dye distress inks, Prismacolor pencils, glossy accents for berries, red and burgundy ribbons, nesties labels one and eight, scalloped circle

Saturday, November 13, 2010

A REAL challenge

Here are the colors that we are to work with over at the Play Date Cafe: light pink, red, burgundy, light blue and bright blue.

 I was all over the place with this one; I tried coloring an image using the colors, and even tried to use the photograph as a kind of sketch.......disasters!  Finally I decided to try and simplify the patterns as much as possible and this is what I came up with.


I used light pink, light blue and burgundy cardstock.  The Houndstooth pattern was stamped in Cranberry ink on the light pink (and also on the sentiment - see how different the color looks when stamped over a different color!), and in Deep Lagoon on the light blue. These were trimmed nto squares and framed up with the burgundy cardstock.  Then I embossed the butterfly on burgundy with pale pink embossing powder, trimmed it out, and popped it above the panel.  My colors aren't reading true - that pale pink embossing looks white, and the burgundy looks brown. 

Supplies:  light pink, light blue, burgundy cardstock, Hero Arts K5175 Houndstooth, E5388 Traditional Butterfly, CL380 Truly Appreciated (sentiment), Adirondack Cranberry, Versafine Deep Lagoon, and Versamark inks, pale pink and clear embossing powders

Thursday, November 11, 2010

More Holly

Two more cards using the lovely Classic Holly stamp.  This first one is done in pastels.  I painted the leaves using a mix of peeled paint distress ink and water.  After it was dry I masked it and overstamped in Soft Blossom ink using the Flourish Background.  The veins of the leaves and the perimeter were glittered, and I added pink pearls and the sentiment to finish.  The beautiful pink cardstock is a gift from Isha; she sent it along with the card she made me for the last Card Chain Challenge in October. 


Supplies: white and pink cardstock, Hero Arts CG229 Classic Holly, CG119 Flourish Background, CL343 Holiday Sayings, Versafine Olympia Green and Versafine Onyx black inks, peeled paint distress ink, nesties labels eight, glitter pen and prisma glitter, Hero Arts pale pink pearls

This next one was inspired by a card made by Barb, from the Hero Arts flickr group.  I loved her caramel and rich red color scheme.  This one was also painted with a mix of pine needles distress ink and water, and fired brick and water for the berries, which were glazed with glossy accents.  The music background was stamped in tea dye distress ink and I used it to distress the edges of the top-notch diecut.  I finished by adding some twine and a button and cutting my sentiment into 2 little tags. 


Supplies:  parchment and red cardstock, Hero Arts CG222 Music Background, CG 229 Classic Holly, CL343 Holiday Sayings, Versafine onyx black ink, tea dye, pine needles, and fired brick distress inks, button, twine

Classic Holly

A very special friend sent me this stamp recently and I dived in and couldn't stop creating; you'll be seeing lots of cards using it.  Here is the first one I finished, to enter into this month's inking technique challenge at the Hero Arts blog


I stamped the holly on a textured white cardstock, colored it with prismacolor pencils, and then coated the leaves and berries with Glossy Accents.  After it dried, I used my Tim Holtz blending tool to shade the background using broken china and a little bit of peeled paint distress inks; the glossy accents provides a barrier so that the distress inks don't stain the image.  This was then cut into an oval, trimming around a few of the leaves, mounted on a red scallop oval and then popped above an aqua cardstock stamped 4 times using broken china distress ink, and then mounted onto a green card.

Supplies: textured white, aqua, red and green cardstock, Hero Arts CG229 Classic Holly, CL343 Holiday Sayings, versafine onyx black, broken china and peeled paint distress inks, prismacolor pencils, Glossy Accents, nestabilities ovals and scalloped ovals

Tuesday, November 9, 2010

Double (and triple) layer resist

Over at TwoPeas, Jennifer McGuire continues her Holiday Thinking Inking classes.  One of the techniques she teaches us this week is called double layer resist: stamping with versamark on glossy white paper to begin, then adding distress ink in a lighter color, stamping a 2nd image in versamark and adding a darker ink on top of that.  So that's what I tried on these cards:


For the first one I stamped small snowflakes all over the glossy paper, then sponged on tumbled glass distress ink.  After heating to make sure it was dried, I stamped a large snowflake several times and sponged over faded jeans distress ink, again heating to dry it.  Then I overstamped the script here and there in faded jeans.  The trees were white embossed on white glossy cardstock, sponged with peeled paint distress ink and then dipped in glitter.

Supplies: white glossy and matte paper, Hero Arts CG100 Snowflake Circle, CL234 Winter's Butterfly (large snowflake), LP123 Artistic Windows, CL459 Merry Christmas Trees, CL343 Holiday Sayings, versamark, tumbled glass, faded jeans, peeled paint distress inks, prisma glitter, punched snowflake


On this one I tried the same technique and did 3 layers, using the flourish background and tumbled glass for the first layer, the same big snowflake and faded jeans for the second, and a couple smaller snowflakes and dusty concord ink for the third layer.  I popped the negative image of a diecut snowflake (overstamped with script) over a blue cardstock square, and centered that over the inked background.

Supplies: white glossy and blue cardstocks, Hero Arts CG119 Flourish Background,  CL234 Winter's Butterfly, CL462 Magic of Christmas (smaller snowflakes), CL460 Joy to All (sentiment),S4878 Old Letter Writing, versamark, tumbled glass, faded jeans, dusty concord distress inks, sizzix snowflake die, snowflake punch, button, embroidry thread

Monday, November 8, 2010

Lavender and Lace

That's the theme this week at the Shabby Tea Room.   Here is my take on it; I decided to make a little posey of lavender, wrapped in lace:


I started by stamping the circle doily in Versamark and embossing it in white powder on white cardstock cut into a label shape.  Then I sponged on tea dye distress ink and overstamped the music background in vintage photo distress ink.  On the purple cardstock I stamped the flourish background in dusty concord.  After attaching the label to the card, I then stamped the flower sprig on white cardstock using markers to color the stamp, and spritzing before stamping.  These were cut out and loosely attached  to give a bit of dimension, adding some punched fern sprigs and the ribbon.  The sentiment was stamped and edged with dusty concord.


Supplies: white and purple cardstock, Hero Arts CG168 Circle Doily, CG222 Music Background, CG119 Flourish Background, CL447 Beautiful Peacocks (sentiment), Delta 2875F Solidago Sprig, versamark in and white embossing powder, tea dye, vintage photo, dusty concord distress inks, Marvy markers, punched ferns, purple grosgrain ribbon

Saturday, November 6, 2010

Christmas Robin


Here's another Christmas card made using the Penny Black clear set called Jolly Friends.  I was first drawn to this set because of this adorable little robin.   He was colored with prismacolor pencils and mineral spirits, then cut out with a labels one die, leaving the die on to sponge on some tumbled glass distress ink for the background.  Then that was double-framed with red and the pendant nestabilities die.    I chose these colors so that I could enter this into the Shabby Tea Room challenge #34, and I'm also entering it into Penny Black Saturday's "Let it Snow" challenge this week (since the pendant die looks like a giant snowflake to me).

Supplies: red, white and dark aqua cardstocks, PB 30-058 Jolly Friends, Hero Arts CL343 Holiday Sayings, versafine onyx black, versamark, and tumbled glass distress inks, white embossing powder, nestabilites labels one and pendant dies, prismacolor pencils and mineral spirits, glue pen and ultrafine prisma glitter, white snowflake button, white twine

Friday, November 5, 2010

Combining challenges

I've got more than usual going on this week, but I still wanted to enter 2 of my favorite challenges, so I thought I'd try combining them.  I used the colors from The Play Date Cafe challenge.


Supplies: white cardstock, 2 digital papers: Melissa Esplin Garden Trellis and K Teague, die-cut branches, fabric flowers, dotted organza ribbon, green gem, Hero Arts AR130 Handwritten Sentiments

Flourishes Warm Winter Wishes challenge

I've been mia here lately because we've been having our floors refinished this week, which meant I was barred from getting back to my craft room.  I passed the time by coloring some stamped images.   This morning I saw this card on Donna's blog and I fell in love with it. I had a few of these nestabilities pendant dies already cut, and my mind instantly went to this Penny Black snowman which I colored yesterday.  Then I saw the current Flourishes challenge "As the weather outside starts to turn to winter, let’s turn to the beautiful shades of cool blue – from deep and vibrant to soft and serene. We want to see these shades on your cards to enter our Warm Winter Wishes Challenge!"  And I was off and running.  So here is my entry:


Our floors are finished and look brand new (they are the original wood floors from 1963), but now we need to paint that room, so I'll be doing that most of this weekend.  Always something, huh?  Hope your weekend is lots more fun than ours will be! 

Suppies: blue and white cardstock, blue mottled dp, unknown, Penny Black snowman from 30-058 Jolly Friends, Hero Arts CL355 Lots of Merry, (also various snowflakes from several other clear sets), versafine onyx black and Adirondack stonewash inks, Prismacolor pencils, glue pen and glitter, cuttlebug snowflake embossing folder, blue dotted grosgrain ribbon, punched snowflakes

Tuesday, November 2, 2010

Inking Techniques

is one of the challenges at the Hero Arts Blog this month.  Here is the announcement with the other choices.  I decided to combine some of the things I've learned from Jennifer McGuire's Thinking Inking classes at 2 Peas and here is my submission:


The techniques I used on this card are: stamping a background using an acrylic block, watercoloring with distress inks, and the emboss-resist technique.  Also, after reading Julie Ebersole's blog entry today, I glittered the little church scene entirely by running it through a Xyron machine face-up so that it was sticky all over, then dunked it in glitter.......reminds me of the glittered cardboard villages around Christmas trees I remember  when I was little.  It really has a lovely twinkle irl, between the little glittered panel and the gemstones.
If you'd like a more detailed explanation, see this card on my Flickr photostream.

Supplies:  white watercolor paper, white glossy cardstock, brown cardstock, Hero Arts K4827 Seasons Greeting Collage, S5069 Stunning Snowflakes, worn lipstick and bundled sage distress inks, Memories Artprint Brown and Versamark inks, clear and white embossing powders, HA pink gems, prisma glitter, gingham ribbon