Sunday, March 31, 2024

Happy Easter!

 I recently "discovered" this lovely cling stamp from Penny Black in my supplies, and decided to give it some love!


supplies: white and pink cardstock, (retired) Penny Black Easter Basket cling stamp from 2011, (retired) Hero Arts sentiment from Celebrate Everyday, Lawn Fawn Fancy Scalloped Rectangle stackable die

I know the main elements of this card are retired, but it is just too pretty of an image to ignore!  

I'm entering this into the current Simon Says Stamp Wednesday challenge: Anything Goes.

Hope you have a blessed Easter!

Thursday, March 28, 2024

Some Garden Path Cards

 Concord and 9th recently brought out a stencil pack with stamped sentiments to coordinate, called Garden Path.  I had a fun time playing with them, and have 3 cards to share today!

The unusual thing about the stencils is that there's one that inks in a background.  For this first card I used twisted citron for that.


supplies: white cardstock, Garden Path stencil pack, distress inks (twisted citron, saltwater taffy, worn lipstick, mustard seed, spiced marmalade, mowed lawn, black soot), blender brushes, Garden Path stamp set, pale pink sequins 

Next I wanted to go a little more monochromatic, and so used blues with a bit of yellow and left the largest flowers uncolored except for their centers.


supplies: white cardstock, Garden Path stencil pack, distress inks (tumbled glass, broken china, squeezed lemonade, evergreen bough), blending brushes, Garden Path stamp set 

And lastly, I used the background stencil to emboss the design from the back, then colored in the rest of it using the rest of the stencils, varying my colors.  Here you can see another of the 4 sentiments from the stamp set, and I added some enamel dots to the centers of the flowers.


white cardstock, Garden Path stencil pack, distress inks (saltwater taffy, worn lipstick, scattered straw, broken china), Altenew inks (lime and fresh leaf), Simon Pawsitively Saturated inks (cantelope and sherbet), blender brushes, Garden Path stamp set, various enamel dots

I used the background stencil to emboss all of my cards and give a bit more definition.  If you do this, be sure to emboss BEFORE adding your sentiment, or you may get some black ink where you didn't intend it!  

These stencil sets are perfect for those of us who aren't into coloring - hope you'll give these a look.

I'll be entering these into the Simon Says Stamp Wednesday challenge for this week: Anything Goes.
Thanks for visiting today!

Wednesday, March 27, 2024

Woodblock Wednesday

 Time for Woodblock Wednesday!  The particular one I chose for this month has only been used once before - bad on me!  


supplies: white cardstock, cloudy sky dp from MFT Happy Patterns 6" paper pad, Memory Box Hope Collage woodblock, Spellbinders Sweet Birds on a Branch die, light magenta marker

Memory Box had a whole series of these collage woodblocks.  I got this one sometime in 2013.  This time I stamped it on a cloudy patterned paper, then colored in the flowers and added a bird.


Be sure to visit Amy's blog to see all the other entries for this monthly challenge - it's always a fun walk down memory lane!

It's Anything Goes week over at the Simon Says Stamp Wednesday challenge, so I'll be entering this card there.

Sunday, March 24, 2024

Thinking of You

 March is the month of daffodils, and I try to feature them during the month every year.  Here's this year's version!


supplies: white, green, yellow, and pale orange cardstock, The Greetery Sprinkled with Kindness layering stamps and die, Spellbinders Rainboot Bouquet daffodil dies, Sunny Studio Eyelet and Lattice Frilly Frames dies, (retired) Tammy Tutterow Sweet Petite Sentiments, adhesive foam

So pleased to see that these daffodils fit into the watering can perfectly! 


Thanks for visiting! 

Wednesday, March 20, 2024

Spring Blessings

 Still on a bird/spring kick here.  I put together some Spellbinders goodies for today's design, and used the same embossing folder from Simon from my last post.


supplies: white and surf blue cardstock, Spellbinders Sealed Birds dies , Lily Arch sentiment and matching die, Essential Arches die, Simon Blossom Field embossing folder, adhesive foam squares

This Sealed Birds die is so dainty and easy to color in with markers.  The birds are cut separately to add to the branch.  I used adhesive foam to lift the embossed panel and the leafy branch above the blue background.  The diminutive sentiment works perfectly with the scale of the branches!

Thanks so much for stopping by!  Is it spring yet where you live?

Adding this to the Simon Says Stamp Wednesday Challenge: Easter/Spring.  And, thanks to Lisa, I'm linking it also to the Just Us Girl's Challenge: Birds., which is collaborating with the Time Out Challenge!

Sunday, March 17, 2024

Spring Robin

 Our weather has taken a decided turn to the chilly side lately, which makes me yearn for spring all the more!  So here's a card to help us be patient until it gets here.


supplies: white, bright pink, yellow, brown, and rust cardstock, Concord & 9th Boughs and Holly stencils, twisted citron, mowed lawn, and rustic wilderness distress inks, 2 Pink Fresh Studio Fairy Dust pink inks, blending brushes, Simon Blossom Field embossing folder, Layered Birdie die, sentiment from Spellbinders Pocket Full of Spring Stitching dies, adhesive foam to pop up robin

This layering wreath stencil set was actually brought out in the winter, but I think that making the berries pink gives it a more spring-like feel.  And I put a robin on it because to me, it's a sign of spring.

Sorry I haven't been around lately, still getting back to normal again.  I'll try to do better!  

Just found that the Just Us Girls Challenge is "birds", and they are teaming up with Time Out Challenges, so I'll be entering this card in both of them!!

Wednesday, March 13, 2024

Inspired by Jennifer

 Hello!  Today once again I have a card that was inspired by one that Jen McGuire did back in January.  I've been loving all the cards lately that have bright colors against a black background, and she showed us how to do that using layering stencils, black cardstock, and acrylic markers.  

Here's my version!


supplies: black and island blue cardstock, Simon's Layered Flowers stencils (4 parts), Altenew Acrylic Markers, vol 1, Happy Wishes die

LOVE the way this turned out!  I need to be a little more careful when stencilling smaller areas, but the effect is fantastic in my eyes!  Now I'm hoping that Altenew will come out with more colors of acrylic markers, especially more pinks, reds, yellows, and oranges!  

We're back home from our snowbird excursion to Florida in January and February, to be met a few days after returning with a little bit of snow and frigid temperatures - but also the start of some daffodils!  I'm finding my way around my home computer again; amazing what I forgot in just 2 months!  But I'm looking forward to getting back into the groove now that I have all my supplies at hand again.  

Sunday, March 10, 2024

Yana's Peony Celebration

Yana is releasing a new collection called Let's Celebrate!  I have a card that uses one of the die sets from that collection, called Peony Celebration.


supplies: white, cream, black, and a peachy-pink cardstock, Yana's Peony Celebration die, markers in green and coral, Heartfelt Thanks and Scallops dies

This set contains a detailed die and a shadow die.  My card uses only the detail one, cut from white and pink cardstock.  I colored the leaves on the white die-cut, then paper-pieced the pink details back into the overall design, adding a bit of detail with a darker coral marker, and following the incised lines in the die.  I placed it over a cream background so that the edges of the flower would show up better, then just added a simple die-cut sentiment.

Yana's collection includes a little bit of everything: 4 press plates, a layering stencil set, and a wax seal design!  She has such a way with flowers, you will love them all!

Thank you for coming by today - hope your day is going well! 

Friday, March 8, 2024

Simon's Tulip Garden

 Simon Hurley has a new collection at Spellbinders, called Tulip Garden!  I have some cards using several of the sets for you today.


I embossed 2 white A2 panels with the Twirling Tulips 3D folder, then used the matching 6-piece set of stencils to color one of them.  That panel was then trimmed a bit, adding 2 green strips on either side, then attached to the 2nd embossed panel, matching up the design.  The sentiment was added to the center of the finished card, using both the sentiment dies and their matching shadow dies.

Next I played with the Tulip Trio dies.


supplies: yellow, pinks, aqua, green, black and white cardstock, Tulip Trio dies, Handwritten Sentiments dies

There are 3 different tulip flowers in this set, each consisting of 3 parts.  I cut each from either a pink or yellow cardstock, then inked them a bit to make them stand out from each other, and put them together using adhesive foam squares for some dimension.  

The sentiment set has 12 word dies and matching shadows that you can use to build your own greeting.  

And 1 final card, simply embossed, then swiped with white pigment ink.


supplies: white and navy cardstock, Twirling Tulips embossing folder, white pigment ink, Handwritten Sentiments

This time I turned my cardstock into a landscape size and didn't use the shadow dies for my sentiment.  Couldn't be easier!

Thanks for coming by today!  If you're a tulip lover, I hope you'll give Simon's collection a look.

Thursday, March 7, 2024

Spellbinders March Club Kits: Dies of the Month, Embossing Folder, Stencils, Glimmer Kit and Deluxe Caboodle Bonus

 The March Club Kits from Spellbinders are now available!  The clubs will remain open until March 27.  

My first card features the Small dies of the month: Wise Owl, the Embossing Folder: Checkered Scallops, one of the Stencils: Dynamic Backgrounds, and a glimmered sentiment from Sketched Lines, the Glimmer Kit for this month.


supplies: colored cardstock, Wise Owl dies, sentiment from Sketched Lines, gold glimmer foil, Checkered Scallops embossing folder, and one of the Dynamic Backgrounds stencils for this month, light aqua ink and a blending brush

For the background, I embossed with the new folder of the month, Checkered Scallops.  I discovered that 2 of the 5 stencils in the Dynamic Backgrounds stencil kit matches it perfectly, so I used just 1 of them with an ink slightly darker than my pale aqua cardstock.

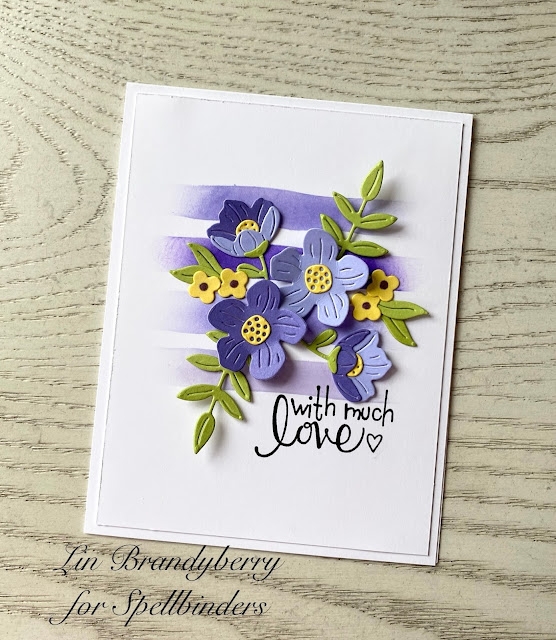
Here's another of the stencils; it looks to me like brushstrokes going horizontally down the length of the panel, but here I only brushed in 4 of them, roughly in the center of my panel, in shades of purples, then added an arrangement of flowers from this month's Stitching kit: Read & Sip.  


supplies: white, dark and medium purples, yellow, and green cardstocks, Dynamic Backgrounds Brushstroke stencil, floral arrangement from Stitched Read & Sip, (retired) Tammy Tutterow cling sentiment from Tiny Sentiments

I've always loved brushstrokes, so I know this particular stencil will get lots of use from me!

Last for today, I have 2 cards that using the Glimmer Plates of the Month.  This first one combines them with the bonus dies that you receive when you order the Deluxe Caboodle.


Starting with an A2 panel of navy cardstock, I positioned the Sketched Lines glimmer plate first vertically, then horizontally and foiled with Cobalt Blue foil.  That panel was trimmed down with a postage edge die, then placed onto a red card front.  Then I constructed the Fairy Tale castle, foiled my sentiment, and centered them onto my card, adding some stars (also from the bonus dies). 

And finally, I used the Glimmer Sketch Lines with the flowers from the Stitching Kit.


supplies: white, yellow, green, and several blue cardstocks, Sketched Lines glimmer kit, Cobalt Blue glimmer foil, flowers and leaves from Stitched Read & Sip kit, sentiment from Snowflake Wishes Stamp/die set

I foiled the sketched lines with Cobalt Blue glimmer foil onto a panel of bright blue cardstock, then added it at an angle to a pale blue card base.  Then I arranged my sentiment and flowers.  Cut from white, they make me think of strawberry blossoms!

You can look HERE for information on Spellbinders Clubs.  Each is available only from the 6th until the 27th of each month.  If you click on my links under each card, you can see the specifics of each product.  You can subscribe to each of our 10 kits separately, (and you can "unjoin" a subscription at any time without any penalty), or you can get them all and save 60% AND get the free bonus dies by choosing the Deluxe Caboodle!  


Wednesday, March 6, 2024

Spellbinders Club Kits for March: Stitching, 3D Embossing Folder, Large Dies and Clear Stamps/Die

 The Spellbinders Club Kits are now available until March 27!  Today I have 2 cards and a bookmark to show off the new goodies.  I'm starting out with the Stitching Kit: Stitched Read and Sip and the 3D Embossing Folder: Classic Backdrop.


supplies: white, cream, coral pinks, yellow, kraft and gold foil cardstock, Stitched Read & Sip Stitching Dies, 4 strands of metallic gold embroidery thread, sentiment from Sketched Lines Glimmer Kit, gold glimmer foilClassic Backdrop 3D embossing folder

I used metallic gold embroidery thread for my stitching on the book and the cup, and also gold foil cardstock for lots of details, and foiled my sentiment in gold also.

The embossing folder is a classic design, and will work for so many occasions.  It's aptly named!

My next card features the Large Dies of the Month: Classic Tales.  I made a card that would work for someone moving into a new home.


supplies: Surf Blue background, peaches, greens, kraft, cream, white, and yellow cardstock, Classic Tales dies, another sentiment from the Sketched Lines Glimmer kit, gold glimmer foil

I followed the example on the front of the Large Dies of the Month to put these dies together.  There's 1 other book spine that I didn't use this time.

Finally I made a little bookmark using the Clear Stamps and Dies:  Storytime Gnomes.


supplies: white and Green Apple cardstock, bias stripe patterned paper, Storybook Gnomes stamps, matching dies, (retired) mini slimline dies, twine

You can look HERE for information on Spellbinders Clubs.  Each is available only from the 6th until the 27th of each month.  If you click on my links under each card, you can see the specifics of each product.  You can subscribe to each of our 10 kits separately, (and you can "unjoin" a subscription at any time without any penalty), or you can get them all and save 60% by choosing the Deluxe Caboodle!  


Saturday, March 2, 2024

Just a Note

 Here's a card just because.......it started with this black and white dotty paper, black on 1 side and white on the reverse.  I die-cut out 2 scalloped rectangles and placed them on a white card base, then piled on some little posies.


supplies: white, black, Green Apple, various pinks, yellows, aquas, Doodlebug black and white dotty cardstock, Spellbinders Petite Floral Potpourri and Mini Blooms and Sprigs, Wendy Vecchi large scallop rectangle, MFT Stitched Mini Scallop Rectangle, Pink Fresh Studio Perfect Sentiment stamps and matching die

Happy March!  Is it spring for you yet?