Friday, July 11, 2014

This is the Life! release at Simon Says Stamp!


Today is the day that a whole new collection of stamps, dies, and stencils are being released at Simon Says Stamp!!  A week ago I gave you a sneak peek of a card I made using a fun die that is part of the collection.  Here's what I made with it:


My die is called Ice Cream Cones, and it can cut up to 3 cones at one time.  I chose to make myself a triple-scoop cone, and paired it with a vellum cloud paper from the Dear Lizzy Neapolitan collection by American Crafts.  My letters are Hero Arts Uppercase Alphabet, and I used mint and cotton candy cardstock from Simon.  And can you see that the cone is one of the new embossed dies?  After cutting it out, you can run it through your machine a second time to get a cool embossed texture on it!

Summer is my excuse to eat all the ice cream I can, so this card couldn't be more appropriate for me!

If you'd like to see the whole new This is the Life release, please click HERE.

Thursday, July 10, 2014

Velveteen stamping

Here's another card for Hero Arts one-layer challenge.  I wanted to do the Velveteen Stamping technique again, and I think this may be my most successful try at it.  Basically you stamp an underlying pattern on the card in white ink, and then overstamp solid images in colors, and if all the planets align, the first pattern shows through the top ones, creating a fun design!  Here's my card:


I stamped the Winnie & Walter sentiment first on an angle, then masked the sentiment and overstamped the Hero Arts Tweed pattern in Colorbox Frost White ink, to cover the top and bottom of my card.  After allowing that to dry thoroughly, I again masked the sentiment, and stamped the flowers (Hero Arts 4 Fun Flowers and the little one from Remember) in various pool, green,  and mint inks.  We're allowed to use embellishments for this challenge, so I added just a few sparkly sequins in clear and blues.  

I'm very pleased with my results, and this will be used almost immediately, as my family has 3 birthdays in August coming up!  

I hope you'll give this technique a try if you haven't already; it's really fun to do!  Thanks for visiting today!

Wednesday, July 9, 2014

Simon Says..........Let's Be Clear

wed-newchallenge-header

Happy Wednesday and welcome to a new Simon Says Stamp Wednesday challenge!

Simon Wednesday Challenge Blog

Our theme this week is a fun one: Let's Be Clear.  You can use acetate or vellum, glass, glossy accents, translucent embossing paste - or even a clear stamp!  The design team are all using products from Clearly Besotted, and if you have any of their stamps or dies, we'd love to see you using them also, but it's not a requirement to enter our challenge.  

I chose the set called Happy Everything and paired it up with some vellum for my cards.


I white embossed this pretty blossoming branch on vellum, then turned it over and colored in the details with some distress markers.  I trimmed it into a partial panel and attached it to a card base made of Simon's Cotton Candy cardstock, to which I white embossed a sentiment from the same set.   And to finish I glued on some antique tatted lace and some white pearls.


This rose is the other floral image in the set.  I did the same as above, white embossed it on vellum, then fussy-cut it out and glued it to a panel that had been inked with worn lipstick and picked raspberry distress inks and overstamped with a lace pattern in picked raspberry.  The sentiment from the set was also white embossed before I popped the panel above my white card base. 

Now it's your turn!  

50dollar_voucher_600px

There's another $50.00 gift voucher to our fabulous Simon Says Stamp Superstore for the random winner!

Simon Says Stamp


Tuesday, July 8, 2014

My Sunshine

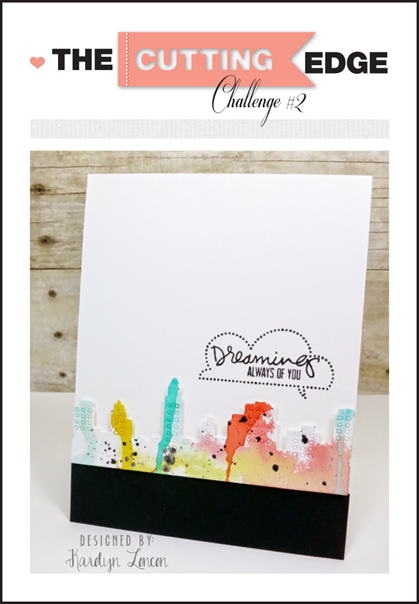
There's a new challenge blog called The Cutting Edge, which will feature die-cutting,  and I made a card today for it.  We're to create a card inspired by this one by Karolyn Loncon:

TCEC_2

I was inspired by the watercoloring and the touches of black, and here's what I did:


supplies: Simon Says Stamp Partial Cut Flowers die, Derwent Inktense watercolor pencils, black enamel dots, Hero Arts Heyday Sentiments

I simply scribbled 3 colors across my panel, then wet a paint brush and blended the scribbles.  When it was dry I made my die-cuts, then added the enamel dots and framed it up with black.  

And since the current challenge at Virginia's View is also to use die-cutting, I'm entering this in her challenge also.


Thanks for your visit today!

Monday, July 7, 2014

Just Like You

I had an idea to group the flowers from Simon's Partial Cut Flowers on the front of a card, watercolor them, pop them and then add some leaves.  For once my card turned out just the way I envisioned it!


I used Sargent watercolor pencils to color in the flowers after making the cuts; it was fairly easy to "keep inside the lines" that way, and then I just went over them with a water pen.  The leaves are from Wplus9's Fresh Cut Florals stamps and dies, and I added various enamel dots to the center of each flower.  My sentiment is an old Hero Arts one, called To Be So Nice.  

I'll be adding this to Virginia's View challenge: Die Cuts.

Virginia's View: Die Cuts

Our theme this month at Virginia's View is die cuts.  I decided to use one of my newest ones, and I think one of my prettiest ones, to make a card for Virginia's challenge.


Isn't this Gorgeous Gardenia Outline die lovely?  Last time I used it I had a kind of stained-glass effect with a black outline, and then meticulously added back in all those tiny little pieces of the flowers and leaves - lots of work.  This time I'm using an idea by Jules I found on Pinterest.  I used the negative of the die cut to act as a mask over watercolor paper so that I could paint in the details with worn lipstick and peeled paint distress inks, mixed with water.  I went back in and added some darker areas with my distress markers in the same colors.  After it was dry, I cut it out, and then glued my gardenia die-cut on top.  I love this effect!  While my worn lipstick diluted ink was still on my acrylic block, I picked up some with a fine brush and splattered it over the card front.  Then I stamped my Technique Tuesday sentiment in charcoal ink, popped my die-cut up, and added some sequins.

........and then, I thought, why not try the same idea, except use some pretty printed papers?  Die-cut piecing, if you will!  So for this next card I pulled out a piece of 12" cardstock that I recently fell in love with (it reminds me of quilting fabric when I used to quilt) and pulled my colors from it.  Here's how that ended up:


supplies: Crate Paper's Dainty Darling from their Oh Darling collection, a green and a pink BoBunny double dot paper, Memory Box's Gorgeous Gardenia Outline die, Nesties Scalloped Oval die, Winnie & Walter's The Big, the Bold, and the Extras (banner) and The Big, the Bold, and the Happy (sentiment inside banner)

Which one do you prefer?

Sunday, July 6, 2014

Hollyhocks

This morning as I was reading new posts on my favorite blogs, I came across Karen's latest card, which features some hollyhocks.  I loved it so much and was disappointed that I don't have a similar stamp.  Then it occurred to me that, with all the tiny flowers in my collection, surely there was one I could adapt.  And sure enough, I found it in Avery Elle's Oh Happy Day set!  I had a fun play this morning, and here's what resulted:


supplies: Avery Elle's Oh Happy Day, Hero Arts Canteloupe and Bubble Gum inks, Worn Lipstick, Shabby Shutters, Peeled Paint, and Tumbled Glass distress inks

Don't you just love that little bird (on the sentiment) that is also in the stamp set?  After forming all my flowers, I smooshed some Tumbled Glass distress ink on my acrylic block, spritzed it with water, and then watercolored in the "sky" around the flowers.  

Next, I decided to try and group them:


This one uses Simon's Cotton Candy ink, along with the Worn Lipstick and Canteloupe from above.  I added my sentiment and stopped there.

Thanks, Karen, for your inspiration!

Celebrate Summer!

The last Share the Love challenge at the Winnie & Walter blog is Tag It!  We're to use our distress inks and at least 1 W&W stamp to make a tag.  I am really growing to enjoy making tags.....they're just a smaller canvas than our usual cards!  Here's what I did:


supplies: Memory Box Texture Shine stencil, Hero Arts long retired Summer Memories stamp, W&W The Big, the Bold and the Extras, mustard seed, spiced marmalade, worn lipstick, and mowed lawn distress inks

I started by stencilling the sun rays in yellow with a touch of orange, then overstamped the Summer Memories twice.  I stamped, sponged, and fussy-cut the flowers and leaves, and overstamped the "celebrate".  My seam binding is also hand-dyed with worn lipstick distress ink.

share-the-love-graphic-distress-inks-ranger

Can you believe we're coming up on half-way through summer!  We have to enjoy every minute of it!  Thanks for visiting today!

Saturday, July 5, 2014

Happy Day

Winnie & Walter's day 4 challenge for us was to incorporate stencils along with distress inks.  I chose a favorite stencil and some softer distress inks to make my card for today.


supplies: W&W's The Big, the Bold, and the Happy, the Big, the Bold, and the Extras ("day"), The Crafter's Workshop Mini Flower Frenzy stencil, tumbled glass, shabby shutters, and peacock feathers distress inks, washi tapes, Lawn Fawn and Pretty Pink Posh sequins

share-the-love-graphic-distress-inks-ranger

Enjoy your holiday weekend!!

Thursday, July 3, 2014

Ombre

For the 2nd day of their Share the Love week at Winnie & Walter, we're still playing with distress inks, but they want us to do something in an ombre effect.  I did something a bit different, and used 4 colors of distress inks to color my pretty new flower stamps from The Big, the Bold, and Extras set.


supplies: tumbled glass, broken china, peacock feathers, evergreen bough, shabby shutters and peeled paint distress inks, The Big, the Bold, and the Happy, (sentiment),  Big Bang Confetti Scenery (tiny dots)

Lots of masking here, to make my flower bouquets!

share-the-love-graphic-distress-inks-ranger

Thanks for visiting!

Wednesday, July 2, 2014

Simon Says..........Shake It!

wed-newchallenge-header

Happy July, and welcome to our first challenge of the month at the Simon Says Stamp Wednesday Challenge Blog!

Simon Wednesday Challenge Blog

We have a fun theme for you this week - confetti packets or shaker cards!  The design team are all using Simon exclusives, and we'd love to see you using some, too, but it's not necessary to enter.  I learned how to make shaker cards earlier this spring, (using Scotch double-sided foam tape) and have loved the process, so I've made 2 cards for you.

My first card uses a butterfly washi tape to border my shaker, which is filled with some Simon's Tiny Flower sequins, a few Pretty Pink Posh Springtime sequins, and some clear ones:


I also used cut 2 Leanna butterflies and secured them to the shaker packet with tiny green clothespins.  Since there wasn't a good space to add a sentiment, I left the front alone.  Here's the inside of my card, using a sentiment from Simon's Flower Friend stamp set, another Leanna butterfly and a tiny pink flower sequins


My 2nd card uses a Simon sentiment from Happy Every Day stamped in Audrey Blue ink inside my shaker, along with more of those cute tiny flower sequins.  I stamped and die-cut some of  Whimsical Flowers for the corner, centered with a button.  


Now it's your turn!  

50dollar_voucher_600px

We have a $50.00 gift voucher to the Simon Says Stamp Superstore for the random winner of our challenge!

Simon Says Stamp

I can't WAIT to see what you make!

Before I go, there are a few sales going on over at the store.  Just click on the graphic to be taken to the right department.


Tuesday, July 1, 2014

AEI♥U's gold challenge

Challenge 10

The current challenge at the Avery Elle challenge blog is to incorporate some gold.


While I had that Tim Holtz Doily stencil still out on my desk from yesterday's post, I decided to use it as it was meant to be used, and stencilled through it using Picked Raspberry and Spiced Marmalade distress inks.  Then I framed that panel in gold and added that to my cream card base.  The pattern really comes through using these darker inks, and has quite a different feel from yesterday's card!  Next I gold embossed my sentiment from Oh Happy Day and sponged over it with Picked Raspberry, trimmed it, and framed that in gold.  And to finish I punched some Martha Stewart butterflies out of the same gold foil cardstock that I used for my framing.  I'm sorry my photo doesn't pick up the lovely glimmer that the gold touches give.

Thanks for visiting, as always, and I'll see you tomorrow for a FUN Simon Says Stamp challenge!

Monday, June 30, 2014

Playing with my favorite distress ink color ......

I saw 2 posts this morning which prompted me to make my card today.  The first was Julie Ebersole at The Classroom, where she used this same stencil as a kind of stamp to make her background.  I just adore this Tim Holtz Doily stencil, but haven't used it in this way, so I wanted to try her technique.  And secondly,  the Winnie & Walter blog is starting a week of inspiration featuring distress inks.  And I just won this new set from them and wanted to ink it up, too.  Here's what resulted:


Just as Julie did, I inked the front of the stencil with Shaded Lilac and just a bit of Dusty Concord distress inks, then spritzed it lightly and layed it on a piece of watercolor paper.   Shaded lilac is such a lovely color, a nice periwinkle or lavender blue color.   I quickly blotted anything that was too oozy, removed the stencil and then let it dry, after which I edged the whole panel with Shaded Lilac and attached it to my card base.  Next I stamped and white embossed the roses and leaves from The Big, the Bold, and Extras, and then using some watered-down distress inks, painted in the colors (shaded lilac, peeled paint and shabby shutters), and then cut them out.  The shaded lilac was reallllly light, so I went back in while the roses were still wet and overstamped the solid image in the set that matches in shaded lilac - much better, and I still get that mottled, watercolor look on them.    After that it was just a matter of finding this grosgrain ribbon that matches perfectly, and teaming it up with a PTI die-cut tiny tag, stamped with little words from The Big, The Bold, and the Happy.  That little heart is part of the die; it pops out, so I inked it also with shaded lilac straight from the pad and inserted it back in.  After putting everything together, I though it needed just a little sparkle, so I added these dusty pink/lavendar sequins that I think are antiques from my friend Carol.

share-the-love-graphic-distress-inks-ranger

Thanks for visiting today!