Wednesday, October 6, 2021

Simon Says.......Interactive


Happy Wednesday - welcome to our challenge at the Simon Says Stamp Wednesday blog!


This week we want to see your Interactive creations!   The team is playing with Lawn Fawn products.  I made an edge-to-edge shaker:


supplies: Green Apple, Slate, Sunshine, black, and white cardstock, acetate, bat stencil, Black Soot distress ink, Lawn Fawn Happy Haunting stamps, (house and sentiment), Spellbinders Spooky Cottage tree die, circle die, ripe persimmon and crackling campfire oxide inks, Orca sequins

I stencilled an A2 Apple Green panel with the bats  Then I trimmed a piece of acetate to be 1" larger than an A2 size, and scored all 4 sides of the rectangle at 1/2".  This was then wrapped and taped on 3 sides around the bat panel.  I added sequins, and sealed the top.  Separately I had stamped and colored the house, cut out a moon and shaded it, and cut out a tree.  Along with a sentiment "ground" panel, they were then all affixed to the shaker, and that was attached to a card base.

Shari Carroll did a great tutorial earlier this year for lots of ways to make your cards interactive, if you need some ideas.

Now it's your turn!  We have a $25.00 gift certificate 


to the amazing Simon Says Stamp store for 1 lucky random winner of this week's challenge!  I can't wait to see what you all make this week!

Monday, October 4, 2021

Cards from World Card Making Day!

Here are the cards I made this weekend as part of World Card Making Day.


supplies: white card, Doodlebug orange Buffalo Check patterned paper, PinkFresh Studio Daisy Wreath stencil set, Altenew Golden Sunset, Lime, and Fresh Leaf inks, Simon Blender Brushes, sentiment from Hello BlueBird Pumpkin Time, copper sequins, adhesive foam to lift large daisies

October is one of my favorite months, so I gathered some of my favorite supplies together for this card.  I'd like to enter this one into PinkFresh Studio's World Card Making Day Challenge.

Next is my first play with The Greetery's Cozy Cup stamps and dies.  They were released in 2019, but I just was able to grab them thanks to a recent Card of the Week post and sale that Betsy does every Monday.  I love my coffee, but don't have many stamps to prove it, so this one can be checked off my wishlist.  I thought I'd do it up in fall colors for its first outing.  There's a sentiment for that in the set.

supplies: white card, a MFT heart patterned paper, Cozy Cup stamps and matching dies and Cozy Cup Coaster die, altenew inks, twine

And finally, a card using just a few of the supplies in the Simon Says Stamp October Card Kit.

supplies: white card base, black and fall colors from Assorted Card Fronts packFriend Outline dieKaleidoscope embossing folder

I cut 1/2" strips from white and 5 of the fall-colored cardstock panels in the assorted pack, and wove them together.  That panel was then put into the Kaleidoscope embossing folder for some "quilted" texture, before I matted it onto black, and then onto the card front.  To finish I used the friend die in the kit.

The idea for this design comes from a sampler quilt I made in the 1990's that had blocks scattered throughout which spelled out "welcome home".  Here's a picture of it.


Thanks for stopping by - have a great week!

Sunday, October 3, 2021

Inspired By.......

 Being an old quilter, I follow quite a few quilting sites on Instagram.  A few days ago, THIS popped up and I was blown away by the colors, especially the use of that pink with the usual fall colors.   Here are two cards I made inspired by that quilt.


supplies: cardstock in Doll Pink, Orange Peel, SunshineGreen Apple, Green Leaf, plus a burgundy, a paler yellow, and an orange sherbert, plank patterned paper background, Simon Stitched Maple Trio dies and Christmas Blessings die, twine, hot pink enamel dot, adhesive foam to lift wreath

I used an old retired twig wreath die for my base to attach the maple leaves to, then backed the wreath with foam squares and popped it above my card, adding a twine bow and the sentiment.

I wanted to use a darker grey background, and remembered this leafy stitched cover plate, which looks a bit like quilting in the background.


supplies: same cardstock colors as above, plus Slate and Fog Grey, gold metallic cardstock, Memory Box Pinpoint Leaf plate, The Greetery Boxwood Heart base and details dies, Fit to be Tied bow die, twig die and Spellbinders Welcome Fall berries die,  My Favorite Things (retired) thanks die

I brought in that magic pink this time in only the berries, along with the sentiment. 

Here's just one of the many quilts made with this Fall Breeze Quilt pattern by Vanessa Christenson.  Amazing, isn't it?

Thanks for visiting today!

Saturday, October 2, 2021

Lush Garden

Happy World Card Making Day!  I hope that you can find some time today to embrace the day and have some fun!  I love the thought of so many of us doing the same thing all across the world!

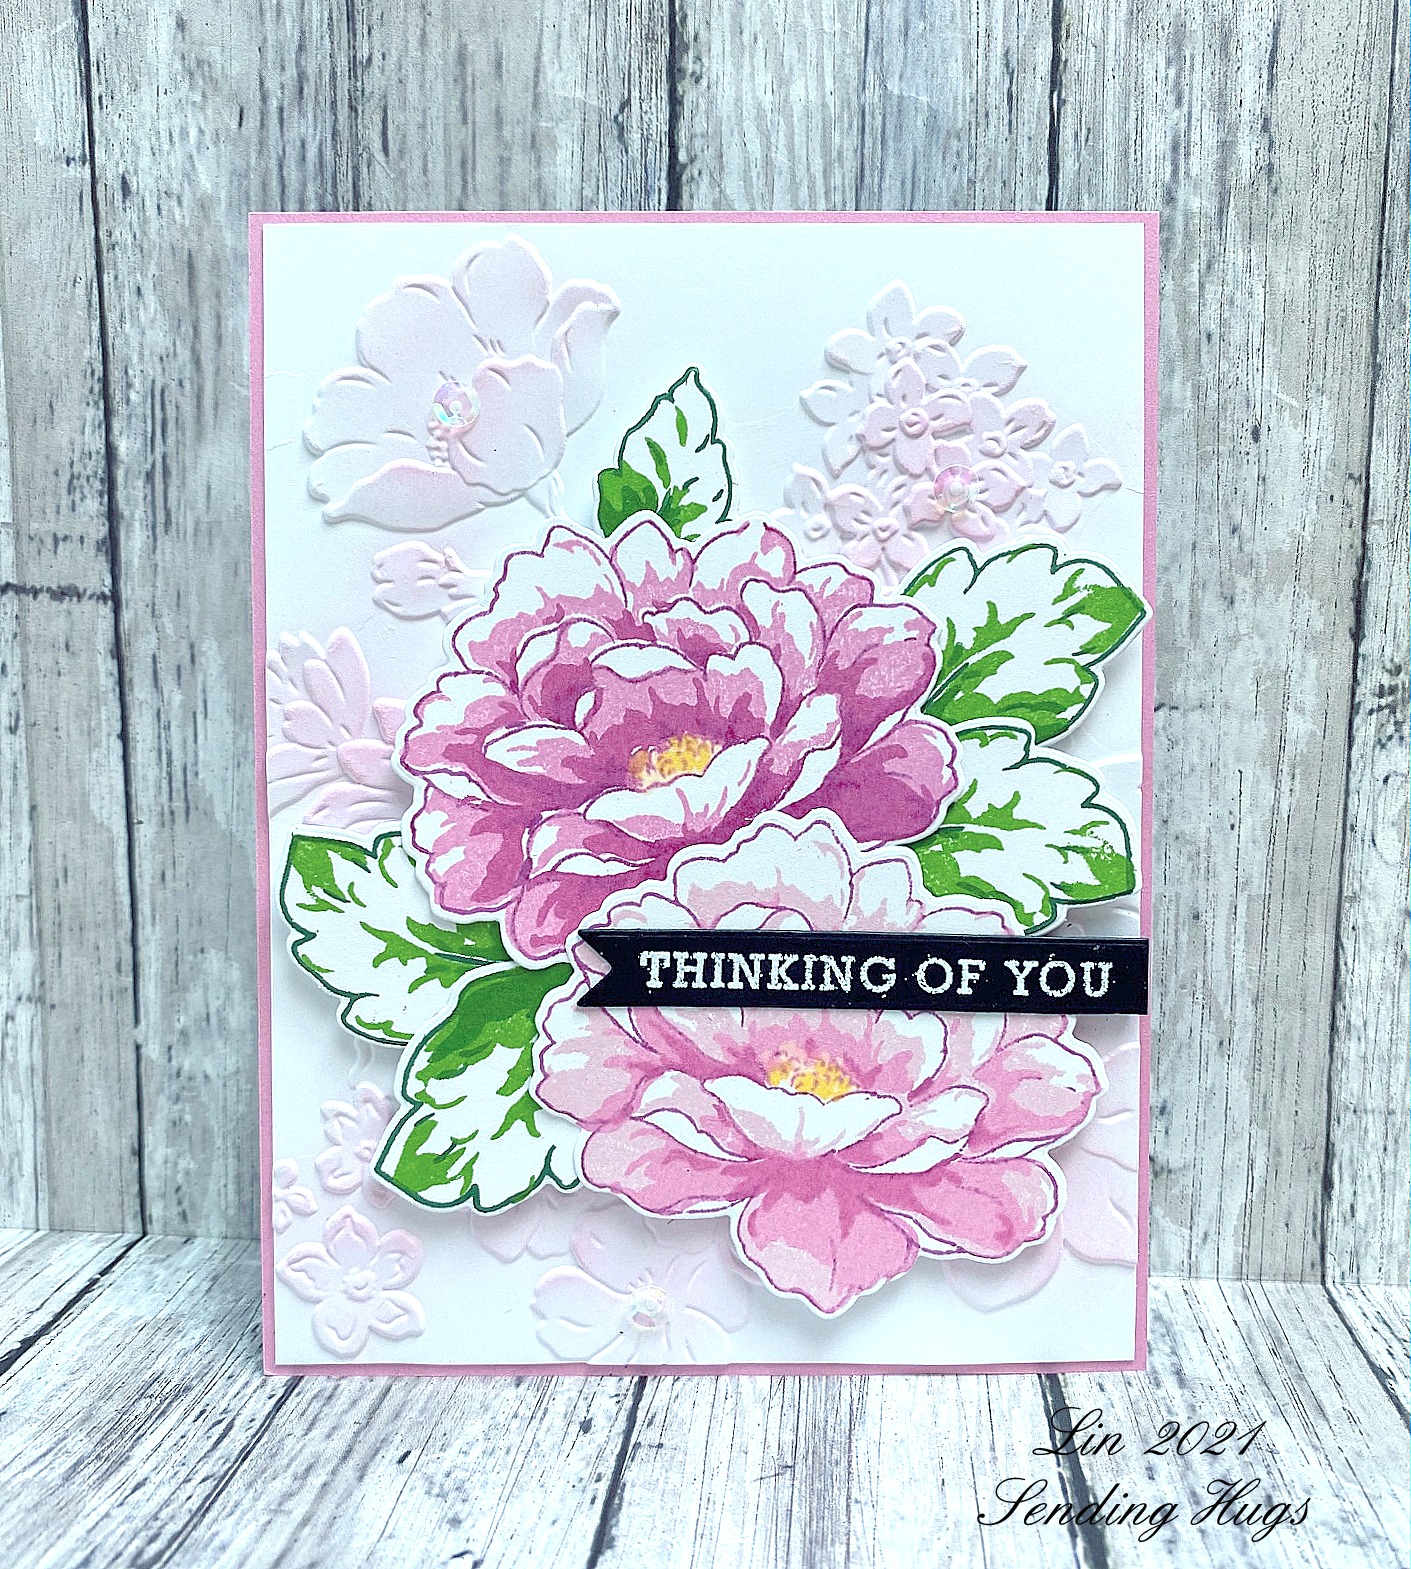
 Altenew has done it again!  I splurged and bought their Lush Garden kit last month, and I'm so glad I did!  

The first thing I grabbed when my kit arrived was this 3D embossing folder and its matching stencils.  


supplies: white card, Lush Garden 3D embossing folder and matching stencils, various Altenew mini ink cubes, PinkFresh Studio Sending Phrase Builder die

What a beautiful piece of art this is!  I had a rough time cutting it down to fit my A2 card, it's that pretty!  I didn't want to cover up a bit more of it than needed, so this smiles sentiment was a good choice, I think. 

Next I pulled out the layering stamp set and matching dies in this kit.  There are 2 different flowers in it - I used just one of them, twice, on my card for today. Isn't it a beauty?


supplies: white, black, and pink card, Lush Garden embossing folder, stamp set, and matching dies, Cherry Blossom and Green Valley ink, Hero Arts Sending Love sentiment and banner die, adhesive foam squares

I stamped the flower twice, and used the 3 lightest Cherry Blossom inks for details on the top flower, and the 3 darkest inks of the same set for the bottom one.  Then I embossed another panel with the 3D folder and lightly brushed on the very lightest ink onto all the flowers.  After arranging my flowers and leaves with the help of Press 'n' Seal, I popped them above the embossed panel, and added my sentiment banner.

It is a real treat for me to have a set of supplies that all coordinate so nicely with each other, and I know this one will get lots of use!

Friday, October 1, 2021

It's October!

 Love this month, so today's cards are a bright and a duller variation using last year's Taylored Expressions Fall Foliage Background stamp/stencil set.


supplies: cream and Audrey Blue card, Taylored Expressions Fall Foliage Background stamp and stencils, distress oxide inks in Peacock Feathers, Mustard Seed, and Ripe Persimmon, a retired Wplus9 Hand Lettered You die, stamped sentiment from Simon Hello You, retired, metallic sequins

I guess I love using blues with autumn colors because of the clear blue skies we get at this time of year - everything just seems so crisp!  

My Dad loved the duller oaks of fall the best, so here's a card in his honor.


supplies: Desert Storm, burgundy, and dark green card, Taylored Expressions Fall Foliage Background stamp and stencils, oxide inks in Fired Brick, Mustard Seed, and Rustic Wilderness, Simon Thinking of You Line dies

I stamped and stencilled this time on some Desert Storm card, and I was surprised how the Fired Brick looked on it, more pink than brick, but I like this effect!  

Which one of these do you prefer?  Thanks for visiting today - have a great weekend!

Thursday, September 30, 2021

My Favorite Cards from September

 Here are the cards from this month that I enjoyed making the most!


Thanks so much for stopping by today!

Wednesday, September 29, 2021

Simon Says........Anything Goes


Happy Wednesday - welcome to our challenge at the Simon Says Stamp Wednesday Challenge blog.


 This is an Anything Goes week, and the team is showcasing Art Impressions goodies.  I'm always looking for cute snowmen, and I found a whole set of them in their Sparkle & Cheer clear set!


supplies: white and Surf Blue card, vellum, Art Impressions Sparkle & Cheer clear stamp set, Simon Stitched Circle die and stamped snowflakes (retired Lots of Snowflakes set), tumbled glass oxide ink, a retired snowflake embossing folder 

This little sweetie with his woodland friends is just 1 of 3 different snowman images in the set, and it includes 5 sentiments, too, 1 of which I used today, so it's a great value!

Now it's your turn!  We have a $25.00 gift certificate 


to the amazing Simon Says Stamp store for 1 lucky random winner of this week's challenge!  I can't wait to see what you all make this week!

Tuesday, September 28, 2021

Autumn Blessings

Today's card is full of fall goodness - all the things I think of when you say "autumn"!


supplies: cream card, Spellbinders Falling Leaves embossing folder and Autumn Leaves dies, Simon Autumn Blessings die, distress oxide inks in fall colors

I started by brushing on several fall shades of oxide inks, then trimming the panel and cutting out my sentiment die.  Then I ran the panel through the embossing folder, inlaid the sentiment cut from cream card back into place, and mounted the panel onto a cream card base.  Then I cut and colored 4 leaves and arranged them, popping up 2 of them.

Enjoy your day, thanks for coming by.

Sunday, September 26, 2021

Thank You Jar

 Here's another card using a stamp from Simon's September Card Kit.  This time I used some of my own supplies along with the canning jar full of flowers.


supplies: white card, a rainbow plaid dp, Sunshine Flowers image and sentiment, Lawn Fawn Scalloped Rectangle die

I like this image because by filling in the banner ribbon with 1 of 2 choices, you don't need to add a sentiment anywhere else, unless you want to.  Fun coincidence, I colored the jar and flowers before I started looking for a patterned backing, and how lucky I was to have this bright rainbow plaid from a past card kit - the colors are perfect!

Hope you're enjoying a good day of rest!  Thanks for stopping by!

Friday, September 24, 2021

Coneflowers for Fall

Here's another play with the gorgeous Coneflower layering dies from Honey Bee Stamps!


supplies: cream, kraft, Green Leaf, shades of coral and orange card, Honey Bee Lovely Layers Coneflower dies, inks and daubers to add details, Sunny Studio Autumn Greetings sentiment, cream embossing powder, enamel dots, mini slimline die, adhesive foam squares

There are 4 layers to the flower - today I separated each one with adhesive foam, so there's lots of dimension on this one!


Coneflowers aren't just pink anymore - there's a whole lovely array of colors nowadays.  I based these ones on some plants that I tried several years ago, seems like they were called Sunset; they were beautiful, but never came back the following year, so I haven't tried again.  Have you had any better luck?

Thanks for your visit!

Wednesday, September 22, 2021

Simon Says......Envelope to Match


Happy Wednesday - welcome to our challenge at the Simon Says Stamp Wednesday Challenge blog!


This week we want you to decorate an envelope to match your card.  The team is playing with Colorado Craft Company products, but you can use anything you'd like.

I've been eying this darling Bunnies & Robin set for quite awhile, so this was my chance to play with it!


supplies: white, black, and Surf Blue cardstock, Colorado Craft Company Bunnies & Robin clear set, Wplus9 Hand Lettered Hello sentiment, Doodlebug heart sprinkles

This set also has separate stamps for the bunnies and the bird, so I took advantage of them to make my simply decorated envelope.


Now it's your turn!  We have a $25.00 gift certificate 


to the amazing Simon Says Stamp store for 1 lucky random winner of this week's challenge!  I can't wait to see what you all make this week!

Monday, September 20, 2021

Merry Stitchmas

 The Merry Stitchmas collection launches today at Spellbinders!  It's a collection of dies that can be stitched.  I chose the Sparkling Mandala set to play with.


supplies: white cardstock, watercolor distress cardstock, Sparkling Mandala and sentiment from All is Calm dies, distress oxide inks, white embroidery thread, pearls

I first made a galaxy background using oxide inks, then cut out the detailed mandala only in 2 places.  After stitching with 3 strands of white floss, I mounted it onto a white slimline cardbase, which allowed more of the details to show through, then added my sentiment and some pearls., 2 large ones in the centers of the flakes, and some smaller ones scattered.

I love how this turned out! The stitching adds some texture without being too bulky.


This die set also includes an outline die so that you can cut and stitch snowflakes which could then be made into ornaments.  They make a nice size at 3" wide.  Here are 3 which I stitched and plan to use this Christmas - just have to add some thread as a hanger, and finish the back with an unstitched die.  On these, I did some outline stitching around each area.  The bottom right one uses silver metallic thread; the other 2 are embroidery floss.

These would also be fun to string together to make a snowflake banner.


So pleased that Spellbinders allowed me to play with this gorgeous die!  Thank you for stopping by!

Saturday, September 18, 2021

Just for Fun

 I really like the mini slimline dies that I got earlier this year from Spellbinders, and wanted to play with them again.  I pulled out an old Taylored Expressions Wildflower Bouquet cling stamp and mixed them for today's card.


supplies: white and Surf Blue cardstock, Taylored Expressions retired Wildflower Bouquet cling, Pink Fresh Perfect Sentiments and Small Butterflies stamps and dies, Spellbinders Mini Slimline Dies

I like this size card; I start with a 6" square for my base, fold it at 3" and then use these dies for matting.  This little canning jar is on the small side for an A2 card, but is perfect for this size.  Same goes for the Small Butterflies - just the right diminutive size for popping almost anywhere!

Hope you're enjoying your day - thanks for coming buy for a visit!

Thursday, September 16, 2021

Wreath Season!

 It's almost offically fall, and I couldn't wait to play with some new Greetery goodies, mixed with lots of other supplies for the season..

First I pulled out a favorite woodblock background stamp and added a wreath consisting of layering dies.  It's a shame that this text background has been retired, but that won't stop me from using it every year - it's becoming a tradition now; it isn't fall until I use it!


supplies: cream, 3 kraft colors, and Orange Peel card, Stampendous (retired) Autumn Words,  Hero Arts Latte ink, The Greetery Rustic Wreath Base dieRustic Wreath Twigs dies, Fit to be Tied bow die, one of the Mighty Oak twig dies, and Spellbinders Welcome Fall (berries) dies, carved pumpkin distress ink and a red marker

After constructing my wreath using 3 colors of kraft card, I decided to decorate it with bittersweet berries.  The berries from Welcome Fall are the perfect size - I cut them from card that had been colored with carved pumpkin distress ink, and added a little red circle to each, then glued them onto a branch from the Mighty Oak Botanicuts set, and inserted them randomly around my wreath.  Then I just added a bow and popped it above the text background.  

My next card is a little fussier, and it uses the stamped version of the Rustic Wreath die.


supplies: cream and kraft card, The Greetery Tartan Builder Diagonal stencils, Rustic Wreath stamps and die, leaves from Honey Bee Fall Bouquets, berries from Spellbinders Welcome Fall, and twig and acorn from the Greetery Mighty Oak, distress inks in fossilized amber, carved pumpkin, festive berries, fired brick, aged mahogany, tea dye, and vintage photo, sentiment from Sunny Studio Autumn Greetings

I first stamped and cut out the wreath, then went hunting in my stash for autumn dies to adorn it with.  They were all cut from cream cardstock and colored with distress inks.  I used some of the same inks to stencil my plaid background.  Since it's so busy, I reinserted the center of the wreath so that I could stamp my sentiment there, and then popped it above the card base.

Hope your day is a great one!