Saturday, December 28, 2013

My favorite cards of 2013

As I have done in past years, I'd like to have an end-of-the-year post where I bring back my favorite cards from this year.

2013 has been a year of change!  Many of our favorite print magazines have gone digital, leaving a big void for me.  Our beloved Cath Edvalson stepped down from her Moxie Fab World column and a huge source of my inspiration went with her.  The Craft's Meow stamp company closed its doors, as did one of my favorite challenges, the Play Date Cafe.  But life is nothing but change, so we adjust and go on.  One thing that has not changed, evidenced by what you'll see below, is my love of all things floral.

I've chosen a favorite or two from each month - hope you enjoy walking down memory lane with me!  You can click on each picture to be taken back to the post where that card was featured, if you need any details.

January

This was for a Simon Says Stamp challenge, using my all-time favorite Penny Black flower stamp.


February

For a Splitcoast Stampers challenge, I die-cut some flowers from felt:


March

This one uses masking and stamps from the Simon March Card Kit.


And for a chevron challenge at Moxie Fab World:


April

This card uses a gorgeous Anna Griffin embossing folder - I loved it so much I made 4 different versions of this card with it.


I included this one just to break up all the flowers you'll be seeing here;  isn't this a pretty stamp?


May

I loved making this - it was for a CASE Study challenge, and I tried to use as many forms of dots as I could.


This was made to debut a new The Craft's Meow chalkboard set.


June

Here's one using Penny Black stamps; that Indian Wheel background is so versatile!


Lilacs are a sentimental favorite of mine, and I really like how this one turned out!


July

I had lots of fun making this for our Hero Arts Hostess Blog Hop - our theme was Summer Picnic!


I love color so much that I don't often do anything just black and white, but I chose to include this card because I love every single element on it!  The sweet silhouette and sentiment are by Flourishes, as is the floral strip.


August

I embraced washi tapes this year, and love the mix of them with this beautiful stamp designed by Clare Buswell, for The Craft's Meow.


Here's a one-layer card that won me a prize in a Hero Arts challenge


September

Another one-layer design that was so simple to do, but I love how it turned out!


I used a favorite Hero Arts background stamp for this one - love the shades of blue here!


October

More washi tape, for a breast cancer awareness card drive at SplitCoast Stampers.


These beautiful leaves are Clearly Besotted stamps, and I played with ink splattering on this card.


November

I had such fun making this one; the panel used a snowflake stencil and several distress inks - love the color!


I made this for Cath Edvalson for her farewell Moxie Fab World blog hop.  I miss her so much!


For this card I started with a panel of white cardstock and built up the colors and layers, inspired by a  discontinued designer paper.


and here we are back around to December!

These Penny Black birds stole my heart, and I love the snowflakes dies they gave us this year, too!


More snowflakes here.  This uses all Simon Says Stamp exclusives.


I'd love to spend some time in this little cottage - it looks so warm and cozy!  These birch tree and cardinal dies were used for many of my Christmas cards this year!


Thanks for bearing with me for this long post.  Is there a card here that is your favorite?  I'd love to hear what you think.

In the past, when doors close, I have been grateful for the new ones that open and the opportunities that I'm given to share this love of cardmaking.  Can't wait to see what 2014 holds for all of us!  Happy New Year to all of you; thank you so much for coming to visit, and especially for your kind comments.

Do you do a similar post with your own card favorites?  Leave me a comment and I'll come visit you!

Friday, December 27, 2013

Let It Snow

Snowflakes have been big this year, with so many beautiful ones!  Here's a card using all Penny Black products.


supplies: Love and Joy (sentiment), Christmas Harmony (snowflakes), Snowflake Trio (dies), various sequins, Memento Luxe Danube Blue ink

Hope you're keeping cozy!  

Wednesday, December 25, 2013

Glory to God in the Highest

One last Christmas card, and more music for you:


This uses the lovely Christmas Angel set from The Craft's Meow, designed by Nina Brackett.  The sentiment is from the same set.  I stamped the angel on white cardstock and colored her with markers, a mix of Letraset and Spectrum Noir, and then stamped the wings again on vellum and embossed them in silver, cut them out and attached them to her.  The oval die is a Spellbinder's one called Floral Ovals, and I used one of the Hero Arts Pool design papers for the card base.

Merry Christmas!  

Tuesday, December 24, 2013

The Greatest Gift

A simple card for Christmas Eve, along with some beautiful music:


supplies: white cardstock, Hero Arts Winter Town, stamped in Memento Luxe Danube Blue ink; star from Heavens Rejoice, embossed in silver embossing powder, sentiment from Greatest Gift

Blessings from our home to yours this Christmas!

Monday, December 23, 2013

Holly Concert

Good morning!  I'm back today with one last Penny Black Christmas card.  I think these little birds may be my favorite Christmas stamp this year from Penny Black.  They're called Holly Concert.


I stamped them on a scrap of cardstock, colored them with markers, dabbed in the background with broken china distress ink, and added some snowflakes with my Signo white pen.  Then I trimmed out the panel, framed it in red and added it to my white card base.  The sentiment is from the Joyous transparent set, and to finish, I die-cut the smallest of the Snowflake Trio.  I love how it turned out!

I'll see you again in the next few days as I share the last of my Christmas cards for this year.

Saturday, December 21, 2013

Using negative die-cuts

It's no secret that I have loved using the Simon exclusive Eliza Snowflake this year, and I wanted to show that it's negative die-cut is just as lovely.  Here are a couple of cards that I made for my SSS sisters this year.  Both cards use Simon's Merry Christmas die also - just love that fun font!


This card used a Hero Arts Pool designer paper.


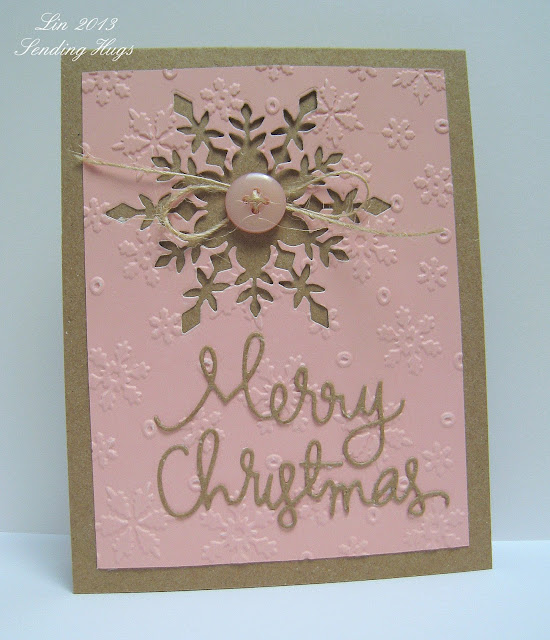
I like this pink and kraft combination.  This time I embossed my background panel with a Darice snowflake folder. 

This weekend, I am determined to get my Christmas cards addressed so that they can go out on Monday.  I know they'll arrive after Christmas, but at least I'll know I made the effort!  I seem to have been playing catch-up ever since our late Thanksgiving!

Friday, December 20, 2013

A Joyous Season

I really like this sentiment from Penny's Black's Joyous transparent set.  I've used it a few times earlier this year, but this time I also chose one of the motifs from it to pair with the sentiment.


Here's an easy, CAS card for the last minute.  I simply stamped the star 3 times vertically, added the sentiment, and centered each star with a metallic dot, then mounted the stamped panel on a red card.  What could be easier!

Are you ready for Christmas?  Enjoy your weekend!

Thursday, December 19, 2013

All Good Wishes

Just a quick post today.  Here's a card that uses the Spellbinder's Poinsettia dies, paired with a sentiment by Tim Holtz from the Simon exclusive Holiday Card Kit:


Hope your Christmas preparations are going well and on schedule!


Wednesday, December 18, 2013

Simon Says .........Bling it On!


Hi and welcome to another week at the Simon Says Stamp Wednesday Challenge!


Because next Wednesday is Christmas, this challenge will continue for TWO weeks this time, finishing on New Year's Day.  And there will be TWO $50.00 vouchers given away!  We wish you all a very Merry Christmas!

This week our theme is Bling it On!  Anything sparkly is what we're looking for: glitter, gems, Stickles, glimmer sprays, you get the idea!  The Design Team is using Simon exclusives this week, and of course we'd love to see you using them, too, but it isn't a requirement to play along.


I used the Simon exclusive Merry Christmas die and thought it would be fun to make a big ornament to wish you all a Merry Christmas!  I first cut out a circle with a circle die from a scrap of Hero Arts Pool designer paper, then die-cut my sentiment from it.  Then I backed it with a piece of red glitter paper.  My card base is another Hero Hues designer paper, this time in Earth.  To that I attached 3 sprigs of Impression Obsession's Pine Branch die, and then hung my ornament with some Doodlebug Ladybug Doodle twine.  And to add a bit more glitz I used a hole punch to punch out some circles of red glitter paper to use as berries on my branches.

Don't forget, there are TWO chances to win 1 of Heidi's $50.00 gift vouchers this week, and you have 2 weeks to play!

50dollar_voucher_600px

to the fabulous Simon Says Stamp Store!  

Simon Says Stamp

Wishing you all a very Merry Christmas and a Happy New Year!

Sunday, December 15, 2013

Warm Wishes

I wanted to share some of my Christmas cards that I've made to send out this year.  Because they will be mailed, I've tried to keep them as flat as possible.  This one features the beautiful Wplus9 Woodland Wreaths, along with a sentiment from Hero Arts Heavens Rejoice.


I'm so glad I ordered the matching dies to the wreath set, too - it was fun stamping the fruits, leaf sprigs and  pretty bow to add to my wreath. I decided to make sugared fruit by adding some prisma glitter to them after they had been cut out.  

How is your Christmas card making going?  It's going to be close for me!  

Friday, December 13, 2013

Another Penny Black Christmas card

Welcome!  Today I'm featuring another Penny Black stamp that was introduced this year, called Robin's Wish.  I love the primitive, retro style of it!


I stamped the bird and branch in brown ink and the holly leaf in green, then minimally-colored the bird with some markers.  I stamped the sentiment from the same set in red ink, and cut out my panel using a Spellbinder's Labels Eighteen.  Next I used that same die to trace and fussy-cut  a red label to frame my panel, and then affixed it to my card with the holly background paper.  And I used lots of tiny red pearls as my berries. 

Because this stamp is such a simple design, it is a great one to use when you need a fast card!  

Thanks for visiting me today - have a great weekend!

Wednesday, December 11, 2013

Simon Says........Let it Snow!!


It's time for a new challenge at the Simon Says Stamp Wednesday Challenge Blog!


This week our theme is Let it Snow!  You can do anything that has to do with snow - snowmen, snowflakes, you get the picture.  I was in a pink mood this week:


I started with this old peachy pink snowflake design paper, not even sure where it comes from.  I colored this darling snowman from Hero Arts Snow Much Joy set in pink and brown, and added some pink pearl berries, then cut him out.  Next I tore a snowbank, and stamped my sentiment from Miracle of the Holidays in Soft Blossom ink.  And to finish I die-cut 3 of the Simon exclusive Eliza Snowflakes, glued them together for more bulk, and attached that to my card.  Really simple to make, but it makes me smile - hope it does you, too!

I used a hotter shade of pink for my next card: it was stencilled with picked raspberry distress ink:


The stencil is Dyan Reaveley's Let It Snow, which I used last week with embossing paste and glitter.  I cut my panel in half and popped it above my card base, on which I'd stamped and silver embossed my sentiment.  Other supplies: Lawn Fawn Let It Snow (sentiment), Ranger Super Fine Detail silver embossing powder, Darice silver sparkle tape, pink and clear rhinestones.

Now it's your turn!  Generous Heidi has provided us with another $50.00 gift voucher


to the amazing Simon Says Stamp store!

Simon Says Stamp

Monday, December 9, 2013

Christmas Blessings

I just love the little snowflake stencil that is part of Simon's December Card Kit, and I thought I'd use it in a slightly different way to show how versatile stencils can be.  So I embossed it on a scrap of white cardstock, rubbed some chalk over it to bring out the details even more, and added some of the tiny clear sequins that are also included in this kit.  A green snowflake?  Why not?


Other supplies that I used here are the red and white cardstock and lime design paper from the kit, plus elements of Simon's Christmas Sentiments stamps and die set.  The tiny stripe is from the 6" pad of Doodlebug Designs Home for the Holidays.  I love the script font for the die and how you can mix so many sentiments using the stamps included with it!

Edited to answer Jennifer's question about embossing a stencil.  Here was my sandwich using my Cuttlebug: plate A, plate B, stencil, cardstock, rubber mat, plate B, some extra cardstock as a shim.  Ran it back and forth 2 or 3 times and got a great impression!

Thanks for stopping by today - have a great week!

Saturday, December 7, 2013

Silver White Winters.........

.......those lyrics come to mind when I see this card that I made using elements from Simon's December Card Kit:


I wanted to feature this beautiful glittery snowflake paper that is part of the kit, so I framed a panel of it with silver glitter tape, stamped my sentiment from the Big Holiday Wishes set in the kit, embossing it in Ranger Super Fine Detail silver powder, and then die-cut an Eliza Snowflake from silver glitter paper and added a silver pearl to it's center.  

Here's a picture of the Card Kit:


Thanks for stopping by today - I hope your weekend is going well.  We had a beautiful snowfall yesterday and last night and everything is white and sparkly here outside!

Friday, December 6, 2013

A Penny Black Merry Christmas

Happy Friday!   I have a card for you today using some Penny Black stamps.


This one uses the woodblock Pine Wreath, paired with one of the sentiments from Yuletide Greetings.  I stamped the wreath in brown ink, colored in the pinecones with a brown marker, and then paper-pieced the berries and bow.  The berries are glitter paper, punched out with our hole punch, and I secured the bow only in the center and bent it a bit for some added dimension. 

Thanks for visiting me today!  Hope you're enjoying the lead-up to Christmas!

Wednesday, December 4, 2013

Simon Says.......Make Your Own Background


It's Wednesday already, and that means a new challenge at the Simon Says Stamp Wednesday Challenge Blog!


This week our theme is Make Your Own Background!  No patterned papers unless you have altered them, please.  You can emboss, stamp, stencil, paint, spray, etc......have fun with this!!  The design team are using stencils or Gelli Plates to make our backgrounds.  If you have these, we'd love to see your work with them, too.  

I played with 2 different stencils this week and made 2 cards today, using some of the same elements.


I started this card by stamping the Penny Black Christmas Cottage on a white piece of cardstock, and coloring it minimally with markers.  Then I sponged on faded jeans and a little broken china distress inks to make the sky.  After making sure that everything was dry, I then attached my panel to the Simon exclusive Falling Snow stencil and used some modeling paste to make my snowflakes.  After more drying time, I attached my Impression Obsession birch trees and the included cardinals die-cuts to my card, and then stamped my sentiment (Hero Arts Miracle of the Holidays stamped in Red Royal mid-tone ink) on another panel of torn white cardstock and attached everything to a red card base.  I hope you can see the fun dimension that the modeling paste gives to my card; still quite mailable.

For this next card I used the same Christmas Cottage and a sentiment from the same set, but used this amazing Dyan Reaveley Let it Snow stencil:


This time I stamped my cottage on the left side of my panel, then sponged on faded jeans and salty ocean distress inks for the background.  Again, I colored the stamped image with red and green markers, and stamped my sentiment in the lower right in Red Royal ink.  Because of the placement of the cottage, I had to mask out a large snowflake from my stencil, but after that I just applied modeling paste to the stencil as I did above, lifted it carefully and sprinkled it with Hero Arts prisma glitter.  This took a little longer to dry, and it warps the paper a bit as it does, but after my card was completely dried and put together, I put it under a pile of heavy books, and that helped straighten everything out pretty well, without doing any damage to the stencilled image.

I plan to use these and various variations of them for my Christmas cards this year.  I hope you'll give these stencils a try - they are really easy to work with, and you don't have to use a modeling or embossing paste with them - they can be inked or sprayed for the same beautiful results.  

As always, our generous Heidi has provided us with another $50.00 gift voucher


Simon Says Stamp

I can't wait to see what you make for us this week!  Have fun!