Monday, July 31, 2023

Favorite Cards in July

This month is full of Christmas cards, thanks to Spellbinders!  So glad to get a good start on them for this year.


I'm still loving that darling little fawn in the center!   

Sunday, July 30, 2023

Stitched for Christmas

 Spellbinders has released a new collection of stitching dies, called Stitched for Christmas!  Here are my samples.


supplies: white, cream, pink, yellow and greens cardstock, pink metallic cardstock, Stitched Poinsettia and Holly dies, cream, pink, and green embroidery floss, 3 strands, Holly & Foliage 3D embossing folder, sentiment and pine sprigs from Mix & Match Holiday Greetings dies, pink metallic sequins

I've always loved pink poinsettias, so that's the direction I went for this first card, and I made a cream flower, also, then used cream and pink floss for my stitching.  After arranging the elements, I decided to bring in some glitz with a metallic sentiment, matting, and sequins.

Next I have 2 cards using the fun Stitched Starry Argyle plate.


supplies: red and teal green cardstock, pewter metallic kraft cardstock, Stitched Starry Argyle stitching plate, holly and berries from Stitched Poinsettia and Holly set, Joy dies, adhesive strips to lift word and holly

I love this argyle plate!  I used 6 strands of a teal green and a wheat floss to stitch it, then trimmed it very slightly so that I could mat it with a peacock green card.  I used the same cardstock colors for my holly and berries, stitching tone-on-tone for them.

Next is a winter card using the same Starry Argyle plate, done in blues this time.  After stitching in 2 shades of my favorite blue, I pulled out 4 ancient snowflakes from my scrapbasket and layered them as the focal point.  I left off a sentiment for now.


supplies: white and 2 shades of blue cardstock, white glitter cardstock, 2 shades of blue embroidery floss, Stitched Starry Argyle Stitching plate, a dark blue gem 

It doesn't show up here, but the largest white snowflake was cut from white glitter card, so between that and the blue gem in the very center, this is very sparkly!  I separated the 4 layers with adhesive foam squares for some dimension, but everything compacts back nicely when put into an envelope.

This plate is called "Starry" Argyle, but I think it looks like teensy snowflakes in between the stitches, so I changed to blues for something a little different.  Of course, this plate doesn't have to be holiday or winter themed, either - choose other colors and make a masculine card.  

Hope you've enjoyed my take on these new dies - thanks so much for stopping by!

Friday, July 28, 2023

One Big Hug

 I was in the mood for some turnabout stamping, and pulled out this Blooms Turnabout.  I did it in pinks and yellows this time.


supplies: white, Green Leaf, Green Apple, Doll Pink pale pink and pale yellow card, Concord & 9th Blooms Turnabout stamps, sentiment from (retired) Simon's Happy Every Day set, kitsch flamingo, picked raspberry, squeezed lemonade, and mustard seed oxide inks, Altenew Lime and Fresh Leaf inks, Spellbinders Be Bold Blooms dies, Winnie & Walter (retired) Noel scalloped rectangle die, adhesive foam squares

This turnabout set actually has 2 turnabout stamps, one for the leaves, another for the flowers!  The turnabouts are fun to play with and always give pretty results, no matter what colors you choose!  And I think this Be Bold Bloom flowers are a nice match with the floral stamps..

Thanks for stopping by today - have a good one!

Wednesday, July 26, 2023

Woodblock Wednesday for July

 Here's my entry for this month's Woodblock Wednesday.  I used one of a set of 4 stamps from Hero Arts called Words & Flowers, dated 2008, and did some easy paper-piecing..


supplies: white cardstock, Doodlebug floral dps, Hero Arts Words & Flowers woodblock, sentiment from Clearly Besotted Sweet Little Sentiments

I've always loved text on a stamp, and adding in a flower is icing on the cake!


And a detail photo:


I hope you'll join us and have a play with your woodblock stamps, too - you can find all the info here.  


I'd like to enter this card into this week's Anything Goes challenge at Simon Says Stamp.

Thanks for stopping by!

Sunday, July 23, 2023

A Get Well Card

 I was intrigued by the Tuck It dies from PaperTrey Ink when I first saw them, but it took me awhile to get them.  I think they'll be a natural with all my posies, don't you think?  The premise of these dies is that they make a partial die-cut so that you can tuck in something behind what becomes your sentiment label.

Here's my first play.


supplies: white cardstock, a green gingham dp, twisted citron distress ink and a blending brush, Memory Box (retired) Daisy Silhouette dies, markers, PTI Tuck It dies and Sentiments (stamped detail on label), Clearly Besotted Sweet Little Sentiments, adhesive foam squares to lift flowers

What is more perfect than gingham and daisies to lift your spirits?  

Thanks for visiting today - have a good one!

Friday, July 21, 2023

Spellbinders July Club Kits Blog Hop

Welcome to my stop on the Spellbinders July Clubs Blog Hop!  I have 2 cards for you today!


To celebrate this month's release, we are giving away a $25 gift certificate to THREE lucky blog readers, selected from comments left on the Spellbinders blog!  The giveaway closes on Sunday, July 23 at 11:59 PM MT, and the winners will be announced in that same Blog Hop post the following Wednesday.  Winners are responsible for shipping costs, duties, and taxes.  

Please note that gift certificates cannot be applied to Club Subscriptions, but can be applied to past Club products, Club extras, and regular releases.

You should have arrived here from Allison's blog.

I wanted to play once again with the lovely Layered Poinsettia Tree dies, and gave my card a kind of woodsy feel this time around with traditional Christmas colors..


supplies: red, green, and cream cardstock, a woodgrain dp, Spellbinders Layered Poinsettia Tree dies of the month, sentiment from this month's Large Die of the Month kit, Stocking Full of Joy, Postage Edge Rectangle die

This month's 3D embossing folder is a favorite for me this month - such amazing details!


supplies: Doll Pink and Green Apple cardstock, a Christmas plaid dp, Adorning the Tree embossing folder, white pigment ink, sentiment from Tiny Merriment add-on die set

This design is an easy one - just a matter of matting up the embossed panel and adding a sentiment.

Now it's time to move on to Sheri's blog!  Enjoy the hop!  If you get lost, just start at the beginning HERE for a list of all the stops.

Wednesday, July 19, 2023

Jubilee

 Here's a new embossing folder/die set from Simon Says Stamp - couldn't wait to get one, and it does NOT disappoint!  I made 2 cards with it.


supplies: white and Audrey Blue cardstock, Jubilee embossing folder set, white pigment ink, aquagreen, and yellow tri-blend markers, sentiment from Mama Elephant Paola's Wishes

And a lavender version.


supplies: white and Lavender cardstock, Jubilee embossing folder set, white pigment ink, purplegreen, and yellow tri-blend markers, sentiment from Mama Elephant Paola's Wishes

For both cards, I first cut out the floral label, then embossed it and colored in the details with markers.  Then I embossed the folder on colored cardstock, swiping that panel with white pigment ink, then mounting it onto a white card base and finally adding the square label.

Can't you see a whole set of these in different colors and sentiments?  

Thank you so much for stopping by today - hope your weekend is a great one!

Sunday, July 16, 2023

Make It Merry Add-On Products

 I promised you a look at the add-on sets that are available to go along with the Make It Merry kit.  Here I used the embossing folder, the floral die-cuts, and the sentiment die-cuts, and paired them with the solid cardstock and the red jewels from the kit.


supplies: ivory, 3 reds, burgundy, 2 greens, and pink cardstock and red adhesive jewels from the Make It Merry kit, Make It Merry Florals add-on dies, Make It Merry Sentiments add-on dies, and In the Pines add-on embossing folder

If you'd like all 3 of these add-on sets. you can also buy them in a bundle, and save, versus ordering all 3 separately!

There are additional dies in the floral set that I didn't use this time: a pine-cone, pine sprigs, and holly leaves and berries. 

If you'd like to see my cards using the main Make it Merry kit, please click HERE

Thanks for stopping by!

Friday, July 14, 2023

Spellbinders Make It Merry Limited Edition Holiday Cardmaking Kit!!

Today I have 5 cards that I made using the supplies in the Make it Merry Cardmaking kit from Spellbinders.  This kit contains everything you will need to make lots and lots of cards for Christmas, even adhesive, envelopes, and card blanks in 2 sizes, not to mention a pad of printed papers, matching cardstock, including gold and silver metallic, and lots of ephemera to mix and match.  This kit has gold metallic accents and there are 2 each of the ephemera pieces.

Here are my cards. 


supplies: Make It Merry Cardmaking kit, and an add-on set of ephemera called Make it Merry Florals


Playing with a kit like this that has everything coordinated is almost like making little quilts, just a matter of choosing what appeals to you and then building around it with papers and a sentiment.  Which is your favorite?  Mine is that sweet little fawn done in pastels.  

Here's a picture of the kit.


There are also some more add-ons: an embossing folder, and 2 sets of dies, that will coordinate with this kit.  I'll be back soon to show you what I did with those.  

Wednesday, July 12, 2023

Layered Christmas Stencils

I REALLY like these new Spellbinders Layered Christmas Stencils!  Here's my card using the Merry Christmas Foliage set and die bundle.


supplies: white, and doll pink cardstock, Merry Christmas Foliage stencil set, distress inks in kitsch flamingo, picked raspberry, twisted citron, mowed lawn, evergreen branch, pine needles, and tumbled glass, Merry Christmas Foliage die, Lawn Fawn Fancy Scallop Rectangle die, adhesive foam squares

The stencil set is 6 pieces.  You can put the sentiment right in the center, using only the stencils, or ink  it separately and die-cut it with the matching die like I did, and pop it up.  

There's a similar set that says "Noel", and a tree that says "Joy",  if you enjoy these stencils!  I hope that Spellbinders will bring similar sets out for everyday - they are fun to play with and give lovely results!

Thanks for visiting today!

Monday, July 10, 2023

Yana's De-Light-Ful Christmas Release!!

 Yana has done it again!  She's releasing some Christmas goodies and you are going to love them!  I chose 5 sets from her Yana's De-Light-ful Christmas release, and I have 5 cards to share with you today!  

All of my sentiments have been foiled with Yana's Merry Little Christmas Sentiments glimmer plates and various colors of glimmer foil.  The sentiment glimmer plates consist of 4 large script sentiments with matching shadow dies, and 5 smaller text sentiments.

First up, 2 cards featuring her Poinsettia Bloom dies.


I paper-pieced my poinsettia with pink and green metallic kraft cardstock, then added a pink foiled sentiment from the new Merry Little Christmas Sentiments glimmer plates/dies set, and popped up a frame using the new Holly & Foliage 3D embossing folder.  You'll see more cards using the embossing folder below.

Here's a 2nd card, using pink and silver this time, a much more CAS design.

 
supplies: 2 shades of pink cardstock, matte silver cardstock, Poinsettia Bloom dies, a pink marker for highlighting the flower, another foiled Merry Little Christmas Sentiments, Silver glimmer foil

I cut the poinsettia from a medium pink cardstock, and a matte silver metallic cardstock, and pieced the bloom back together, adding a few highlights with a marker..  Then I just glued it onto a pink panel on which I'd foiled my sentiment.

This next card may be my favorite, simply because it's all glimmer and went together effortlessly!  The plate has a matching stencil set, too, to color in the details!


The stencil set is 4 stencils.  And here I used a matching die from the Sentiment glimmer set.  (I fussy-cut a shadow for it from red cardstock).  I had to take another picture to try and get the pretty glimmer the foiling makes.


Finally, I have 2 cards using the 3d Embossing Folder called Holly & Foliage.  This design has essentially the same elements as the above Holly Background glimmer plate, but on a slightly larger scale. 


supplies: white, red, and pale green cardstock, Holly & Foliage embossing folder, white pigment ink, another of the Merry Little Christmas Sentiments, Red glimmer foil

I centered a small pale green rectangle on an A2 sized white one and put them both into the embossing folder, then matted them both in red, reattached them so that the pattern  matched, and added a red-foiled sentiment.  (I rubbed white pigment ink on the green one before matting it, but I'm not sure it made a difference on this light cardstock.)  

I wanted to try and color the embossing folder for my final card.  My hands aren't as steady as they used to be, but I'm pleased with the results.


supplies: white cardstock, Holly & Foliage 3D embossing folder, alcohol markers to color, another of the glimmer sentiments and its matching shadow die, Magenta glimmer foil

"Delightful" is the perfect title for Yana's collection, as I had a delightful time playing with these lovelies!

Thanks for stopping by!

Saturday, July 8, 2023

Petal Pushers!!

The Greetery recently had a new release, among which was a suite of products called Petal Pushers!  The suite includes a very detailed cover plate, a set of layering stencils, and floral dies to match.  I made 3 cards today.

First, I combined the cover die and the stencil set.


supplies: white, yellow,  and Audrey Blue cardstock, Petal Pushers cover die and stencil set, Altenew mini inks in purple, teal, blue, and green, blending brushes, stamped sentiment from Hero Arts Sending Love Mail

The cover die is made so that the flowers and leaves are cut out along the edges, but not in the middle, so you can pop them up.  The background dots (which I love!) come out so that you can line the whole panel in a colored cardstock, in this case, Audrey Blue. I used the dies here only to fill in the centers of the purple flowers.

And then I used only the layering stencils:


supplies: white cardstock, Petal Pushers stencil set, pastel Pink Fresh Studio and Altenew mini ink cubes, blending brushes, stamped sentiment from Hero Arts Sending Love Mail, enamel dots 

And finally, this card starts again with the stencils, with the blooms dies popped above the card.


supplies: white, kraft, bright gold, and orange cardstock, Petal Pushers stencil set, distress inks and blending brushes, Petal Pushers Blooms dies, enamel dots, Birch Press Design foiled sentiment from Sugar Script Sentiments, teal foil

Because of those dots, I think I like the stencils every bit as much as the cover plate!  

Thanks for visiting today - hope I've piqued your interest!

Thursday, July 6, 2023

Spellbinders Club Kits for July!

 The Spellbinders Club Kits for July are now available - it's Christmas in July!!

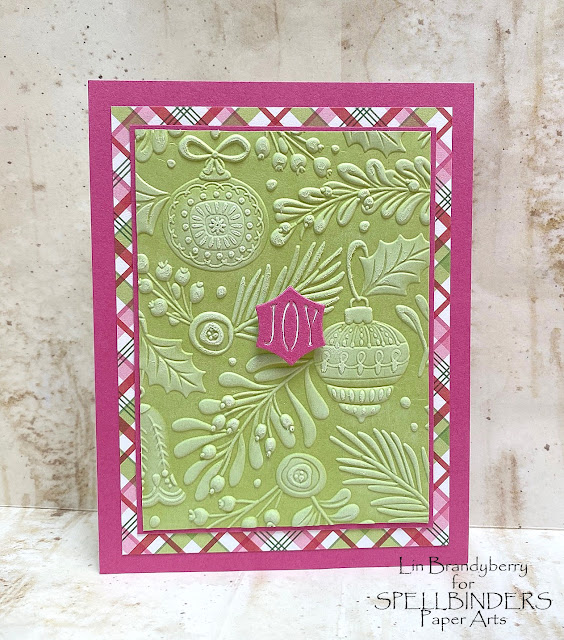
The Die of the Month is darling - it's called Layered Poinsettia Tree.  I went with non-traditional colors.


supplies: Ivory, 2 pinks, Schoolhouse Red, Audrey Blue, and Peacock Teal cardstock, silver metallic cardstock, Layered Poinsettia Tree dies, and sentiment from the large dies of the Month (Stocking Full of Joy), adhesive rhinestones, adhesive foam to lift star

There are 2 smaller rose dies included in this set that I used to bring more of the pink into the picture.  And since I used silver metallic cardstock for the star and my sentiment, I also sprinkled some teensy rhinestones here and there for additional sparkle.  I can't wait to try this again in more traditional colors, maybe on a kraft background!

Next is my card using the Large Dies of the Month: Stocking Full of Joy.  This is another really fun set, with so many details to stuff your stocking with!  


supplies: kraft, white, reds, and greens cardstock, Spellbinders Stocking Full of Joy dies of the month for July, Adorning the Tree 3D embossing folder of the month for July

This die set contains all that you see here, plus a few things you don't!  So many possibilities!

Next are my cards using the embossing folders of the month.  The first one is called Christmas Wrap Pattern, and I used the holly sprig and sentiment from the above Stocking Full of Joy dies with it.


supplies: cream, blue-green, red, and red glitter cardstock, Christmas Wrap Pattern embossing folder, Stocking Full of Joy sentiment and holly sprig

I cut my sentiment from red glitter paper for a little bit of sparkle.

Here is the 3D embossing folder, Adorning the Tree.  It has such lovely details, that I just embossed it on a dark green cardstock, then carefully rubbed on white pigment ink and added a sentiment and a border so that you could see as many of those details as possible..


supplies: dark green and lipstick red cardstock, Adorning the Tree 3D folder, white pigment ink, Merry Christmas sentiment die

I'll be playing with the Stamps and Dies of the Month going forward - this month's is called Pine Cones & Holly.

I stamped it on Desert Storm kraft card in black ink and colored it with markers, then stamped the sentiment in red ink, and mounted the panel on a red base..


Then I thought I'd use one of the dies that match for a 2nd version, just placing it over the card above.  Which do you prefer?


supplies: white, a pale blue, and Cornflower cardstock, Stitched Snowflake kit, medium blue embroidery floss, 3 strands, sentiment from add-on kit called Tiny Merriment

And finally, here are 2 cards using the Glimmer of the Month kit, Glimmering Christmas Flora and the foil that was included in the kit: Polished Brass.


supplies: gold foil cardstock, burgundy cardstock, Glimmering Christmas Flora glimmer kit, Polished Brass glimmer foil

Next I foiled on Desert Storm card using a green glimmer foil, and used an accomanying die to cut out the center of the design.  Then I lifted the panel above the green card base.


supplies: Desert Storm and dark green cardstock, Glimmering Christmas Flora glimmer kit, Veridian Green glimmer foil, adhesive foam squares

You can look HERE for information on Spellbinders Clubs.  Each is available only from the 6th until the 27th of each month.  If you click on my links under each card, you can see the specifics of each product.  You can subscribe to the kits separately, but there are also lots of ways to combine several of them (scroll down and look under Value Clubs).  And you can "unjoin" a subscription at any time without any penalty.