Showing posts with label Avery Elle. Show all posts

Saturday, June 1, 2024

Blue Butterflies

It's June - Happy Summer!   

Here's a card featuring the lovely Twilight Butterflies released last month at Spellbinders. I love these blues!


supplies: white cardstock, retired brushstroke stamps from Simon Says Stamp Brush Stroke Messages and Avery Elle Brushed, a mix of inks from Pink Fresh Studio Morning Sky and Altenew Lapis Lazuli mini ink cube sets, sentiment from Mama Elephant Paola's Wishes, Spellbinders Twilight Butterfliessequins

If this looks familiar, this card is a CASE of one of my own  made back in 2015!  Still love those brushstrokes!!  Mine are retired, but if you search "brush stroke stamps", you'll find some other options.  Also, there are stencils out there that will give the same results, too.  

Thanks for stopping by, and I hope you have a wonderful summer ahead!

Friday, January 12, 2024

Friendship Frames

 Here's another stamp and matching stencils set that I scooped up last year during some Black Friday sales.  They're Honey Bee Stamps, called Friendship Frame.  You know me and wreaths!  I made 2 cards with them.


supplies: white, black, and Mint cardstock, Honey Bee Friendship Frame clear stamp and Friendship Frame layering stencils, Altenew mini inks, blending brushes, unknown hello die (maybe Winnie & Walter?), stamped sentiment from (retired) Avery Elle Simply Said Hello

After stamping and using the stencils to color the frame, I tried different colors for my background, and this time Mint won the day.  I'm sure there's a set of dies to match, but I enjoyed fussy-cutting out the floral.

My 2nd card is in aquas and purples against white and I turned it to a portrait.


supplies: white cardstock, Honey Bee Friendship Frame clear stamp and Friendship Frame layering stencils, Altenew mini inks, blender brushes, Taylored Expressions (retired) Handlettered Sentiments cling stamp

This frame fits snugly on an A2 panel, so this time I stamped and stencilled, then attached my finished panel to a card blank.  

You may or may not have noticed some small changes here on my blog since the first of the year.  That's because we are snow-birding here in Florida for a few months.  As a result, I'm using my husband's laptop and my iphone for editing my pictures and adding a watermark.  I'm pretty proud of myself that I was able to make the changes with a minimum of drama - I DO still have some brains!!

One thing that I didn't bring down here was accessories, like enamel dots, which would have been nice on both of these cards.  I see a trip to the local scrapbook store in my future!!

Thanks for stopping by today - hope your day is a good one!

Friday, June 2, 2023

Heart Wreath

 June is the month for weddings, and therefore anniversaries.  We have our fair share in our family, and today I have a card that would work for an anniversary, or just any "thinking of you" occasion.  I mixed some favorite stamps for this card.


supplies: white cardstock, Impression Obsession Wooden Plank cover-a-card cling stamp, Wplus9 Silver Lining ink, (retired) Simon You Have My Heart wreath, Tri-blend markers in Magenta and Jade Green, sentiment from Avery Elle Loads of Wishes, small adhesive foam squares

I stamped the wreath partially a 2nd time just to get an impression of the large flowers in it, so I could color and cut them out and add them to the wreath.  Since my card is so simple, I thought it needed a bit more distribution of color.

Thanks for coming by today - I hope it's a good one!

Monday, April 24, 2023

Ever in Bloom

Taylored Expressions has perfected a wonderful concept: layering stencils, called Quads, which can make 4 cards at one time, because the stencils are 8 1/2 X 11"!  I love Taylor's designs, and she's hit it out of the park with this idea!

Here is my first play with her newest Ever in Bloom stencil set.


I started with a piece of 8 1/2 X 11" white cardstock, then systematically layered the 4 stencils, using these inks: Simon Says Stamp Teeny Bikini, Melon, Duckling, Altenew Lime, and vintage photo distress ink.  Then I trimmed out each panel to a little less tha A2 size and framed each with a colored cardstock: kraft, Cotton Candy, a darker pink, and Green Apple.  Then I chose a stamp or die to fit each.  Here are the individual cards:


supplies: sentiment from Honey Bee Bitty Buzzwords dies, cut from a dark brown cardstock and shadowed with vellum


supplies: stamped sentiment from Taylored Expressions Handlettered Sentiments cling stamps, stamped in Altenew Dark Chocolate ink


supplies: Simon Just Miss You sentiment, Dark Chocolate ink

supplies: Avery Elle Loads of Wishes sentiment, Dark Chocolate ink 

HERE's a link to more of these Create-in-Quads sets.  If you love layering stencils, you will love these!  I can't wait to try some other color combinations!

Friday, March 10, 2023

Floral Harmony

 I am in love with this beautiful Simon Says Stamp embossing folder called Floral Harmony that I recently brought home!  Here are 2 cards.


This one uses the 3 floral dies that are included in the set.  The embossing folder is so pretty that it really doesn't need a thing.  Next I just embossed it on colored cardstock and then swiped it with white pigment ink; no dies this time.


I didn't want to cover up a single inch of these, so I chose sentiments on the small side.  As you can see, you can spend as much or as little time on this - the results are spectacular either way!

Thanks for visiting me today - have a lovely day!

Wednesday, December 14, 2022

Simon Says......Ice Cold


Welcome to the new challenge at the Simon Says Stamp Wednesday Challenge Blog!


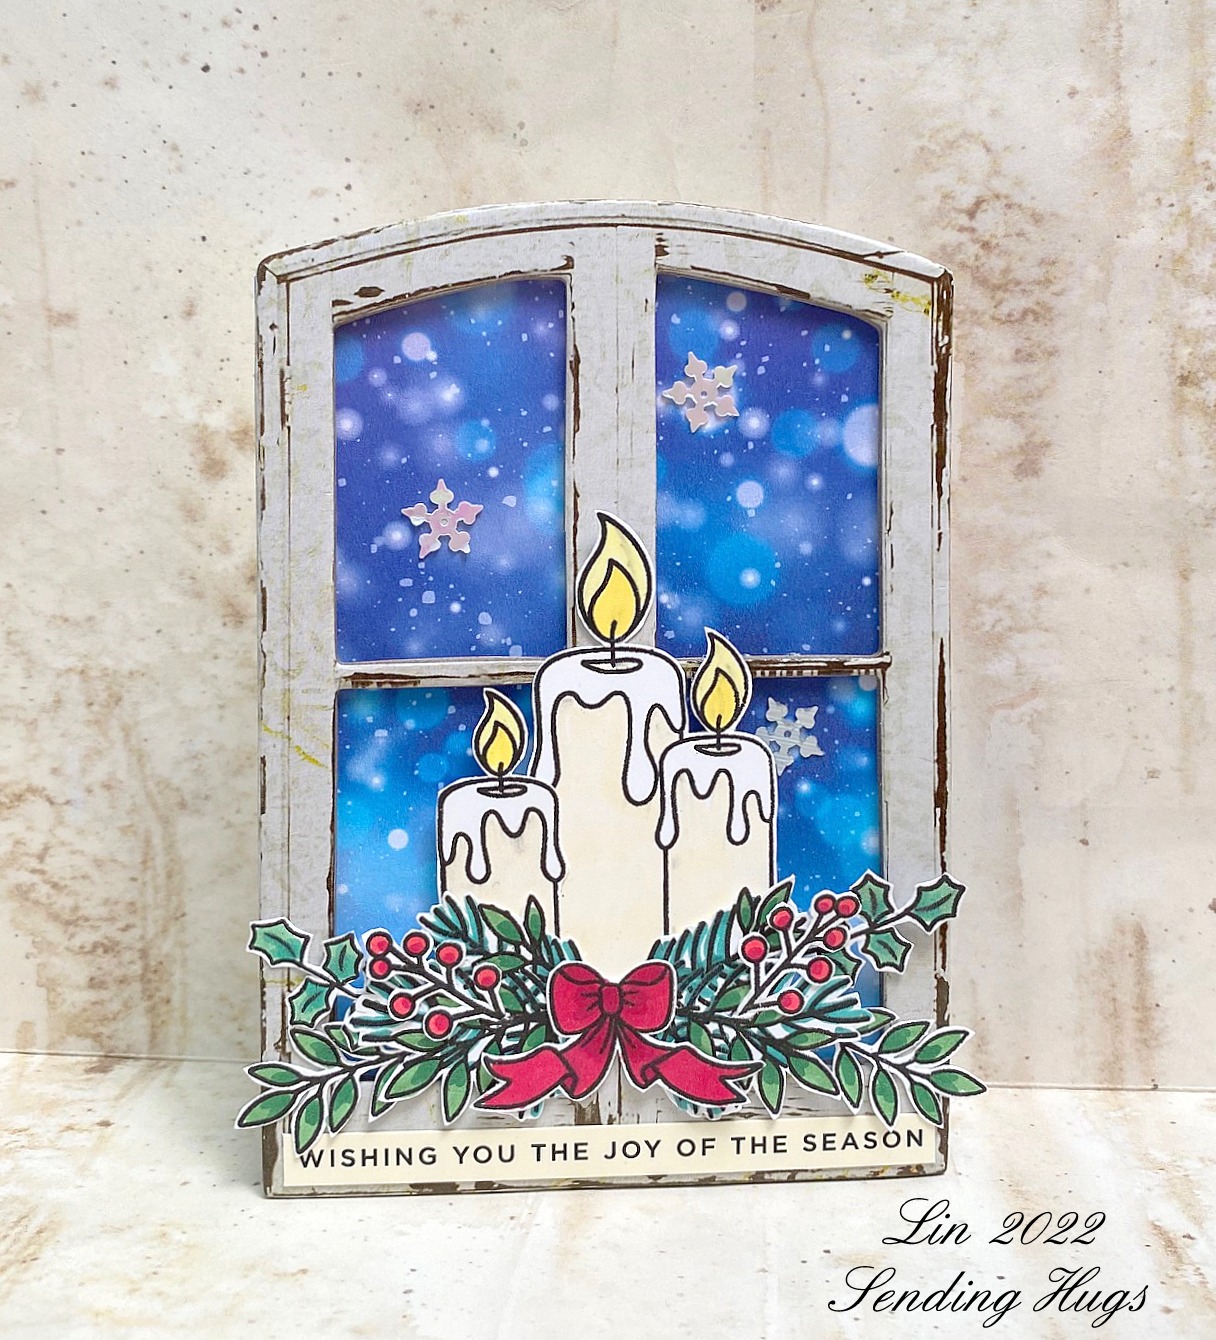
This week our theme is Ice Cold, and the team is featuring Avery Elle products.  I made a window-shaped card.


supplies: white cardstock (for card back), Blurry Flurries design paper, Avery Elle Candlelight Christmas clear stamps, Tim Holtz Baseboard Window Frame, Simon sentiment strip, snowflake sequins

I chose my elements to make my window arrangement, colored them, cut them out, and arranged them. Then I glued them onto the window frame.  I backed it with a nighttime falling snow paper, and used the frame to cut out another piece of white cardstock to use as my card backing.

This is exactly how we decorate our home for Christmas, except that the greens are outside each window, and the candle inside.

Now it's your turn!  We have a $25.00 gift certificate 


to the amazing Simon Says Stamp store for 1 lucky random winner of this week's challenge!  I can't wait to see what you all make this week!


Friday, May 6, 2022

A Birthday Card

 May is a popular month for birthdays!  Here is one that I made for our niece this year.


supplies: purple, 2 pinks, Green Apple, and white card, Concord & 9th Bitty Burst Turnabout, ripe persimmon, picked raspberry, wilted violet, and twisted citron oxide inks, The Greetery Sunflower Botanicut, Hero Arts leaves, Avery Elle Loads of Wishes sentiment, MFT Wonky Stitched Rectangle die, enamel dot

This is a real mix of products from lots of companies!  I started by finding a color mix on Pinterest that I liked: orange, hot pink, lime, and purple.  All of those colors were used in the turnabout background.  Then I used colored cardstocks to bring in the pink, purple, and green, and an orange enamel dot.  

Thanks for stopping by!

Wednesday, June 23, 2021

Simon Says.......Red, White, and/or Blue


Happy Wednesday - welcome to our challenge at the Simon Says Stamp Wednesday Challenge Blog!


This week our theme is "Red,White,and/or Blue" and the team is playing with Avery Elle products.  Here's my card.


supplies: white cardstock, red, white and blue star and grid patterned papers from Sunny Studio, Avery Elle Loads of Wishes sentiment, flower and leaf sprig dies, enamel dots, adhesive foam

Now it's your turn!  We have a $25.00 gift certificate 


to the amazing Simon Says Stamp store for 1 lucky random winner of this week's challenge!  I can't wait to see what you all make this week!


Friday, May 14, 2021

Hollyhocks Mini Slimline

 I'm still on the mini slimline bandwagon, and I thought I'd CASE some of my own cards and convert them to this new size.  

Back in 2014, I took an online class called Stretch Your Stamps 2, and one of the lessons, taught by Dawn W., was to doodle around a stamped floral image.  I pretty much CASEd the card I made then for today's card.


supplies: white and coral cardstock, long-retired Avery Elle Oh Happy Day solid floral and leaf stamps, Altenew inks, Simon Beautiful Butterflies sentiment, a fine-tipped pen to outline the stamped images, pink and yellow pearls

I stamped the solid flowers and leaves vertically to create my hollyhocks, then dipped my wet paint brush into one of the green inks and created stems to connect them.  Then I just doodled/outlined around everything.

This was just as much fun this time around as it was back then!  Thanks for stopping by - enjoy your day.

Saturday, January 2, 2021

A Heart Wreath

  I got this new Simon clear set just for this sweet heart wreath.  I used it for a birthday card today.


supplies: white cardstock, Simon's You Have My Heart, sentiment from Avery Elle Loads of Wishes, Lawn Fawn Fancy Scalloped Rectangle Stackable die

I stamped the part of the wreath that had the flowers again and cut out the flowers to add to the bottom left.  

Thanks for stopping by today!

Friday, May 29, 2020

Floral Butterfly

Pulling another die that has hardly seen the light.


supplies: white, 3 shades of pink, pink glitter, and Audrey Blue cardstock, dp from Memory Box Cottage Meadow collection, Spellbinders February 2019 Large Die of the Month, Avery Elle Loads of Wishes sentiment, a Doodlebug sprinkle

As I was looking at Simon's June Card Kit with all its butterflies, I was thinking that I haven't done a card featuring butterflies in a long time, and this lovely 4-layer one sprung to mind.  I hadn't made it in pink yet, so that's where I started.  I cut 3 layers from  3 shades of pink, and the top layer from glittered pink and glued them together only in the center, so that the layers can be pulled upwards for texture.  And then I went looking for a patterned paper to put behind it.  I love it with this Memory Box paper with the floral spray in the corner!  I then added a white flower (from the same die set) to the butterfly to pull everything together, and embossed my sentiment in white. 

Hope this makes you smile - thanks for dropping by!  I hope to see you again tomorrow for my stop on a Simon Crafty Hugs blog hop!

Sunday, April 26, 2020

Sweet Friend

Playing with some favorites today.


supplies: white, black and Carnation cardstock, Altenew Painted Flowers stamps, Simon Rosie Cheeks, Rose Apple, Teeny Bikini, Duckling, Melon, and Clementine inks, Altenew Green Valley mini inks, Sunny Studio Frilly Frames Eyelet Lace die, a Hello die, and a stamped (retired) sentiment from Avery Elle, pale pink sequins

How is everyone doing?  Be safe!

Sunday, February 9, 2020

Flowers in the Snow

I'm playing today with some pretties to take my mind off of winter.  Although the one good thing about winter is the nice bright light when there's lots of snow on the ground!  I pulled out this Wplus9 cover die and made 2 cards with it.


supplies: white cardstock, Wplus9 Tossed Floral Background die, Nuvo Creative Pens to color, Avery Elle Loads of Wishes sentiment, Doodlebug Tiny Heart sprinkles, adhesive foam strips

I cut the big die twice, then cut apart one of them into little floral sprays, and colored them in blues and a little bit of lilac.  The whole cover plate was attached to my card base, and then I popped the fussy-cut sentiment and the floral sprays above it, and added a couple of my favorite tiny hearts.  I enjoyed the process so much I made another card.


supplies: white and dotted mint cardstock, Wplus9 Tossed Floral Background cover die, Hello and Thanks floral stamp, and sentiment from Memory Box Big and Little Words, Nuvo Creative Pens in pinks and greens, adhesive foam strips 

This time when I cut this cover die, I left it in it's surrounding frame and trimmed that just a tad so that my minty dot behind it would give a tiny frame.  I used those skinny adhesive strips to lift it above the card base - I love the dimension this gives me.  Then I stamped and fussy-cut the floral spray, lifted that above the panel, and added my sentiment banner.

Doesn't this give the illusion of lace?  I love this die! Also, since the background paper is dotted, it kind of looks like what I saw outside this weekend as I was working on this card!

Hope your week will be a great one!  Thanks for your visit today!

Friday, December 27, 2019

For a Special Lady

......who had a birthday recently and loves pink.


supplies: white, black, shades of pinky coral and green cardstock, Altenew Layered Rose dies, Avery Elle Loads of Wishes sentiment, Spellbinders Floral embossing folder

It's been a good while since I've played with these layering dies - I love how they look when finished!  I used Press 'n' Seal to hold my arrangement together and get everything placed just where I wanted it.

Happy Weekend!

Wednesday, August 14, 2019

Simon Says...........Midsummer Blues

Happy Wednesday - welcome to our challenge at the Simon Says Stamp Wednesday Challenge Blog!

wed-newchallenge-header


This week our theme is Midsummer Blues, and we are featuring Avery Elle products.  If you have any of their products, we'd love you to use them, too, but it isn't a requirement to enter our challenge.  Just go with the blue theme.


supplies: white and Cornflower cardstock, Avery Elle Layered Rose stamp set, Altenew Lapis Lazuli and Green Valley mini inks, sentiment from Simon's Delicate Flowers, Sunny Studio Quilted Hearts embossing folder, Lawn Fawn Stitched Scallop Border die, Doodlebug heart sprinkles

Now it's your turn!  We have a $50.00 gift certificate 

50dollar_voucher_600px

to the amazing Simon Says Stamp store for 1 lucky random winner of this week's challenge!  I can't wait to see what you all make this week!


Please don't forget about our Kids' Challenge going on all month.  The theme is Anything Goes with Sparkle, and it's open to kids 16 years and under.  HERE are all the details.

Kid'sChallenge-01

Friday, July 26, 2019

Daisies and Sunflowers and Wood

To say that I've been enamored of Betsy Veldman's The Greetery line of stamps and dies would be putting it mildly.  However, I can't have it all, so, inspired by her latest release of dies, I used what I have already and made 2 cards.


supplies: white, cream, pink, kraft, yellow, Green Apple and Green Leaf cardstock, a scrap of pink gingham dp, Stampendous Build a Bouquet cling canning jar, Spellbinders flowers from an April Small Die of the Month Kit, Simon leaves, Zig markers and water, old Tim Holtz woodgrain embossing folder, adhesive foam squares to separate flower layers

I played around with lots of different color combinations for these daisies, but in the end I went with a pretty pink - I think it looks nice against the kraft woodgrain background.

Next I added another layer to the flowers and made them into sunflowers.  With the heat recently I have been daydreaming about fall, and these colors work so well for that season. 


supplies: kraft, Audrey Blue, various greens, yellows, and oranges and brown cardstock, Spellbinders flowers from the April Die of the Month, flower centers and leaves from Tim Holtz Funky Foliage dies, sentiment from Avery Elle Loads of Wishes, Tim Holtz Lumber embossing folder, inked with vintage photo to bring out the details, and Penny Black Stitched Stackers die, adhesive foam squares to separate flower layers

 I enjoyed a fun afternoon bringing these to life - hope they give you some ideas, too!

Thursday, June 20, 2019

Hello, my Friend, Take 2

Here's another play with my Hello with a Bouquet die.  The first time I used it, I paper-pieced it in yellow and black; this time I used a technique I saw on the Memory Box blog to watercolor the flowers.


supplies: white and Audrey Blue cardstock, watercolor paper, PinkFresh Studio Hello with a Bouquet die, Zig watercolor markers and a bit of water, sentiment from Avery Elle (retired) Simply Said Hello, adhesive foam strips

Dave Brethauer's technique works this way: use a heavy watercolor paper to die-cut the image.  Before I remove the die, I use single-sided tape (in this case, package tape) to hold the pieces together on the back.  Turn it over, remove the die, and watercolor the flowers and leaves.  After everything is dry, cut another image from heavy white cardstock.  Discard the negative, punch out all the letters and flower/leaf parts, then glue the outline carefully over your watercolored panel.  

I then framed the panel with a colored cardstock to match, popped up the letters, and added my sentiment strip.

This is a big die, as you see it takes up almost the whole card, and needs nothing else.  The fun is coloring these lovely rosebuds in your favorite method!

Thanks for stopping by today!  I'm looking forward to a date with DH tonight to see the new drum corps shows for 2019!  

Friday, April 26, 2019

Hello, My Friend

Here's a card that gets your attention with its big bold design!


supplies: white, 2 yellows, Apple Green card, dps from MFT Itsy Bitsy Polka Dots and Black and White Stripes pads, Pink Fresh Studio Hello with a Bouquet die, Avery Elle Simply Said Hello stamped sentiment

This took a little minute, but I wanted to paper-piece it first time out.  I used a favorite color combo of black, white, and yellow.  Next time, I'll use this as a stencil to color in the flowers........

Thanks for stopping by! 

Wednesday, February 13, 2019

Simon Says........Black, White, and One Other Color

Happy Wednesday!  Welcome to another challenge at the Simon Says Stamp Wednesday Challenge Blog!

wed-newchallenge-header


Our challenge this week is to make something using black, white, and one other color of your choice!  The team is playing with Avery Elle products.


supplies: white and black card, dps from Gina K Designs Petite Patterns, Doodlebug Floral Graph Rainbow Petite Prints, and the large dot from a retired MME paper pad, Avery Elle Hand Drawn Florals and Loads of Wishes stamp sets, Nuvo Irish Clover markers to color, Simon's Scallop Stitches die

Way back when there was a weekly challenge called the Play Date Cafe and my favorite challenges there were called "Black, White, and a Splash".  I always loved the ones that asked for a splash of lime - I think all the colors pop in that combination.  So of course, that was my first choice for this week's card.

That was so much fun that I used the same elements and made a 2nd card, this time with yellow.


supplies: white and black card, dps from Gina K Designs Petite Patterns, a retired Doodlebug woodgrain, and Lawn Fawn (Let's Polka heart print), Avery Elle Hand Drawn Florals and Loads of Wishes stamps, Nuvo Sunshine marker to color, Simon's Scallop Stitches die, and a Tim Holtz Garden Greens die

This time I used the largest and the smallest of the flowers and a sketch that I've used many times.  I was lazy this time and stamped my flowers on a yellow heart print design paper, adding a tiny bit of shading with a marker.  And I used die-cut leaves to mimic the vining design in the paper.  

Now it's your turn!  We have a $50.00 gift certificate 

50dollar_voucher_600px

to the amazing Simon Says Stamp store for 1 lucky random winner of this week's challenge!