Showing posts with label inlaid die cuts. Show all posts

Tuesday, April 15, 2025

CASE-ing Joy

My birthday was last month, and I got some gorgeous hand-made cards!  Among them was this beautiful one from my friend Joy.  I fell in love with it and wanted to make a stab at CASEing it.  Here's the result.


supplies: white, pink, and green cardstock, Simon Says Stamp (retired) Spring Flowers Background, Taylored Expressions (retired) Rosy Posy embossing folder, Paper Smooches (retired) Rad Roses die, Waffle Flower Full Bloom Sentiments, Scalloped Rectangle die, enamel dots and hearts

Joy's card was much more dramatic with black accents, and I loved how the stamped background coordinated with the embossed one and the focal image.  A tiny detail that I think made a big impact was Joy's shading here and there on her background stamp, just enough to make it a part of the design.  So I used those elements, but different supplies and colors, with a Scribble Flowers theme instead.  All of my supplies except the sentiment are retired.  But it's a "joy" to pull out these oldies and show them some love once again.  

Thank you, Joy, for your beautiful inspiration!

Friday, March 14, 2025

Blooming Circle

 Today I brought out a favorite Simon Says Stamp floral wreath die that is still current to make my card. 


supplies: white, black, and Surf Blue cardstock, Simon Blooming Circle die, Tri-Blend markers to color, Lawn Fawn Fancy Scallop Rectangle die, Spellbinders (retired) Pocketful of Spring die

This wreath die cuts out the flowers and leaves, so I cut it first from an A2 panel, saving all the bits and pieces that fell out, then cut that panel with the fancy scallop rectangle.  I used my markers to color in all the pieces in rainbow order, then reinserted them back into the design.  I toyed with adding a bow, but didn't want to cover up any of the colors, so I kept things clean and simple and added only this little die-cut sentiment.  

This card makes me happy - hope it does the same for you!  Thanks for coming by today!

Saturday, February 22, 2025

Nature's Blooms

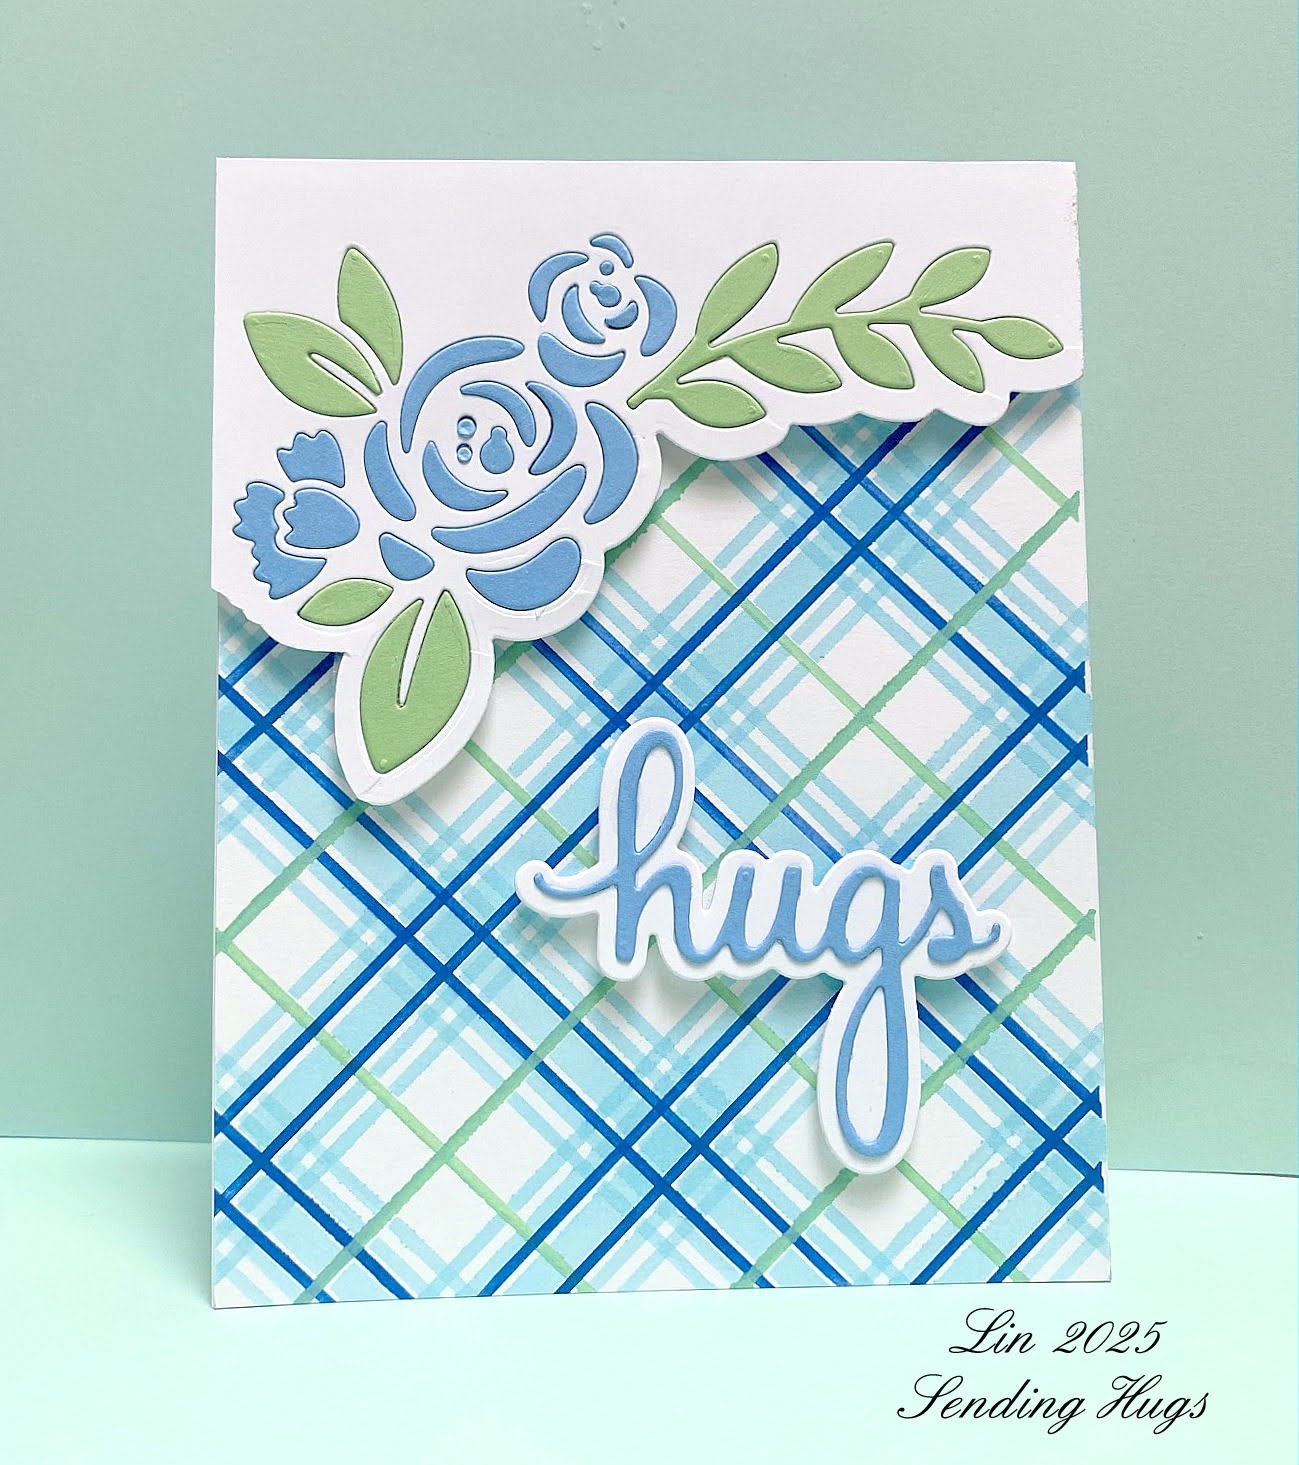
 I recently got a new die from Papertrey Ink called Nature's Blooms Elegant Edges.  Here are  some cards I made with it.


supplies: white, blue, and green cardstock, PTI Elegant Edges: Nature's Blooms dies, The Greetery Tartan Builder Diagonal stencils, tumbled glass, cracked pistachio and prize ribbon distress inks, Pink Fresh Studio Phrase Builder Sending sentiment dies

The plaid panel was already stencilled and in my scrap basket, so I just had to find some cardstock to match the colors and a sentiment.  I really liked using a plaid with these dies as I saw Brenda Noelke do when they were introduced at the end of December.

I wonder when they'll figure out how to make a blue rose?  I'll be the first in line to have one!

Next I matched it up with an embossing folder.


supplies: pink and white cardstock, PTI Elegant Edges: Nature's Blooms dies, Tim Holtz (retired) Roses embossing folder, Simon Sending Smiles die

I used the edging die to cut an extra piece of pink cardstock to line the white detailed panel, which was then put atop the embossed roses panel with a large sentiment die. and the negative die-cut of the long leafy sprig.

And one more, because I like mixing stripes with florals, and I had to have some yellow roses.

supplies: white, yellow, green cardstock, unknown green stripe patterned paper, PTI Elegant Edges Nature's Blooms dies, Spellbinders A Little Hello Sentiments stamp/die set 

Thanks for hanging with me for this long post today - have a good one!

Monday, November 6, 2023

Spellbinders November Club Kits: Large and Small Dies, Embossing Folder, Clear Stamps and Dies, and Glimmer Plates

 The November Club Kits are now available!  

I combined several clubs for my cards today.  First up is the Large Dies of the Month: Towering Blooms.  The sentiment is one of the set from this month's Glimmer Kit, All You Need Sentiments.


supplies: white, bright yellow, green, and black cardstock, Towering Blooms dies, All You Need Sentiments foiling plate and die, black glimmer foil

This is such a unique design that I followed the example that was shown. There are 3 large words included that can be die-cut, but instead I used a foiled sentiment from this month's Glimmer Kit, which is a large selection of sentiments and a multi-banner die to cut them out separately.  I used black foil for this sentiment.

The Small Dies of the Month are called Build a Card Hello, and I combined them with the embossing folder of the month, Meandering Floral. On these, I did not follow the sample given, as there are enough dies in this set to make multiple designs. The floral motifs in this set worked nicely for paper-piecing, which I enjoy doing.  


supplies: white, greens, pink, and blue cardstock, Build a Card floral spray and sentiment dies, another of the foiled All You Need Sentiments, pink glimmer foilMeandering Floral embossing folder 

I cut the large motif from white card, then glued it onto a panel of pale green.  Then I cut the flowers and larger leaves from pink and green card and inlaid them back into the design.  There is a separate die to cut the tiny blue flowers.  I thought this design was close to the embossing folder design, so I paired them together for this card, and added another of the foiled sentiments, in pink this time, along with the Hello included in the Small Dies kit.

My last card uses the Meandering Floral embossing folder, and a sentiment made from the stamp and dies of the month club, called Sending Sentiments.  I like the font on these this month!


supplies: white cardstock, vellum, Meandering Floral embossing folder, kitsch flamingo, picked raspberry, spiced marmalade, and mustard seed distress inks, blending brush, white pigment ink, Sending Sentiments clear stamp and die of the month, clear ink and white embossing powder

I ink-blended some distress inks, then embossed that panel, highlighted with white pigment ink, then just added my sentiment stamped on vellum.

You can look HERE for information on Spellbinders Clubs.  Each is available only from the 6th until the 27th of each month.  If you click on my links under each card, you can see the specifics of each product.  You can subscribe to the kits separately, but there are also lots of ways to combine several of them (scroll down and look under Value Clubs).  And you can "unjoin" a subscription at any time without any penalty.


Friday, January 13, 2023

Yana's Anemones

 Yana Smakula has a really lovely new collection that just released a few days ago - it's called Anemone Blooms, and it is amazing!

Today I have some cards that  use her Anemone dies and matching sentiment dies from this collection.  I wasn't familiar with this kind of anemone, so I looked it up and found pictures that suggested it comes in white, red, purple, and bright pink.  

For my first card I used all colored foils for all my die-cutting.


supplies: white cardstock, lavender, sage green, and gold foil cardstock, Yana's Anemone dies and Wonderful Script Sentiments dies, microdot adhesive

My sentiment is just 1 of 4 different ones, and there are shadow dies to match each.  I used microdot adhesive to adhere the floral outline and the sentiment, and glue to inlay the flower parts right onto my card base.

Here's a 2nd version.  This time I cut everything from ivory cardstock and watercolored in the details.


supplies: white, black, and ivory cardstock, Yana's Anemone dies and Wonderful Script Sentiment die, Zig watercolor markers and water, microdot adhesive

I'm really pleased with how this one turned out!  I intentionally used an ivory as my background and white for my card base.  This time I stuck to the script and gave the flowers black centers, as they all had when I looked them up.  That tied in nicely with my black sentiment.

Stay tuned.....I'll be back soon with some cards using Yana's Glimmer Anemones!

Sunday, June 19, 2022

Bless You

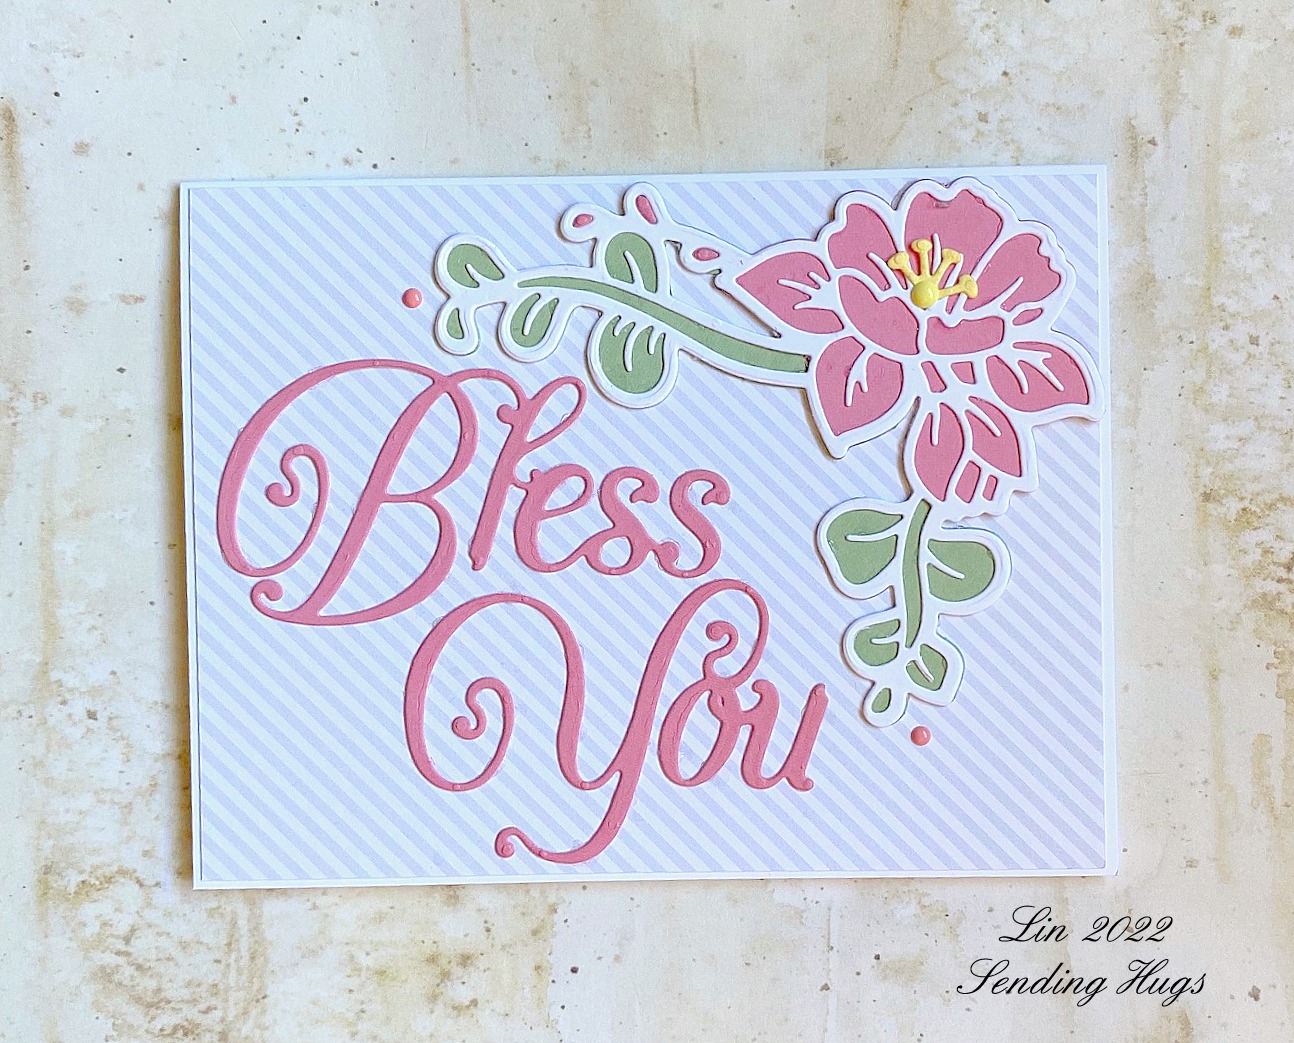
 Here's a card made with a set of Becca Feeken dies that were released last week - her collection is called The Right Words.


supplies: white, pink, green, and pale yellow cardstock, pale grey striped patterned paper, You Are a Blessing dies

This die set includes what you see, plus a few other words/parts of words to build around "Bless".  Isn't the font lovely?  

Many thanks to Spellbinders for sending me this new set to play with!  

Monday, April 11, 2022

Some Easter Cards

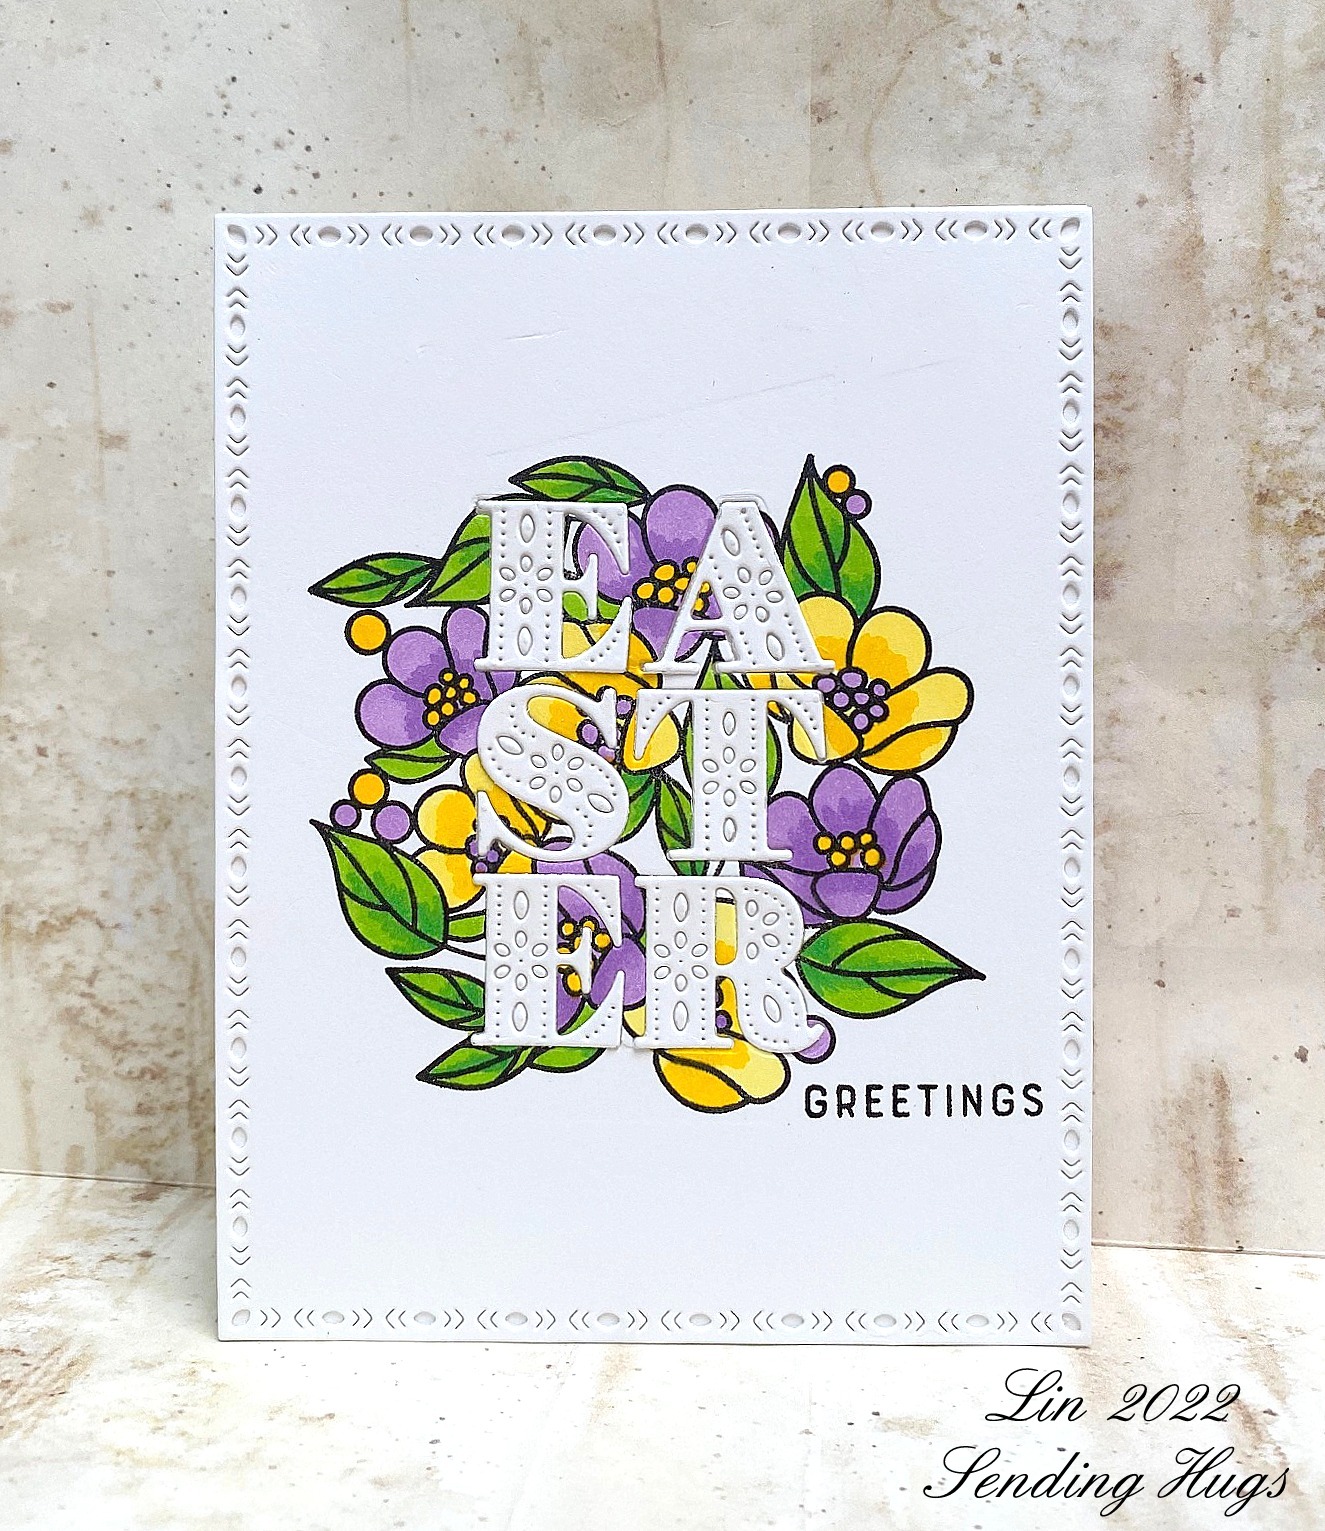
 Happy Monday!  I have a pretty little Easter die that I haven't used nearly enough, so today I pulled it out and made 2 cards.


supplies: white cardstock, Simon's Center Cut Flowers cling stamp, markers to color, The Greetery Easter Jubilee Easter die and stamped sentiment, Pink Fresh Studio Folk Edge Rectangle die

I centered and stamped the floral circle on white card, then colored it with markers. Next I centered the Easter die and cut it from that panel.  Separately, I cut the word again from a white scrap and inlaid it back into the design, then stamped my sentiment.  Then I remembered this Folk Edge Rectangle and used it to border my panel - I think it picks up nicely on the details in the letters.

Next I tried to think of a different way to use this die.  I came up with cutting it from some washi tape and making it into a mini slim-line card - here's the result.


supplies: white and light coral card, The Greetery Easter Jubilee die and stamped sentiment, Pink Fresh Studio Hydrangea and Rose washi tape

There is a large element in this washi tape that is the perfect size to fit the Easter die.  So after cutting out my letters, I affixed them to a skinny rectangle, framed it with coral, and then surrounded it with more of the other florals from the same washi set.  This is one of the washis that have gold line accents, so that added feature makes this even prettier in the flesh!

It's a bit early, but I wish you a lovely Easter!

Tuesday, September 28, 2021

Autumn Blessings

Today's card is full of fall goodness - all the things I think of when you say "autumn"!


supplies: cream card, Spellbinders Falling Leaves embossing folder and Autumn Leaves dies, Simon Autumn Blessings die, distress oxide inks in fall colors

I started by brushing on several fall shades of oxide inks, then trimming the panel and cutting out my sentiment die.  Then I ran the panel through the embossing folder, inlaid the sentiment cut from cream card back into place, and mounted the panel onto a cream card base.  Then I cut and colored 4 leaves and arranged them, popping up 2 of them.

Enjoy your day, thanks for coming by.

Monday, July 19, 2021

My Favorite Things, PinkFresh Studio, and Lawn Fawn

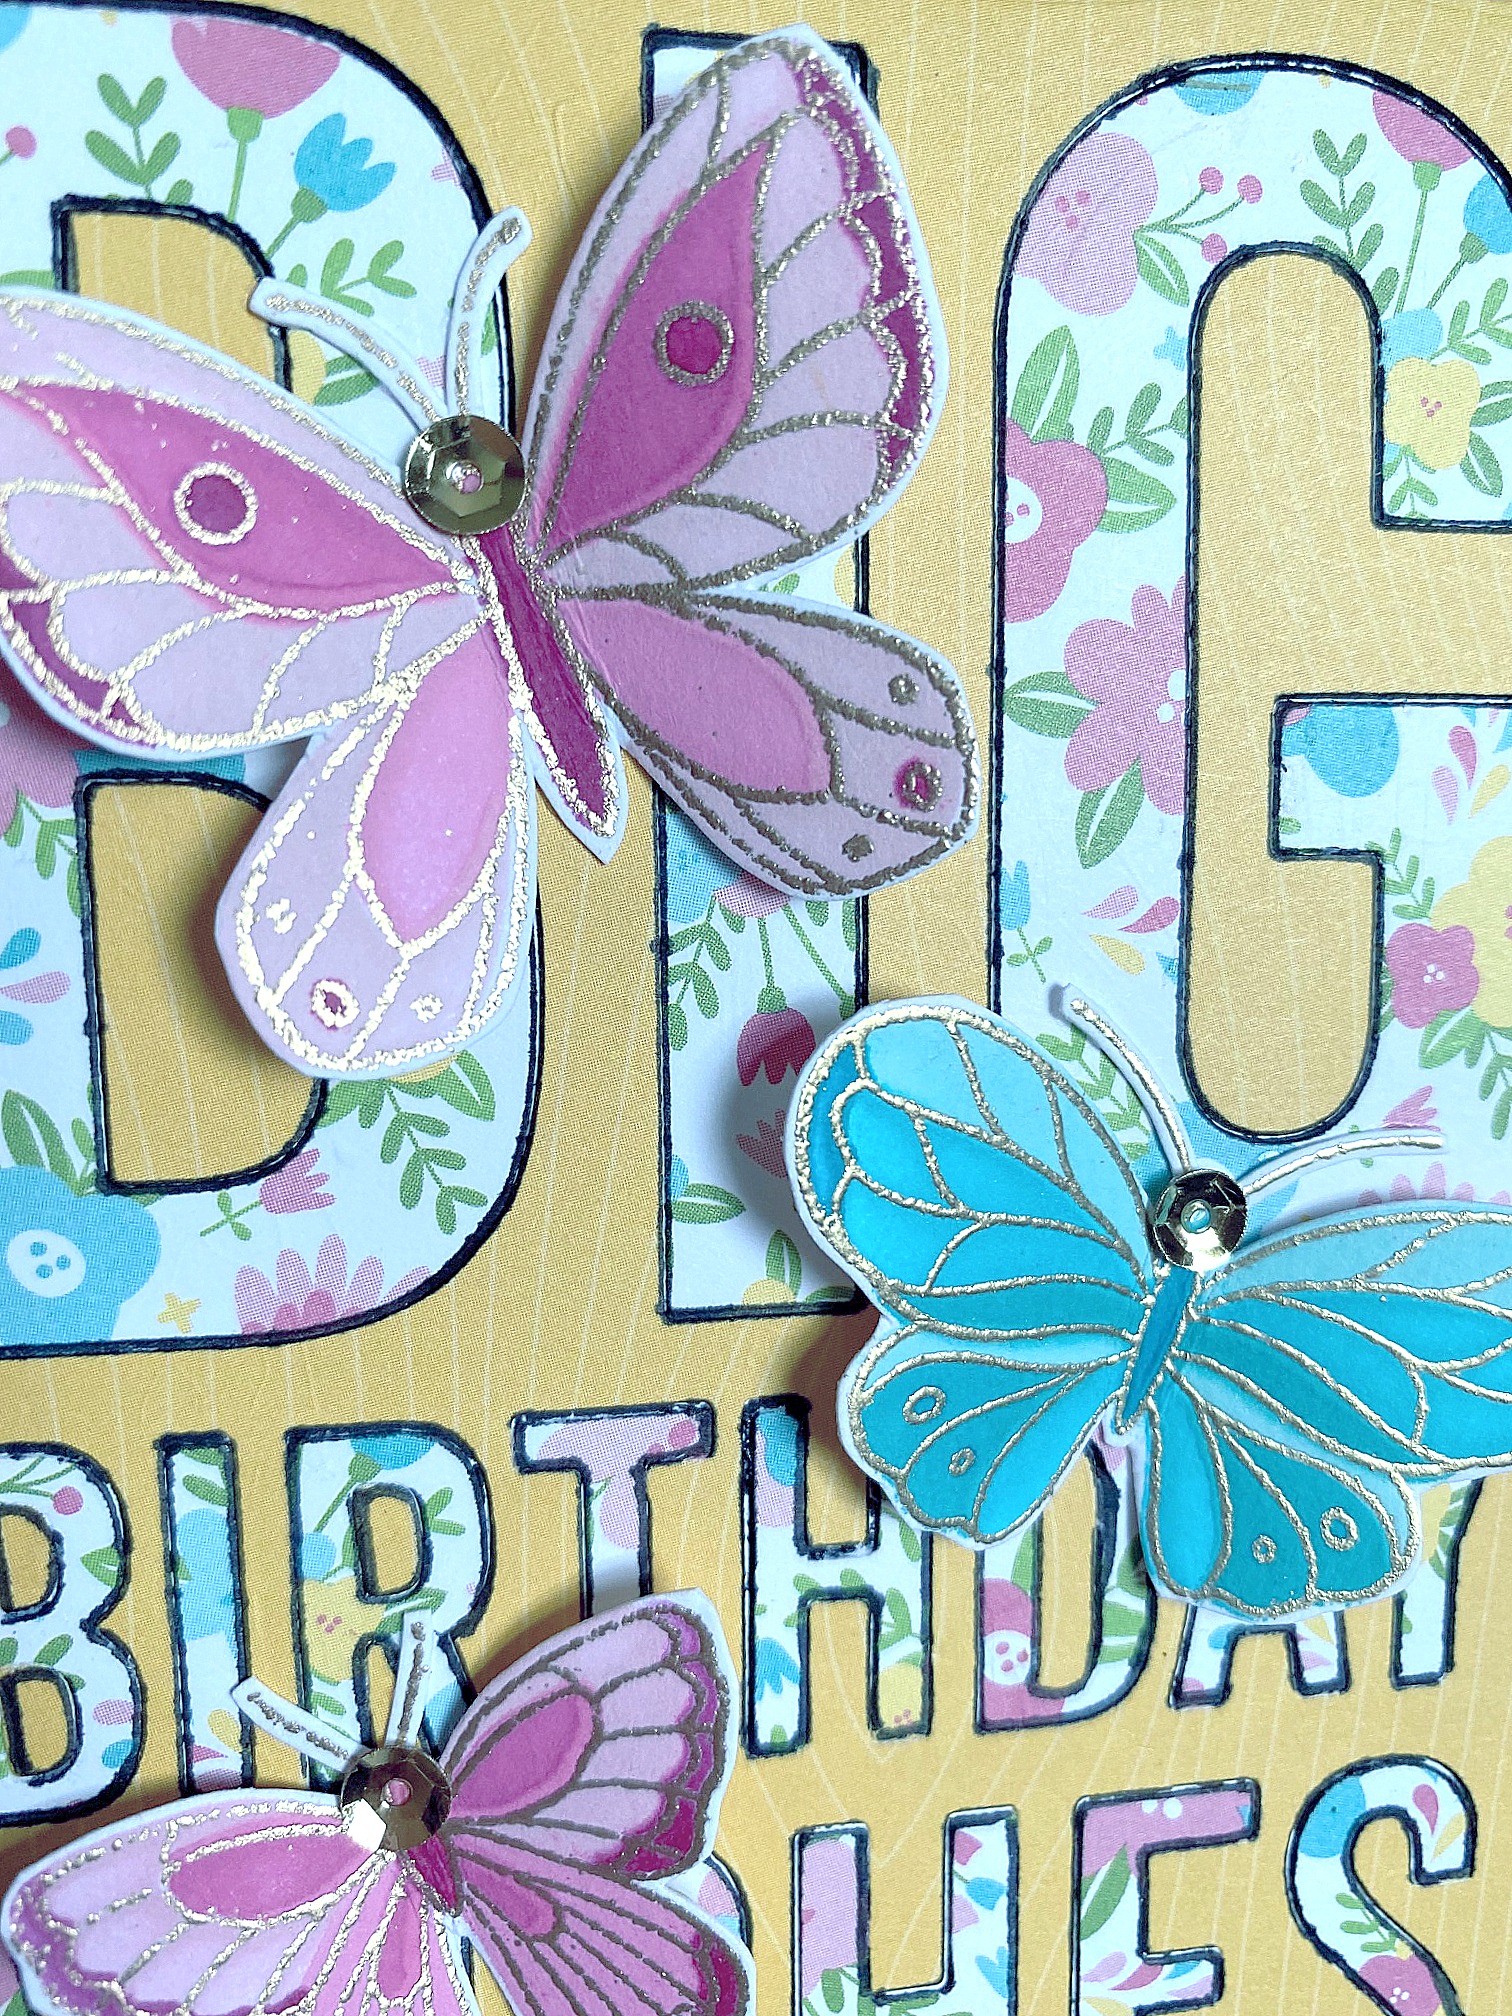
 I recently grabbed the Small Butterflies stamps and stencils that I've been wanting, and used them to  make some birthday cards.  When I use this Big Birthday Wishes die, I always get a two-fer!  You can never have too many birthday cards, right?  


supplies: white cardstock, (retired) Lawn Fawn Spring Fling and Knock on Wood paper pads, MFT Big Birthday Wishes and Wonky Stitched Rectangle dies,  PinkFresh Studio Small Butterflies stamps and matching stencils, gold embossed, Altenew Cherry Blossom and Sweet Dreams mini inks,  black marker to outline, gold sequins

This one uses the letters from the die.  I cut it a 2nd time (giving me a 3-fer!) from yellow woodgrain patterned paper and paper-pieced the floral letters back in.  They just didn't stand out well, so I went back and outlined them with a fine-tip marker - that solved the problem nicely.  Then I added my butterflies, gluing them only in their centers and pulling up their wings for dimension, and adding gold sequins to help bring out their gold embossing.

Here's a closer pic to show the gold embossing on the butterflies a bit better:


Next is the card that uses the negative cut of the big sentiment cut from the floral paper.   I simply added dotty papers from the same pad behind the letters this time, then attached my butterflies.


supplies: white cardstock, (retired) Lawn Fawn Spring Fling patterned papers, MFT Big Birthday Wishes die, PinkFresh Studio Small Butterflies stamps and matching stencils, gold embossed and colored with Altenew Cherry Blossom and Sweet Dreams mini inks

Thanks for stopping by - have a great week!

Friday, April 30, 2021

Spellbinders Stained Glass Bouquet Collection

Becca Feeken has done it again!  Just look at these ornate dies she's created for her latest collection called Stained Glass Bouquet! 

My first card uses the Tulip Trio set of dies.


supplies: black, ivory parchment, and watercolor cardstock, Tulip Trio dies, oxide inks and water, Hero Arts retired sentiment

I thought the best way to achieve a mottled stained glass look was to make my own colors using distress oxide inks.  Each of these colors started with the smooth side of watercolor card, then I sponged on various shades of the color I was going for, spritzed with water, and dried, continually adding droplets of color until I was satisfied.  I'm very pleased with the results.  I saw bleeding hearts in the corners, so I added a little more red to the pinks I had used for my tulips for them.

We've had a need for sympathy cards this spring, and I thought this would work well for that occasion. 

Next up is a set called Deco Bloom, which makes a card just a little less than 5 x 7.


supplies: slate grey, ivory, surf blue, kraft, pale green, 2 pink, and 2 yellow cardstock, Deco Bloom dies, Pink & Main Sent with Love sentiment, adhesive foam squares

This time I used a variety of colored cardstock to bring color to this design.  This die set is made of  dies for the border and the wreath, so you can use just parts of it for other designs, and the roses are separate dies that can be placed anywhere you'd like on this wreath. I chose to adhere them with adhesive foam so that they stand above the rest of the card.

I won't deny that paper-piecing these cards took a little time, but I enjoyed every minute.  These dies cut beautifully.  Thank you, Spellbinders, for sharing these with me!

Sunday, February 21, 2021

Frame Builder Dies

 Today I'm playing with some new-to-me dies.  

e
supplies: white, Lavender and a darker purple cardstock, Doodlebug patterned papers, Pink Fresh Studio Botanical Rectangle Frame Builder die, Simon Miss You sentiment die, Taylored Expressions Rosy Posy embossing folder

This Frame Builder die set is an interesting one - you can either make your frame by cutting the die twice, and spacing it as close or as far away as you want on your card front (see my 2nd card below), or you can cut it once like this, then use the negative of the cut to complete the rectangle.  I inlaid the flower with some tiny Doodlebug patterns: flowers, dots, and gingham, then framed my rectangle in lavender and popped it above an embossed background that mimics the flower.

Here's a closer look at the patterns.


This die set includes this floral corner, and also a leaf corner, so it's a nice value for the money.  You can use either one, or both to make your frame.

Next I made an easy card using the other die twice.


supplies: white cardstock, a patterned paper from Simple Stories Simple Vintage Garden District pad, Pink Fresh Studio Botanical Rectangle Frame Builder, Simon Sending Smiles die

Pink Fresh makes other Botanical Frame Builder dies like these in circle, oval, diamond, or triangle shapes, too!

Thanks for visiting me today - enjoy your day!

Wednesday, September 16, 2020

Simon Says.........No Stamps Allowed


Happy Wednesday - welcome to our challenge at the Simon Says Stamp Wednesday Challenge Blog!


Our theme this week is No Stamps Allowed, and the team is showcasing Spellbinders' products!

For my first card, I chose their lovely Oval Coronet dies.  I love the beautiful filigree details that the designer, Becca Feeken, specializes in!


supplies: white, Surf Blue, Audrey Blue, Lavender, purple, Green Apple, and Green Leaf cardstock, Oval Coronet dies

This die set has 5 dies that can be mixed and matched for different results.  I used all of the dies except the very largest shaped one today.  I cut the most detailed oval die from 6 different colors, and then inlaid them back into the pattern.  That panel was then placed onto an oval of surf blue cardstock, before attaching it to the large white panel cut with the largest die.  Then that panel was attached to an A2 panel of surf blue cardstock.  

I didn't really have a sentiment die that wouldn't cover up this beautiful design, so I opted to leave this as is for the present.  I'll probably add a small stamped sentiment when I use it.

Next I made a card with another die set that was released at Christmas.  This one has a built-in sentiment, I made it into a year-round card by using floral patterned papers for a spring or summer feel. 


supplies: white, Green Leaf, a darker green, and several coral pink cardstocks, Carta Bella Flora #1 patterned paper, Joy die set, enamel dots in deep red

I first embossed the image into a piece of white cardstock, then cut it out from 2 greens.  There is a separate flower die, which I used to cut out the flowers in several shades of coral.  I cut apart the green die-cuts and glued them into place on my embossed panel, then added the flowers.  Finally, I cut out the letters, which are also separate dies, and pieced them back into the design.  I used the same patterned paper as borders after trimming my embossed panel.

Now it's your turn!  We have a $25.00 gift certificate 


to the amazing Simon Says Stamp store for 1 lucky random winner of this week's challenge!  I can't wait to see what you all make this week!


Sunday, September 13, 2020

A Season of Blessings

 I've pulled out all my fall goodies and will be playing with them this month and next.  I always love a fall wreath!

supplies: cream cardstock, Poppy Stamps (retired) Leafy Wreath Collage die, markers to color, Sunny Studio Autumn Greetings sentiment, Winnie & Walter Noelle die (retired), foam to pop up top panel.

I first cut the stitched scallop panel, then the wreath.  After removing the tiny cuts, I added some tape on the back of the panel, sticky side towards the front, then carefully colored and pieced each leaf back into the wreath.  My sentiment is the only new-to-me thing on this card - and it appears to be discontinued already!

The last time I used this stamp was in 2017 - high time to bring it forward again!  

Tuesday, July 7, 2020

A Masculine Card

It's always difficult for me to make a masculine birthday card, but I'm liking how this one turned out!  Love these colors together, and I think they'd please a guy, too!


supplies: kraft, Green AppleGreen LeafSurf BlueAudrey Blue, and Dark Chocolate cardstock, Outline Clustered LeavesTop Edger die, a leafy vines embossing folder

I slotted 2 green cardstock panels together and die-cut the leafy branch, then again in all the other colors.  Then I just pieced everything back together again, embossed the whole thing in a leafy folder, then mounted the trimmed panel on a kraft card base and added my sentiment.

Thanks so much for stopping by today - be safe!

Wednesday, May 6, 2020

Simon Says........Use Dies/Punches


Happy Wednesday - welcome to our challenge at the Simon Says Stamp Wednesday Challenge Blog!


This week we want you to use dies or punches in your creations.  The team is playing with Paper Rose products.

I first saw these Ella's Garden Scribble Roses dies when Shari Carroll had a post on the Simon blog showing them off.  I've always loved scribble flowers, and these come in a nice large size, with lots of leaf variations.  They even have a matching stamp set, which I have on my wishlist. I have 3 cards for you today using the dies.


supplies: white, Green Apple, Green Leaf, and 4 blue cardstock, Ella's Garden Scribble Roses dies, sentiment and leafy sprigs from Hero Arts, silver sequins, adhesive foam squares to pop up arrangement

Here I used my favorite shades of blues and just arranged the flowers and leaves to my liking.  All of the dies I used were cut twice, once from white card and once from a color, then inlaid back into the white outlines. 

Next I used only the smaller outline dies and didn't fill them in.  I was lucky to have some old enamel dots in exactly the right colors to act as the center of each flower.  This card is much busier in design.


supplies: white, black, Green Apple, Green Leaf, yellow, Coral Cream, and Roselle cardstock, Ella's Garden Scribble Roses dies, Sunny Studio Eyelet Lace Frilly Frame die, Altenew Fine Frames die, Simon's Big Hugs die, a tiny leafy sprig die, large enamel dots

Can you stand one more, in the same colors as above?  This one shows a 3rd way to use these dies.


supplies: white, black, coral, peach, pale yellow, Green Apple, and Green Leaf cardstock, Paper Rose Ella's Garden Scribble Roses dies, Sunny Studio Frilly Frames Eyelet Lace die, a Tammy Tutterow sentiment, enamel dots to match flowers

This set comes with detailed dies (which I cut in white only), plus large shaped dies (those I cut in the colors).  Using these together, there's no need for inlaying the details like I did on the first card, and therefore makes for a really fast card when you need one!  And these are extra large, so you won't need much else except a sentiment; they fill an A2 card nicely!  

As you may know, the Simon Says Stamp store is accepting new orders, but will have longer shipping times, due to the Covid-19 pandemic.  With this in mind, we have made the difficult decision to suspend our prize gift cards for now.  But we will continue our challenges each week, and we'd love for you to play along with us.  We're all in this together!


Friday, April 24, 2020

Sunny Days Ahead Blog Hop, Day 1

Simon Says Stamp has released a new bevy of products, called Sunny Days Ahead!  I'm thrilled to be participating in the first of 2 days of blog hops to show off all the new goodies!


You should have arrived here from Bobby Lemanski'blog.  If you have just happened upon me today and want to start the hop from the beginning, go to the Simon Says Stamp blog to start.  We'll be giving away a $25.00 coupon at every stop on the hop, so don't forget to leave a comment!  The winners will be announced at the Simon Says Stamp Store Blog next Wednesday, April 29.

Today I have 4 cards, 3 of them featuring the new Stylized Tulips die and 1 card using the CZ Design Extra Large Congrats die.

One of the prettiest spring plantings I've seen prominently featured pale pink and yellow tulips.  This first card is inspired by that garden.


supplies: white, Surf Blue, Cotton Candy, Green Leaf and a pale yellow cardstock, Stylized Tulips and Thanks dies, adhesive foam strips

I popped the pink tulip up and paper-pieced the sentiment in the same colors that I used for my flowers.

Next up, I used some subtle prints to piece my tulip in brighter colors.


supplies: white and black cardstock, various Doodlebug patterned papers, Stylized Tulips die, 4 Seasons die and sentiment

And lastly, I added some shading with oxide inks and colored pencils before piecing them back together for this one full of warm sunshine.


supplies: white, yellow, and Green Leaf cardstock, MFT gingham dp, Stylized Tulips and Painted Hello dies, mustard seed and mowed lawn oxide inks with pencil shading

And finally, I have a card using the new  CZ Design Extra Large Congrats die; I decided to use it for a wedding card, using the colors from the invitation we received.


supplies: eggshell cardstock, Simon CZ Design Extra Large Congrats and Elegant Roses dies, stamped sentiment from Floral Bliss,  (retired) Modern Rose Blooms cling stamp, broken tumbled glass oxide ink, a off-white enamel dot, foam squares to lift up rose

This card started with a white-embossed panel of Modern Rose Blooms.  Next I sponged on some tumbled glass oxide ink.  I die-cut the big word from it, and 4 others from eggshell and glued them together, then attached them back into place.  Then I added an Elegant Rose to mimic the background, and a stamped sentiment.

Don't forget to come back tomorrow for Day 2 of this Blog Hop.  Again, it will begin at the Simon Says Stamp blog.  Don't forget that each stop on both days will be offering a $25.00 coupon to the store for a random commenter, and if you buy anything on either of these 2 days, you can also get a free gift!  Use the code sssink to get a free Intense Black ink pad (see the banner at the top of this post to see it).

You'll be glad to know that the Simon Says Stamp store is shipping again!  For more information, you can watch this video.

Click HERE for all the new goodies, and for more inspiration, don't forget to visit our Sunny Days Ahead gallery.

Thanks so much for coming by today.  Here's today's Hop Order.