Showing posts with label aqua. Show all posts

Wednesday, May 28, 2025

Woodblock Wednesday!

 Here's my card for Amy's Woodblock Wednesday.  This month I was inspired by a place that we've been going to for walks.  It was formerly a 36-hole golf course, but when the parents retired and the kids weren't interested in continuing the business, the family donated most of it to the local park systems here!  All last year we enjoyed watching the trees and wildflowers develop and grow.  Now this spring we'll start all over again!  

I chose this Hero Arts Design Block called Silhouette.  It's dated 2008.  I've always stamped it in black or white to make a true silhouette, but today I used some oxide inks in the colors of new spring growth.


supplies: white and jade cardstock, Hero Arts DesignBlock Silhouette, salvaged patina, cracked pistachio, mermaid lagoon, and lucky clover oxide inks, sentiment from Simon Brushed Flowers, some punched butterflies

I randomly applied the 4 colors of oxide ink to the stamp.  Then I cut the panel down into smaller
sections and matted them with jade cardstock.  Here's a picture of just the card.


You can see more entries at Amy's blog HERE.  


Sunday, May 25, 2025

Just a Note

 I've used this sketch before, but with all stamping.  Today I thought I'd play with a favorite floral layering die set.


supplies: white, shades of aqua, yellow, and green cardstock, Altenew Mini Flower Cluster dies, The Greetery Opposites Attract sentiment, Lil Inker (retired) Circles and Diamond Stitched Pattern cover plate

After assembling my floral cluster, I trimmed down some white cardstock and stamped my sentiment, then used the cover plate over that.  Then I matted the panel, attached it to my card base, and added the flowers.  

These posies have always made me think of flowering fruit trees, but today I chose to make them blue.

Can you believe June is almost here?!  It's still on the chilly side here, and my husband thought we had a light frost a few nights ago!  Still, I'd rather this than the dive into summer temps we've had some years.  We are enjoying a nice slow unfolding of our gardens this year.

Wednesday, August 14, 2024

Four Seasons Winter

 Spellbinders has released an exclusive collection called All Seasons.  It consists of a set of dies and shadow dies of the names of the four seasons, plus 4 press plates sets with smaller sentiments for each season.  Today I'm using the Winter ones.


supplies: white, aqua, and silver glitter cardstock, various strips of aqua/snowflake patterned papers, Four Seasons dies, All Seasons Winter betterpress plate and die set, teal glimmer hot foil, various small snowflake dies

I cut my paper scraps into strips, and then used them to cover an A2 panel, leaving a tiny border between the strips.  Then I simply foiled the press plate sentiment, cut out the large word dies and some snowflakes, and put everything together. 

I'll share some of the other seasons with you soon!  Thanks for stopping by!

Sunday, June 16, 2024

Be Fearless

 I haven't had anything new from Pink Fresh Studio in awhile, so after their latest release, I grabbed a new stamp and stencil combo and a set of peach inks.


supplies: white and Peach Sorbet cardstock, Pink Fresh Studio Be Fearless stamps and matching stencils, Chasing Sunset and Forest Glades mini inks, blending brushes, (retired) Paper Smooches Fab Frames die, sentiment from Mama Elephant Paola's Wishes, Peach Blush gems

This peach and sage combination is cooling to me today, as it's humid here.  After stamping and stencilling my flowers, I fussy-cut them out, which is a calming thing for me, too.  Of course, if you're not into that, Pink Fresh always obliges with matching dies!

Here's another design switching up to a cool aqua.


supplies: white and aqua cardstock, Be Fearless stamps and matching stencils, Morning Sky and Lime mini ink cubes, blending brushes, sentiment from (retired) Simon Says Stamp Summer Garden, Spellbinders Floral embossing folder, Capri Blue gems, adhesive foam squares

I used just 2 of the floral sprigs this time, with an extra bunch of leaves at the very bottom.

Hope you're enjoying your weekend - thank you for stopping by!

Tuesday, May 28, 2024

Lisa Horton Spotlight Frames and Florals Collection

There's another fun new release at Spellbinders, this one designed by Lisa Horton!  I chose 3 different die sets and here's what I made.


supplies: white, 4 shades of aqua, and green cardstock, Woven Lattice Texture die, Layered Anemone dies, A Little Hello Sentiments stamp/die set

I'm so pleased with the Woven Lattice die and the Hello dies!  The lattice will make a wonderful background for all kinds of cards, and the big hello can be broken apart and used singly, doubly, or triply (is that a word???) like I used it today - love the font, too!  It also includes a set of 7 small sub-sentiment stamps that will make it even more versatile!  As I'm writing this post, it is already sold out, but that just means it will be back asap - put it in your wishlist at Spellbinders.

Thank you for coming by today - I hope it's a good one for you!

Monday, April 8, 2024

A Birthday Card

 I need a birthday card soon, and remembered this Simon stamp set from a card kit - I liked the sentiment stamp that could be colored in, so that's where I started.  Since this is for a man, I kept my colors on the cool side, and liked the idea of adding a leafy embossed background.


supplies: white, Audrey Blue, and green cardstock, Simon Let's Celebrate stamps, markers to color, Spellbinders Branching Out embossing folder, swiped with teal and green inks

Since "Happy Birthday" is the theme over at the Simon Wednesday Challenge, I'll be entering this card there.  It's their 15th birthday!

Thanks for stopping by - will you be watching for the eclipse today?  We're in a good area for watching, except that at this time of year, getting a clear day is not something I'd expect, so time will tell!

Sunday, January 28, 2024

Spring Hugs

Here's a card using the Petal Pusher stand-alone floral dies from the Greetery,  paired with a heart splatter stamp and a die-cut sentiment.


supplies: white, Green Apple, purple, dark aqua, and black cardstock, The Greetery Petal Pusher Blooms dies, unknown Hugs die, Your Next Stamp Mini Heart Ink Splatter, Altenew Ocean Waves and Hydrangea inks, (retired) Winnie & Walter Noelle Scalloped Rectangle die, adhesive foam squares

I like this combination of aqua and purple with a bright green.  And it was fun to pull out the heart splatter stamp and the Scalloped Rectangle die to give them some love!

Once again, thanks so much for coming by today.

Friday, November 10, 2023

Kaleidoscope Arch Collection

 I was pleased to receive a stamp set and a die set from the new Kaleidoscope Arch Collection, and I made 2 cards with them!


supplies: cream, 2 peaches, yellow, and sage green cardstock, Kaleidoscope Arch dies and Kaleidoscope Sentiments stamps, Flower Frenzy 3D embossing folder

I used 2 of the arch dies, the flower and leaf dies, and one of the large sentiments from the stamp set, along with a stamped banner sentiment, arranged, and placed over my favorite floral embossed background.  I really like the way the large sentiments fit into the arches!  There's another one, too, that says "Thanks So Much", plus 2 other smaller supporting sentiments to fit on the banner. 

On the 2nd card, I used only the dies.


supplies: white, blues, aquas, purples, and green cardstock, Kaleidoscope Arch dies

As you can see, there's 1 stitching die included in this set, which can be added to the main arch, and there's also a die-cut sentiment: "From Me to You".  Since I did my first card in warm colors, this one got cool ones.

The collection also includes a new stencil and a press plate, so do be sure to check them out, also.

Let's enter both these cards into Simon's Wednesday Challenge: Thinking of You!

Thanks for visiting today - hope your day is a crafty one!

Wednesday, November 1, 2023

Mixing It Up!

 I realized that the Spellbinders Sealed floral and leafy sprigs would be a great match for Papertrey Ink's Tuck It stamps and dies, so last month when there was a great sale at Spellbinders, I scooped up a couple of the older Sealed sets and had a play.


supplies: white, Audrey Blue, and Green Apple cardstock, Spellbinders Sealed Blooms dies and Flower Frenzy 3D embossing folder, PTI Tuck It die and dotted scallop stamp, Clearly Besotted sentiment from Sweet Little Sentiments

I think it's so charming that you can "tuck" flowers into a sentiment that is partially die-cut; kind of like making your own little nosegay for someone!  I've used this set before - see HERE and HERE for some more ideas.  I like that these new Sealed products are etched with details, and I'll be watching for more sets that can be mixed and matched with the ones I already have, so that a bigger bouquet can be built.

Thanks for stopping by - enjoy your day!

Tuesday, October 17, 2023

Tim Holtz Big Tidings

I loved all of Tim's new Christmas dies from Sizzix this year!  This set of Big Tidings is the first of them to come home with me, and I made a card with each of the big words, first in traditional colors and a woodsy theme.


supplies: cream, Lipstick Red, and green cardstock, woodgrain and buffalo plaid patterned papers, Big Tidings (word, shadow, and bow), Mini Holiday Greens (pine sprigs), and Funky Festive (berry sprigs) dies, sentiment sticker from Idea-ology Christmas 2023 sticker book

And the second is in frosty cool colors.


supplies: white, glitter white, 2 shades of aqua cardstock, Tim Holtz Big Tidings Noel and star dies, Plaid stencil, sentiment from his collaboration with Simon Says Stamp in 2013, pine needles distress ink, a retired snowflake folder

I really liked the effect that stencilling on the words has - got that idea from several of Tim's Makers when this set was first introduced last month.

So many wonderful possibilites with this new set of dies!  

Wednesday, July 19, 2023

Jubilee

 Here's a new embossing folder/die set from Simon Says Stamp - couldn't wait to get one, and it does NOT disappoint!  I made 2 cards with it.


supplies: white and Audrey Blue cardstock, Jubilee embossing folder set, white pigment ink, aquagreen, and yellow tri-blend markers, sentiment from Mama Elephant Paola's Wishes

And a lavender version.


supplies: white and Lavender cardstock, Jubilee embossing folder set, white pigment ink, purplegreen, and yellow tri-blend markers, sentiment from Mama Elephant Paola's Wishes

For both cards, I first cut out the floral label, then embossed it and colored in the details with markers.  Then I embossed the folder on colored cardstock, swiping that panel with white pigment ink, then mounting it onto a white card base and finally adding the square label.

Can't you see a whole set of these in different colors and sentiments?  

Thank you so much for stopping by today - hope your weekend is a great one!

Friday, February 24, 2023

Winter Blues

Can you stand another card using these Antique Rose stamps?   I had stamped them in various colors, but never used these aqua ones, so I decided to do a monochromatic version.


supplies: white, and aqua foil cardstock, dotty dp from Whimsy Stamps Mix n Match 2 paper pad, Altenew Antique Roses stamps, Sweet Dreams and Green Valley inks, Fine Frames die, foiled sentiment from Birch Press Design Sugar Script Hot Foil Plate and Die set, teal glimmer foil, adhesive foam

I started with this paper with a mix of different sizes and shades of aqua dots.  Then I cut some fine frames from aqua metallic cardstock next, to reinforce my foiled sentiment, then arranged my florals and sentiment and popped them above everything. 

I didn't think of it until after I'd named my post for today, but those dots do look a bit like falling snow!  

Thanks for stopping by - have a good day!

Friday, January 6, 2023

Spellbinders January Clubs: Stitching Die Kit and Glimmer Hot Foil Kit

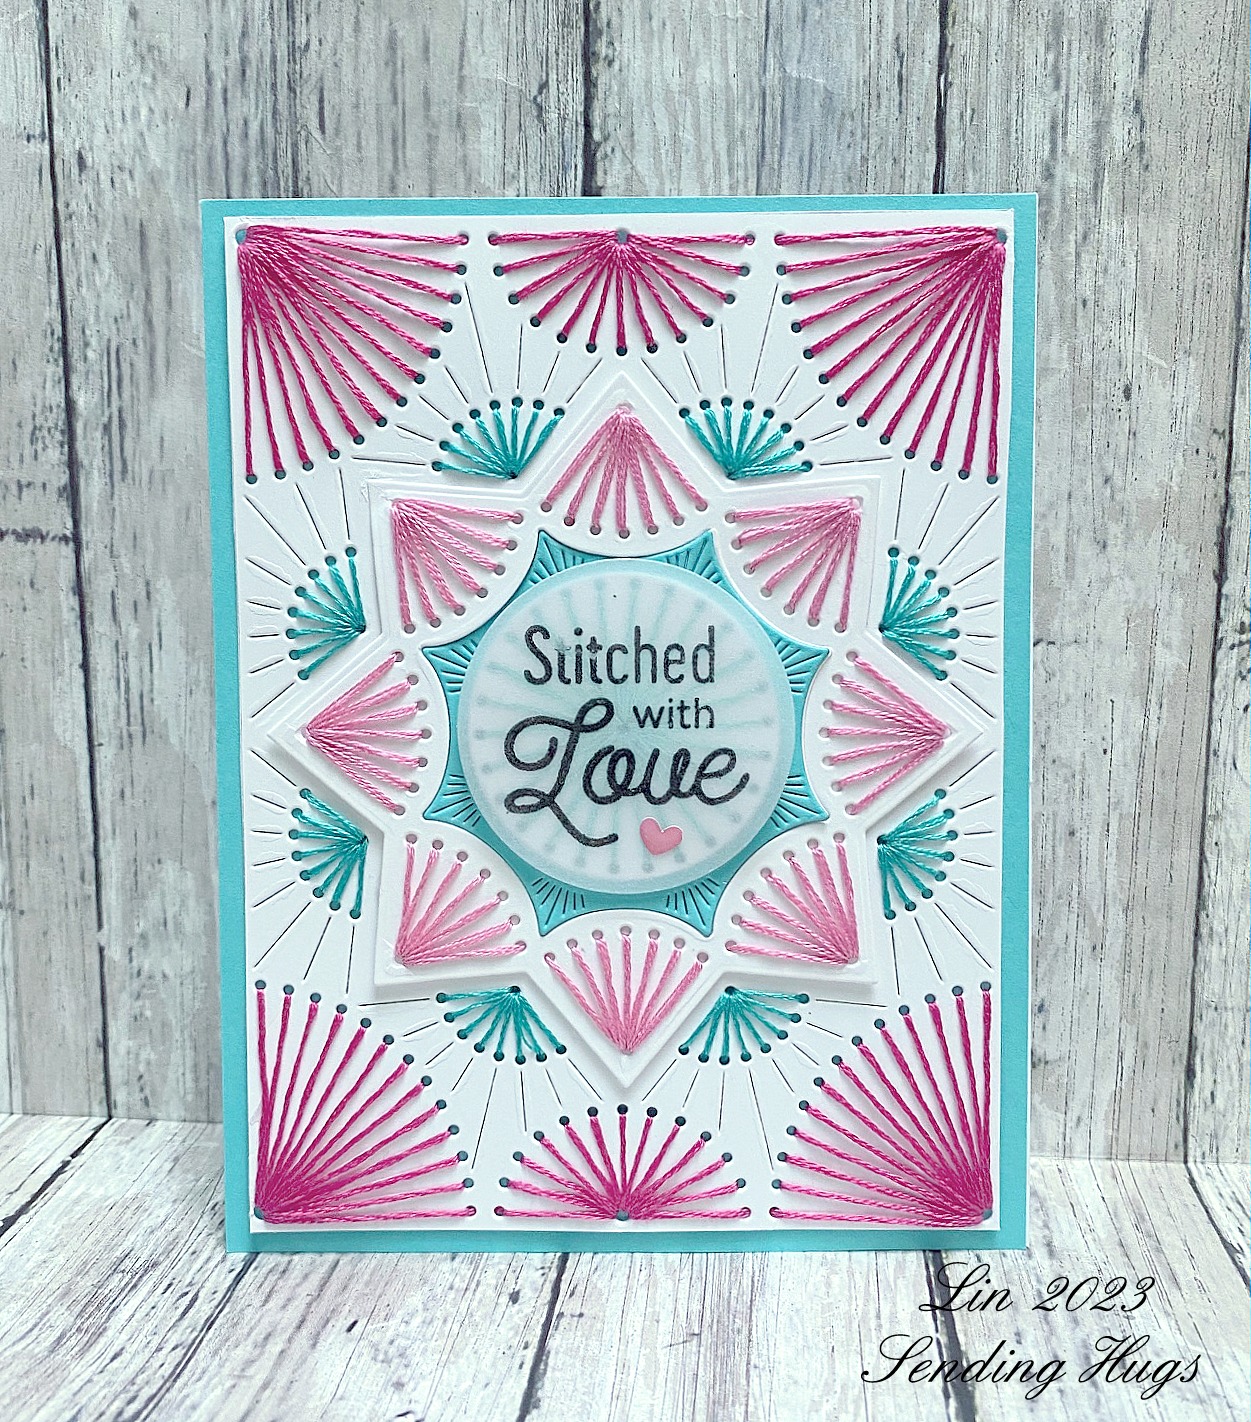
Today I have 2 more January Club Kits to show you!  I'm excited to share with you that we'll now have a Stitching Die Club each month!!  My first card features the Stitching kit for January, called Nested Stitched Burst.  There is also a matching set of clear stamps that you can get: Sentimental Greetings, which covers a nice range of occasions.


suppllies: white and Audrey Blue cardstock, vellum, Nested Stitched Burst stitching dies, 2 pink and an aqua embroidery floss, 3 threads, Sentimental Greetings sentiment, tiny heart enamel dot

This stitching set consists of 3 stitching dies and 2 cutting dies, and I used all of them this time.  As always, I really enjoyed choosing the colors and doing the stitching.  You can either do a stamped circle with a sentiment in the center, or a stitched one - I did both, stamping on vellum so that the stitching shows through a bit.

Edited to add: the kit has sold out for this month - be sure to be there on Feb 1 when the next one arrives!

My last card features the Glimmer Hot Foil Kit: Flower Delivery.  Isn't it fun?


supplies: white and Audrey Blue cardstock, January Glimmer Kit Flower Delivery, Teal and Black glimmer hot foil, foiled sentiment from  Anytime Glimmer Sentiments, tiny aqua gems for flower centers

This kit truly did make me smile (thus the sentiment I chose) because I learned to drive on a stick-shift pale blue VW Bug!  And what fun to include this little spray of flowers for it to wear on its roof!  I foiled it in black and then colored it before cutting it out with its matching die.  The car has matching dies, too, along with a tag die and some teensy words to foil inside.

You can look HERE for information on Spellbinders Clubs.  Each is available only until January 28.  If you click on my links under each card, you can see the details of each kit.

Monday, August 1, 2022

Spellbinders Glimmer of the Month Kit for August: Illustrated Floral and Solid

 This month's kit is exciting to me because we get a pretty spray of flowers and matching die, a solid oval glimmer plate, and 2 sentiments that can be foiled, with dies to cut them out.  Here are my 2 cards using these new supplies, and black foil.


Did you know that you can get black foil?  That's useful for floral sprays like this that you want to be the center of your design; see my 2nd card.  This foil is not as metallic as most others, but it is shiny, so it's still a nice option for our foiling.

So for this card, I foiled the spray and one of the sentiments with black foil.  I set aside the floral image that resulted for my 2nd card, and placed the "used" black foil over the oval foiling plate and foiled again.  That foiled panel was trimmed to a smaller rectangle, matted in black, then placed onto the floral print background, along with the foiled sentiment which I trimmed out with its matching die.

For my 2nd card, I used the matching floral die to cut out the previously foiled floral spray and colored it with markers.  That was attached to a pretty lacey oval and then adhered to my card base which was inked in an oval shape.  To finish I just added a fussy-cut stamped sentiment.


supplies: white cardstock, August Glimmer of the Month floral spray, matching die, and black foil, Picot Petite Oval die, a retired sentiment from Tammy Tutterow's Tiny Sentiments

You can find all the information you'll need HERE to get this fun kit for yourself.  You'll have until August 28 to join the club, and you can "unjoin" at any time!  And don't forget that each month you'll also get a roll of glimmer foil!

Thanks for stopping by today - beginning of a new week AND a new month!  Enjoy!

Thursday, July 7, 2022

Some Floral Wreaths

 I finally brought home this Lawn Fawn Floral Wreath die after seeing my teammate Karin's cards recently, and have been having a ball playing with it.  I like it because it lends itself to straight coloring, but there are additional dies so that you can paper-piece it, also.

I have 2 cards for you today.  First is the paper-pieced version.


supplies: white, Green Apple, aquas from Memory Box Fresh Aqua Collection pad, retired My Favorite Things Tiny Check paper pad, Lawn Fawn Floral Wreath dies and Fancy Scalloped Rectangle die, sentiment from Simon Garden Greetings, Aqualicious ink, aqua pearls

Next I cut the wreath from white cardstock and used my markers to color in the details.  I liked these colors against cream, and added some texture with a subtle cover die which repeats the circle theme.


supplies: Cream cardstock, Lawn Fawn Floral Wreath, Simon Detail Ringlet cover plate and Bold Hello die

I have 4 other already-colored wreaths finished, so you'll be seeing more of this soon!

Thanks for stopping by!

Friday, May 13, 2022

Blue Roses

 I haven't played with these lovely multi-layered stamps in quite awhile.  Today is the day!


supplies: Audrey Blue and white card, Altenew Antique Roses stamps, Sweet Dreams and Green Meadow inks, Maker's Movement/Tammy Tutterow Sweet Petite Sentiment, Sunny Studio Frilly Frames Lattice dies, adhesive foam squares

These layering stamps are pretty easy to line up, and also to fussy-cut when they're finished.  I also did the same with the sentiment.  They would look lovely in any color, but today I was in a blue mood.

Happy Friday - hope your weekend is a great one!  Thanks for stopping by!

Wednesday, October 27, 2021

Simon Says.......Anything Goes


Happy Wednesday - welcome to our challenge at the Simon Says Stamp Wednesday Challenge Blog!


Our theme, since it's the last of the month, is Anything Goes, and the team is showcasing Impression Obsession products.  IO has lots of really nice sentiment stamps, and I chose one of them for my card for you today.


supplies: white, Audrey Blue, Peacock, Lipstick Red, Schoolhouse Red, kraft, and black card, Impression Obsession Little Things cling stamp, Spellbinders Sweet Birds on a Branch dies, MFT Wonky Stitched Rectangle die, heart sprinkles

These "little things" certainly make me smile!  Hope they do the same for you.  I added in some tiny enamel hearts in the places that the sentiment had them, and did some minimal coloring where I could on it.  

Now it's your turn!  We have a $25.00 gift certificate 


to the amazing Simon Says Stamp store for 1 lucky random winner of this week's challenge!  I can't wait to see what you all make this week!

Wednesday, September 15, 2021

Simon Says.......Lots of Layers


Happy Wednesday - welcome to our challenge at the Simon Says Stamp Wednesday Challenge blog!


This week our theme is "Lots of Layers", and the team is highlighting Penny Black goodies. I used an old favorite set of nesting dies and ended up with 7 layers!


supplies: white cardstock, plaid patterned paper, Penny Black Stitched Stackers dies, Simon Blooming Meadow stamps and matching dies, PinkFresh Studio Perfect Sentiments stamp and matching die, enamel hearts, adhesive foam squares

I cut 2 sizes of the stitched stackers, matting each in a plaid paper. Then I stamped my flowers and leaves, pulling the colors from the plaid, and cut them out to make 2 arrangements.  After planning my placement, I popped up the smallest rectangle and added a spray of flowers on top, along with a sentiment, and a smaller spray underneath it.

Now it's your turn!  We have a $25.00 gift certificate 


to the amazing Simon Says Stamp store for 1 lucky random winner of this week's challenge!  I can't wait to see what you all make this week!


Monday, August 30, 2021

An Elegant Snowflake?

I have another card to share with you that uses new dies from Spellbinders/Becca Feeken.  She has a new holiday collection out called Holiday Medley, and I used her All is Calm dies to make a glitzy snowflake card.


supplies: white and Audrey Blue card, silver mirror card, Spellbinders All is Calm dies (includes 2 sentiments), a snowflake embossing folder, silver and aqua pearls

When I think of Becca, I think of elegant designs, so I chose some silver metallic cardstock and paired it with aqua for my card.  I paper-pieced in some of the tile design, adding pearls, then cut a 2nd frame from silver and turned it 90 degrees before attaching it to the ornate one to make an 8-point snowflake.  There are 2 sentiments in this set - I chose the snow one and cut it twice from both colors and layered them a bit offset to carry the sparkle all the way down the card.

I also considered making this "snowflake" into a tree ornament by adding a hanger to the top, and that could still be done if the card is dismantled and backed with a 2nd pieced square.  The silver would certainly reflect the tree lights nicely!

As always, my thanks to Spellbinders for allowing me to play with their goodies! 

Wednesday, July 21, 2021

Simon Says.......Out with the Old and In with the New!


 Happy Wednesday - welcome to our challenge at the Simon Says Stamp Wednesday Challenge Blog!


This week we want you to use something old AND something new on your creations!  The team is playing with our own Simon Says Stamp exclusives!  


supplies: white, black, and Audrey Blue cardstock, Simon Bouquet of Roses stencil, Sending Smiles die, and a Stitching Butterfly die, Oxide inks: salvaged patina, peacock feathers, cracked pistachio, and lucky clover, Rainbow Blender Brushes, MFT Wonky Stitched Rectangle die, aqua pearls

The butterly die is my "old" - it's from 2018.  I stencilled a die-cut panel of white cardstock with oxide inks, then kept the stencil attached while I passed it through my cutting machine with an embossing pad and plate to raise the inked areas for more dimension.  Then I simply glued on my sentiment and butterfly, with some pearls in the flower centers.

Now it's your turn!  We have a $25.00 gift certificate 


to the amazing Simon Says Stamp store for 1 lucky random winner of this week's challenge!  I can't wait to see what you all make this week!