Wednesday, November 30, 2022

Simon Says......Anything Goes


Welcome to a new challenge at the Simon Says Stamp Wednesday Challenge blog!


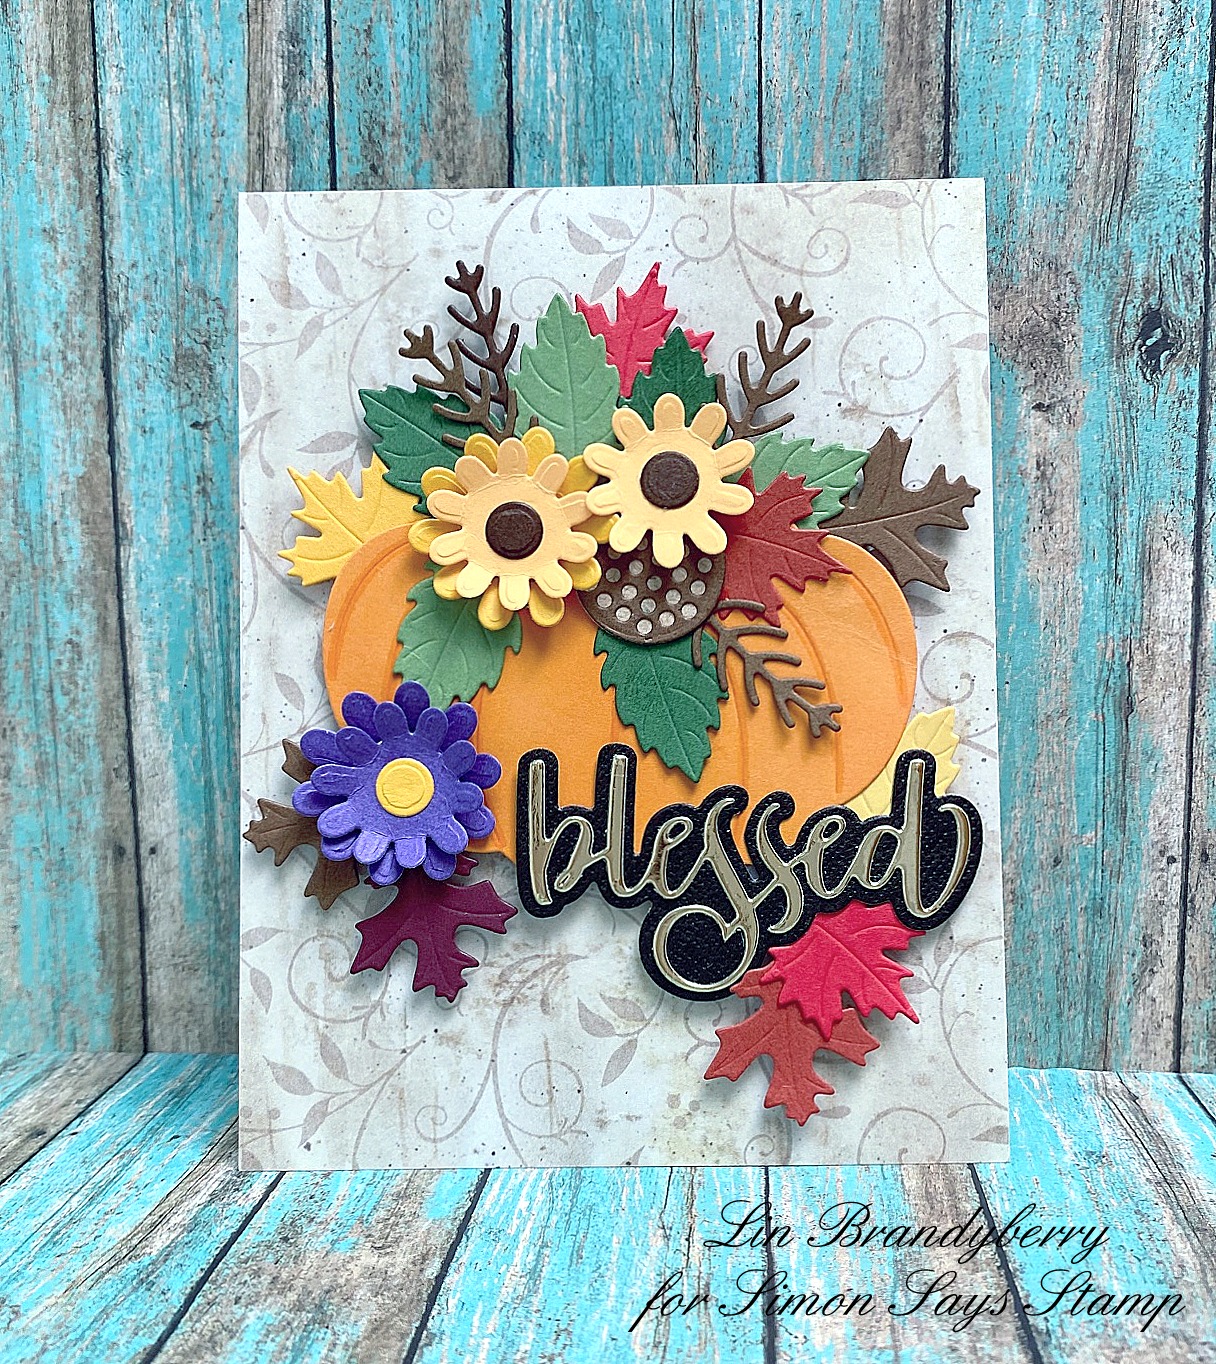
Our theme this week is Anything Goes, and the team is featuring Honey Bee products!  Having just celebrated Thanksgiving here in the States, I wanted to play with this gorgeous set of dies from them.


supplies: Green Leaf, Sunshine, Burnt Orange, Dark Chocolate, and other fall colors of cardstock, Gold Mirror Card, an unknown neutral flourish patterned paper, Honey Bee Fall Bouquet and Bitty Buzzwords dies, adhesive foam

This lovely die set has everything you need to make a seasonal bouquet.  I chose to put mine into a pumpkin base, but there's also a canning jar included in the set!  After arranging everything, I held it all together with some Press 'n Seal, secured it on the reverse, then added some adhesive foam to pop the whole thing above my card base. 

Now it's your turn!  We have a $25.00 gift certificate 


to the amazing Simon Says Stamp store for 1 lucky random winner of this week's challenge!  I can't wait to see what you all make this week!

Monday, November 28, 2022

Paper Village

 Happy Monday!  Hope all of you in the US had a safe and enjoyable Thanksgiving!

I have had this set of little houses on my wishlist since it appeared in 2021, but just never got around to grabbing it.  Fast forward to this November, and I finally got around to getting it and playing with it.  First I made a set in Cream cardstock with silver glitter roofs, and then, once I was feeling more sure of myself, I made another set using small-scale printed papers.  Couldn't wait to share!


supplies: Tim Holtz Paper Village 2, various printed papers, 1/8" Score tape and Gina K Connect liquid glue

I used music paper for the church, a script, a tiny ditsy print on blue, and a pale yellow stripe for the houses, plus a solid red for the "barn" and a solid grey for the "silo".

Alot of these papers are from old Basic Grey paper pads - they often had solids mixed in, which worked nicely for my roofs, and were not flimsy.  If you're wondering, the trees were made years ago, using a Concord & 9th Take a Bough set of dies.  I'm hoping Sir Tim will come out with some free-standing trees someday in a size to go along with these houses.........

I have had this little grouping sitting on one of my kitchen shelves most of this month, but it will be replaced now for Christmas.  These ones are done in Cream cardstock with white glitter cardstock roofs.  They will probably be nestled in some greens on my mantel.  


Tim mentioned these villages in his Christmas Hoopla last weekend, and hinted that he may play with them again for us soon - can't wait!  Thanks for stopping by today. 

Sunday, November 27, 2022

Changing Seasons

Recently I was looking through my "To Inspire" Pinterest board and found something that I wanted to mimic on a card. I'm always drawn to birch trees, and putting them against a wood plank background really appealed to me! Here's my result.


supplies: white and Lipstick Red cardstock, aqua plank dp from Hobby Lobby, Taylored Expressions Birch Tree cover die, Spellbinders Sealed Birds dies, Hero Arts 2015 woodblock Beauty of the Season

The planks on this paper were a bit too wide, so I simply used a t-square and a black marker to draw lines to make them skinnier. 

I've done many takes on this theme of cardinals in birch trees down through the years, and I will continue to do so each year, I think.  Thanks for indulging me once again!

Here's the pin that inspired me.

Friday, November 25, 2022

Emboss Resist

I wanted to make another card with this sweet sentiment die, and took my inspiration from a couple of cardmakers, Yoonsun and Barbara.  Then I remembered this old favorite Hero Arts cling background from 2012, and I was off and running!


supplies: white cardstock, (retired) Hero Arts Leaf & Floral Background cling stamp, saltwater taffy and worn lipstick distress inks, VersaMark and clear embossing powder, Paper Rose Sending Love and Hugs die, little flower and leaf dies, Doodlebug Tiny Heart sprinkles

Do any of you remember that background stamp?  It's a classic!

I enjoyed making that so much that I dug out another oldie background and made a blue version.


supplies: white cardstock, (retired) 2012 Penny Black Floral Thread cling background, salvaged patina and broken china distress inks, VersaMark and clear embossing powder, Hero Arts Thinking of You  Stamp and Cut die, enamel hearts

What a beautiful font, don't you agree?  Wish my handwriting looked like that!  The process is the same for both cards.  Brush on the lighter of 2 inks, dry thoroughly, stamp and emboss in clear, then brush on a darker shade of the same color.  My sentiments were cut multiple times for stability and stacked.

It's fun to mix your old stuff with brand new, isn't it?  Gives us more possibilities!

Wednesday, November 23, 2022

Simon Says.......Not a Card


Welcome to the new challenge at the Simon Says Stamp Wednesday Challenge blog!


Our theme this week is "Not a Card", and the team is featuring Memory Box products.  I made a Christmas tag.


supplies: white and green cardstock, printed paper from Blurry Flurries pad, Poppy Stamps Evergreen Trio dies, Hero Arts Neighborhood Houses die, sentiment from Simon (retired) Winter Scene clear set, Unicorn Confetti, MFT Stitched Tag die

Now it's your turn!  We have a $25.00 gift certificate 


to the amazing Simon Says Stamp store for 1 lucky random winner of this week's challenge!  I can't wait to see what you all make this week!

Tuesday, November 22, 2022

Let It Snow

 I recently brought home a Gina K. Master Layout set of dies, my first, and mixed it with a bunch of retired snow-themed products for my card today.


supplies: white, a blue from the Ocean Blue collection paper pad, and Chrome Silver mirror card, Master Layouts 11 dies, oxide inks in mermaid lagoon, prize ribbon, and wilted violet, blending brushes, (retired) Hero Arts Snowflake Circle cling stamp, clear ink and white embossing powder, an unknown snowflake die, (retired) Birch Press Design Let it Snow dies, a silver snowflake sequin

I used the largest master layout die to make a mask to sponge on my inks, then left it in place and overstamped a small snowflake stamp, white heat-embossing it.  The snowflakes were the perfect size for these windows, don't you think?  The panel was then matted in silver foil card.  I used that for my sentiment dies, too.  I seem to remember that the large snowflake may have come with Cuttlebug machines when they first came out?  I don't actually have it, but I used to borrow it from a friend and cut bunches of them at a time, which I still have after all these years!

This shade of blue cardstock is the perfect blue, just right for a crisp clear winter sky, but more importantly it matched my ink blending nicely.


Thanks for stopping by today.

Sunday, November 20, 2022

Simon's December Card Kit: Joy to You and Yours

 This month's kit is a lovely variety - a Santa die, a pretty 3D embossing folder, foiling elements, and some fun papers.  Here are 3 cards and a tag that I made with the kit.

First I played with the foiling elements.


supplies: white and Schoolhouse Red cardstock, Christmas adhesive transfers, red and green foils, red pearls

Next, the embossing folder:  


supplies: Peacock and Surf Blue cardstock, Fir Tree Branches embossing folder, markers to color, a sentiment label from the Joy to You and Yours stamp set, VersaMark ink and clear embossing powder

And the icing on the cake is the brand new Tim Holtz distress ink color, Lumberjack Plaid, only available right now in this mini size in this kit!  For my last card I used it to stamp a sentiment to mix with some of the papers in the kit.


supplies: Schoolhouse Red and white cardstock, Prima Candy Cane Lane papers, sentiment from Joy to You and Yours

And finally, I used the papers again, along with the Santa dies and one of the candy canes, to make a tag.


supplies: white cardstock, Simon's new Snow White Pawsitively Velvet cardstock, markers for details, Candy Cane Lane papers, Santa Claus die, Tim Holtz Candy Cane Confections

Here's a picture of all that you get in this month's kit.

Friday, November 18, 2022

Some New Washi Tapes!

 I'm a big fan of Pink Fresh Studio's wide washi tapes, and they recently brought out a new group of them.  Today's post has cards using 2 of the new designs, Chrysanthemums and Whimsical Blooms.  I learned awhile back that I can usually fussy-cut the designs without much trouble, it just takes a bit of patience and good lighting, so I saved myself a bit of money and did just that.


supplies white and a dark coral from Memory Box Berry Red collection paper pad, Chrysanthemum washi tape, Spellbinders Hemstitch Rectangle die, sentiment from Simon Leafy Frames clear stamp set, adhesive foam squares

I grouped together 3 of the flower sprigs from the washi and popped them above a cutting of  my old favorite Hemstitch Rectangle die.

My 2nd card uses the largest sprig from the Whimsical Blooms washi roll.  


supplies: white and Doll Pink cardstock, Whimsical Blooms washi tape, Spellbinders Floral embossing folder, Paper Smooches Fab Frames die, Honey Bee Bitty Buzzwords stamp and matching die, adhesive foam 

For this one, I wanted to make my colored background textural, and in looking through my embossing folders, I found this doll pink panel already done - I think it matches the flowers perfectly!  Then I proceeded to cover up most of it......This time I lifted everything above the card base.

And one more, using another of the little bouquets in this set.


supplies: white and  a lilac from the Memory Box Twilight Purple paper pad, Whimsical Blooms Washi, Ornate Oval die, Hero Arts Sending Love Mail sentiment and Boutique Accessories fishtail die, Simon Blossom Field embossing folder, white pigment ink

This ornate oval is the perfect place to hold this delicate little bouquet; it reminds me of a cameo!   And this time you can see more of my embossing - I swiped the background with white pigment ink gently to bring out the details even more.

These washi tape elements certainly make for easy and colorful designs.  I always make up 2 or 3 panels of them when they arrive, cut them out, and store them so they're ready for last-minute cards. 

Wednesday, November 16, 2022

Simon Says........Stencil It!


Welcome to the new challenge at the Simon Says Stamp Wednesday Challenge Blog!


This week's theme is Stencil It!, and the team is featuring Tim Holtz products.  


supplies: Cream and kraft cardstock, Tim Holtz Plaid Stencil, fossilized amber, ripe persimmon, crackling campfire, and vintage photo distress inks, Funky Wreath, bittersweet sprigs from Spellbinders Fall Label Motif die set, sentiment from Pink & Main Fall Sentiments, natural twine, adhesive foam squares to lift wreath

I stencilled my plaid onto a trimmed Cream rectangle, splattered the same inks, then embossed the panel for more dimension and edged it with crackling campfire ink. I cut 2 wreaths and 4 berry sprigs and arranged them, adding a twine bow and my fussy-cut sentiment before lifting them above the card base.

And here's another.  Love this new Pinecone stencil!


Because the letters are so dainty, I cut them 3 times and stacked them, using microdot adhesive sheets..  

Now it's your turn!  We have a $25.00 gift certificate 


to the amazing Simon Says Stamp store for 1 lucky random winner of this week's challenge!  I can't wait to see what you all make this week!

Sunday, November 13, 2022

Too Early for a Snowman??

Maybe so, but this one is too cute not to share!  I've been waiting for ages for him, and was able to snag him last month! 


supplies: white, Surf Blue, Audrey BluePeacock, Lipstick Red, Green Leaf, Orange Peel, brown, and black cardstock, Lawn Fawn Build a Snowman dies, (retired) Snow Flurries embossing folder, Tim Holtz Tree Line die, (retired) PTI sentiment

There are 2 snowmen in this set - today I used the larger one.  My sentiment is from an old Papertrey Ink set - long gone, I'm sure, but isn't it perfect?  And that little bird is included in the set, too; one of the many reasons I've been wanting this set.

I always make note of the date of our first snow here every year -  when I quickly looked back, Oct 18 of 1992 was the earliest snow I could find.  And it snowed here for a few hours yesterday, though nothing stuck, so I guess it's not too early at all to be thinking about snowmen!

Thanks for stopping by!

Friday, November 11, 2022

Postage Edge Shapes

 Becca Feeken has a new release which launched earlier this week.  I have been looking for some postage-edge dies for a long time, so I was thrilled to be able to get these to play with!

The set consists of 4 different sizes of rectangular postage frames, plus 4 more dies with pinpoint details, a total of 8 dies altogether.

For my first card, I paired the rectangles with some fall motifs, also by Becca.  


supplies: Cream, Audrey Blue, and Burnt Orange cardstock, Postage Edge Rectangle dies, Fall Label Motif dies, Sugar Pea Fall Fox sentiment

Here I used 2 of the pinpoint dies with 2 of the postage edge ones.

Next, I used the largest rectangle and paired it with the next-to-smallest postage edge die and some supplies from the Santa Lane Christmas kit.


supplies: Becca Feeken Postage Edge Rectangle dies, red cardstock, floral panel and green plank papers, and puffy stickers (sentiment and gold snowflakes) from Santa Lane Christmas kit

These dies were released also in squares, slimlines, circles, and ovals, if rectangles aren't your thing.  

Thanks for your visit today.  It's Friday again - enjoy your weekend!

Wednesday, November 9, 2022

Simon Says.......Thinking of You


Welcome to the new challenge at the Simon Says Stamp Wednesday Challenge blog!


Out theme this week is Thinking of You, and the team is playing with Paper Rose Studio products.  I chose 2 die sets for my card today.  

The word "pansy" is derived from the French word "pensee", which means "thought", and the flower has come to symbolize remembrance.  So I thought these pansies would work nicely with our theme this week.


supplies: white, Fog, and green cardstock, Paper Rose Etched Pansy 1 and Sending Love and Hugs die sets, markers, tiny heart sprinkles

I chose fog as the background so my white sentiment would stand out nicely.  It was cut 3 times and stacked.  Isn't it a pretty mix of fonts?  The leaves were cut from green cardstock, but I colored the flowers with markers in blues and purples.

Now it's your turn!  We have a $25.00 gift certificate 


to the Simon Says Stamp store for 1 lucky random winner of this week's challenge!  

Tuesday, November 8, 2022

For a November Birthday

 I wanted to use Simon Hurley's Candy Stripe die again and make it into a plaid, so here's what I came up with for my brother-in-law's birthday card this year.


supplies: kraft, burnt orange, tangerine cardstock, Candy Stripe die, Lil Inker Boxed Up Birthday die, Honey Bee Fall Bouquet maple leaves colored with distress inks

What an easy way to get a plaid background!  Just cut this stripe die twice, and reverse one of them before layering them.  I also cut the sentiment die twice in 2 colors and off-set it when I placed it on its backing.  The leaves were already sitting on my desk, so this came together pretty quickly once I decided on my colors.

Have a great day!