Showing posts with label Becca Feeken. Show all posts

Friday, April 14, 2023

Cherry Blossom Wreath

Still being inspired by colors of spring!  


supplies: white, kraft, pale pink, Audrey Blue and Green Leaf cardstock, Spellbinders (retired) Layered Cherry Blossoms dies, Tim Holtz Funky Wreath die, sentiment from Newton's Nook Woodland Spring , Doodlebug Tiny Heart sprinkle

It seems to have taken forever, but I believe we've turned the corner - spring is unfolding beautifully here!  These blooms remind me of our crabapple tree just outside my craft room window - they are about to pop any minute!  Here's a picture taken 2 springs ago.


Sunday, December 11, 2022

Home Sweet Quilt Collection: Filigree Eight Point Star and Orange Peel

Today I have some cards using more of the Home Sweet Quilt collection by Becca Feeken.

Here's another set of dies that I couldn't wait to play with:  Filigree Eight Point Star.


supplies: white and 2 shades of cornflower blue cardstock, Filigree Eight Point Star dies, Quilty Hugs Sentiments, embossed in white, tiny heart sprinkle

This set of dies has all kinds of possibilities!  There are filigree pieces for all of the triangle and diamond pieces of the large star, but you don't have to use them, as there are stitching dies also (you can see them in the corner triangles).  

At this time of year, I wanted a kind of snowflake look, so I kept to 2 shades of blue and white, but you could bring in all kinds of colors if you'd like!

I showed you this Orange Peel embossing folder earlier HERE, but today I thought I'd let it be the star of the show.


supplies: white and Peacock cardstock, Orange Peel embossing folder, peacock feathers distress ink, sentiment dies from Log Cabin & Flower Mini Quilts die set, scalloped circle and circle die

After embossing on white cardstock, I lightly rubbed peacock feathers ink in a circular motion across the surface to catch the highest points.  Then I trimmed the panel slightly, matted it, and added my sentiment.

If you're a quilter, you are going to love this collection - I've shown you only a few of the sets that Becca has designed!

Thanks for visiting today.

Friday, December 9, 2022

Home Sweet Quilt Collection: Log Cabin and Flower Mini Quilts

 Spellbinders and Becca Feeken are launching a new collection called Home Sweet Quilt!  I was so excited to see this, as I quilted for many years before I became a cardmaker.  

One of the die sets is called Log Cabin and Flower Mini Quilts, and I have 3 cards using that set today.  I also used Becca's new Orange Peel Quilt embossing folder and some sentiments from  the Quilty Hugs clear stamp set, both of which are included in her collection.  For all of these designs, I started by cutting out the quilt motif, setting aside the small pieces, and applying clear packing tape to the back of the "bones" of the design.  Then I simply paper-pieced it in the colors of my choosing; the sticky tape holds everything together as I go.


supplies: white, Lipstick Red, and Audrey Blue cardstock, Flower Mini Quilt dies (includes sentiment)

I cut the quilt on the diagonal on a panel of white cardstock, then cut it again in red and aqua.  Then I simply pieced back the rest of the design into its outline, giving the effect of an inlaid design.  The Quilty Hugs sentiment is part of this die set.

Next I used more of the same pieces from my original cuttings and make another little mini quilt, but this time I ran it through the Orange Peel embossing folder for some dimension.  I did the same for the background panel, and then added the mini quilt, matching the "quilting", and added a stamped sentiment from Becca's Quilty Hugs.


supplies: white, Audrey Blue, and Lipstick Red cardstock, Flower Mini Quilt dies, Orange Peel embossing folder, and a sentiment from Quilty Hugs clear stamp set

And because I cut this design out of 3 different colors, I have another little quilt made up of the leftover pieces after doing the 2 above.  I placed it over an A2 panel, just to show you how different these blocks can look, depending on where you place the colors.  That's what makes quilting fun!


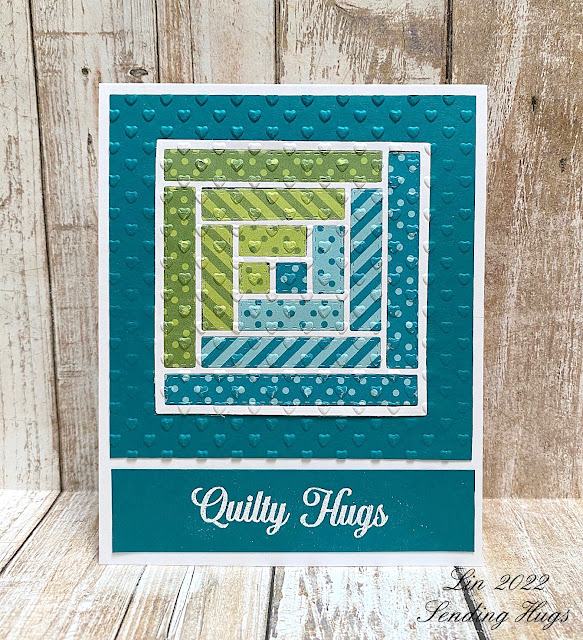
Next I switched to the Log Cabin design and used some small-scale printed papers to piece it, then embossed it in a little heart folder, and added another of the stamped sentiments.


supplies: white and Peacock cardstock, patterned papers from a retired MFT paper pad, Log Cabin Mini Quilt dies, sentiment from Quilty Hugs stamp set, my own heart embossing folder

For my last design, I made a paper Christmas Log Cabin quilt, measuring about 7" square.  


white cardstock, various Doodlebug Petite Prints in red and green, a snowflake die, Log Cabin Mini Quilt dies

This is simply 4 blocks of the log cabin, seamed together after piecing, and matted on red.  No sentiment on this, as it's meant as something to be displayed on a shelf, mantel, etc.   

I think that's enough for today!  Thanks for hanging in with me!  I'll be back again very soon with another set of quilt dies from this same collection!

Sunday, June 19, 2022

Bless You

 Here's a card made with a set of Becca Feeken dies that were released last week - her collection is called The Right Words.


supplies: white, pink, green, and pale yellow cardstock, pale grey striped patterned paper, You Are a Blessing dies

This die set includes what you see, plus a few other words/parts of words to build around "Bless".  Isn't the font lovely?  

Many thanks to Spellbinders for sending me this new set to play with!  

Friday, April 22, 2022

New Spellbinders Goodies!

I had the most fun putting together today's card!  It uses some Hollyhock dies and a garden sentiment from Susan Tierney Cockburn's latest collection called Through the Garden Gate, along with a new Becca Feeken slimline die called Half Slimline Bracket from her new Layered Fleur Bouquet Slimline release!


supplies: grey, Surf Blue, Green Leaf, pale yellow, and coral cream card, Susan Tierney Cockburn's Hollyhock dies and Through the Garden Gate sentiment, Becca Feeken's Half Slimline Bracket dies

The slimline bracket die looks like a beautiful wrought-iron gate to me, so I chose a medium grey for that and placed it against a light blue background.  Then I constructed my hollyhock stem and added it along with the sentiment.  

Hollyhocks are another plant that I can't seem to grow well in my gardens, so I was thrilled to be able to play with this paper version!  

Thanks so much for stopping by today!

Saturday, April 16, 2022

Layered Fleur Bouquet dies

 Becca Feeken has a new collection out called Layered Fleur Bouquet Slimlines,  I have 2 cards today using some of these new floral dies.

First is a card that uses her Layered Tulips dies.


supplies: white, yellow, and green card, Layered Tulips and Eyelet Lace Frame dies, distress inks for shading

I thought that this bouquet of tulips would look pretty mixed with Becca's Eyelet Lace frames.  My card measures 5 x 7 inches, and I pulled the different tulip layers up a bit for some dimenstion., securing everything at the bottom of each flower.

Next are the Cherry Blossoms.


supplies: white, Surf Blue, kraft, Green Leaf, a pink and a yellow cardstock, pink marker to shade flowers, Layered Cherry Blossom dies, a cloud stencil and tumbled glass oxide ink, Simon retired spring sentiment

I cut out all the branches, leaves, and flowers using colored cardstock, just shading the flowers a bit with a darker pink marker.  After constructing the flowers and lifting up some of the petals for dimension, I added them to my branches atop a stencilled cloud background onto which I had first stamped my simple sentiment.  To finish I added leaves,

My card is a mini-slimline, measuring about 3 1/4" X 6 1/4".  I'm finding I prefer this size over the larger regular slimlines.

Many thanks to Spellbinders for sharing these die sets with me; I'll have another die from this collection coming soon.

Monday, December 20, 2021

Eyelet Lace Frame

 Spellbinders is releasing a new Becca Feeken collection called Garden Shutters today.  I fell in love with this beautiful large Eyelet Lace Frame, and I have 3 cards for you.  This die set has 7 separate dies to make a large 5" X 7" card.

First, I used pink and added some washi tape flowers and a foiled sentiment to adorn it.


supplies: white and Cotton Candy card, rose gold metallic kraft card, Eyelet Lace Frame dieswashi tape flowers, a foiled birthday sentiment that came with my glimmer machinerose gold glimmer foil, Hero Arts leaf die, adhesive foam squares

For my 2nd card, I cut from yellow and added some daisies.


supplies: white and yellow card, Spellbinders Eyelet Lace Frame dies, Tim Holtz Wildflower Stems 1 dies, Simon reverse sentiment strip, yellow enamel dots

And my last card.


supplies: white, black, and Cotton Candy card, Eyelet Lace Frame dies, butterflies from December 2021 Card Kit of the Month, Simon retired Beautiful Day sentiment

Isn't that eyelet gorgeous?!  I used just 4 of the dies to make my card front and lined it with pale pink.  There's a natural place for a sentiment.  

You could also use these dies to make an actual frame to show off a prized photo of someone special - so many options!

Many thanks to Spellbinders for sharing this lovely set with me!  I know it will become a classic!

Monday, August 30, 2021

An Elegant Snowflake?

I have another card to share with you that uses new dies from Spellbinders/Becca Feeken.  She has a new holiday collection out called Holiday Medley, and I used her All is Calm dies to make a glitzy snowflake card.


supplies: white and Audrey Blue card, silver mirror card, Spellbinders All is Calm dies (includes 2 sentiments), a snowflake embossing folder, silver and aqua pearls

When I think of Becca, I think of elegant designs, so I chose some silver metallic cardstock and paired it with aqua for my card.  I paper-pieced in some of the tile design, adding pearls, then cut a 2nd frame from silver and turned it 90 degrees before attaching it to the ornate one to make an 8-point snowflake.  There are 2 sentiments in this set - I chose the snow one and cut it twice from both colors and layered them a bit offset to carry the sparkle all the way down the card.

I also considered making this "snowflake" into a tree ornament by adding a hanger to the top, and that could still be done if the card is dismantled and backed with a 2nd pieced square.  The silver would certainly reflect the tree lights nicely!

As always, my thanks to Spellbinders for allowing me to play with their goodies! 

Friday, April 30, 2021

Spellbinders Stained Glass Bouquet Collection

Becca Feeken has done it again!  Just look at these ornate dies she's created for her latest collection called Stained Glass Bouquet! 

My first card uses the Tulip Trio set of dies.


supplies: black, ivory parchment, and watercolor cardstock, Tulip Trio dies, oxide inks and water, Hero Arts retired sentiment

I thought the best way to achieve a mottled stained glass look was to make my own colors using distress oxide inks.  Each of these colors started with the smooth side of watercolor card, then I sponged on various shades of the color I was going for, spritzed with water, and dried, continually adding droplets of color until I was satisfied.  I'm very pleased with the results.  I saw bleeding hearts in the corners, so I added a little more red to the pinks I had used for my tulips for them.

We've had a need for sympathy cards this spring, and I thought this would work well for that occasion. 

Next up is a set called Deco Bloom, which makes a card just a little less than 5 x 7.


supplies: slate grey, ivory, surf blue, kraft, pale green, 2 pink, and 2 yellow cardstock, Deco Bloom dies, Pink & Main Sent with Love sentiment, adhesive foam squares

This time I used a variety of colored cardstock to bring color to this design.  This die set is made of  dies for the border and the wreath, so you can use just parts of it for other designs, and the roses are separate dies that can be placed anywhere you'd like on this wreath. I chose to adhere them with adhesive foam so that they stand above the rest of the card.

I won't deny that paper-piecing these cards took a little time, but I enjoyed every minute.  These dies cut beautifully.  Thank you, Spellbinders, for sharing these with me!

Wednesday, September 16, 2020

Simon Says.........No Stamps Allowed


Happy Wednesday - welcome to our challenge at the Simon Says Stamp Wednesday Challenge Blog!


Our theme this week is No Stamps Allowed, and the team is showcasing Spellbinders' products!

For my first card, I chose their lovely Oval Coronet dies.  I love the beautiful filigree details that the designer, Becca Feeken, specializes in!


supplies: white, Surf Blue, Audrey Blue, Lavender, purple, Green Apple, and Green Leaf cardstock, Oval Coronet dies

This die set has 5 dies that can be mixed and matched for different results.  I used all of the dies except the very largest shaped one today.  I cut the most detailed oval die from 6 different colors, and then inlaid them back into the pattern.  That panel was then placed onto an oval of surf blue cardstock, before attaching it to the large white panel cut with the largest die.  Then that panel was attached to an A2 panel of surf blue cardstock.  

I didn't really have a sentiment die that wouldn't cover up this beautiful design, so I opted to leave this as is for the present.  I'll probably add a small stamped sentiment when I use it.

Next I made a card with another die set that was released at Christmas.  This one has a built-in sentiment, I made it into a year-round card by using floral patterned papers for a spring or summer feel. 


supplies: white, Green Leaf, a darker green, and several coral pink cardstocks, Carta Bella Flora #1 patterned paper, Joy die set, enamel dots in deep red

I first embossed the image into a piece of white cardstock, then cut it out from 2 greens.  There is a separate flower die, which I used to cut out the flowers in several shades of coral.  I cut apart the green die-cuts and glued them into place on my embossed panel, then added the flowers.  Finally, I cut out the letters, which are also separate dies, and pieced them back into the design.  I used the same patterned paper as borders after trimming my embossed panel.

Now it's your turn!  We have a $25.00 gift certificate 


to the amazing Simon Says Stamp store for 1 lucky random winner of this week's challenge!  I can't wait to see what you all make this week!


Friday, August 14, 2020

Becca Feeken's new Halloween collection!

I have some Halloween cards today using the new Becca Feeken Halloween Collection!  I received her Spooky Boo and Spooky Cottage dies.

For my first one, I decided to cut black silhouettes and make a fun scene using my go-to colors for Halloween cards: purple, green, gold, orange, and black, of course!


supplies: black, gold, purple, and Green Apple cardstock, cat and small bat from Spooky Boo dies, tree, fence, large bat and sentiment from Spooky Cottage dies, circle die, googly eyes

This was fun to put together!  I stamped a swirly magical background onto the purple sky, added some green ground, then cut a gold circle for my moon, shading it with ripe persimmon ink, and then added my black silhouettes. I pulled the bats' wings forward and stacked my sentiment for some added dimension; the googly eyes I have fit perfectly into the Boo!  There are lots of fun details built into these dies!  

There's a little 2-piece mummy die in the Spooky Cottage set that I wanted to use on my 2nd card.


supplies: white, kraft, pale grey, and black cardstock, scraps of Doodlebug Halloween printed papers, Spooky Cottage mummy dies, (retired) Hero Arts Halloween sentiment

A much simpler design this time - I dug out some ancient leftover scraps of printed Halloween papers to  showcase my fun Mummies!

Hope I've given you some smiles today - thanks for dropping by!

Monday, April 13, 2020

Flourished Fretwork

Spellbinders generously shared 2 sets of Becca Feeken's newest die designs that she calls Flourished Fretwork, and today I'm sharing some cards that I made with them. Becca does intricate dies like noone else!

This first die set is called Richelieu Square.  Looking at the design, I thought of a kaleidoscope, and so I chose 2 of the 6 dies and some jewel-tone cardstock for this first card.


supplies: black, 2 pinks, 3 purples, and 2 turquoise cardstock, Richelieu Square dies

Starting with a 4" square black panel, I first cut out the square design, then the circle inside it.  I did the same for all of the other colors.  I attached wide packing tape to the reverse of the black panel, and then inlaid the other colors into it.  When I was finished I framed it with the lighter of the turquoise colors and attached it to a 4 1/4" square card base.

Now I think it looks more like a quilt, and I love how the black makes all the colors pop, kind of like a modern Amish quilt!  This card took me all day to put together, but I must say that it was just what I needed, considering the state of things right now.  It was very therapeutic.

I used the square detailed die once again for the next card, adding in an outer border, which is also included in the set.  This card is a really simple design in just 2 colors, pink and grey, and you can see how different it looks from my first card.


supplies: Cotton Candy and Slate cardstock, Richelieu Square dies, and a birthday die sentiment, adhesive foam

With the added border, this card measures out to 4 3/4" on each side. The sentiment die I used is part of a past Small Die of the Month set, and it fits perfectly inside the space in the center!  I love when that happens!

My next 2 cards feature the Oval Coronet dies; I changed up to pastels for this first one.


supplies: white, black, green, blue, lavendar, pink, and yellow cardstock, Oval Coronet dies, Rose Creations flowers and leaves, enamel dots to match

Once again, I used only the ornate dies from the set to cut from a white panel.  There is a plain oval die in this set, which I used to cut a blue oval for behind the central design, then I mounted the white panel onto a green card and added my flowers and sentiment.

And my final card, using just the inner ovals to show off their design.


supplies: white, Surf Blue, Audrey Blue, Lavender, purple, Green Apple, and Green Leaf cardstock, Oval Coronet dies

After cutting the detailed oval, I affixed the trimmed panel to a Surf Blue A2 card, then cut it again in the other colors and inlaid them back into the design, allowing some of the paler blue backing to show through around the edges.  The design is so symmetrical that I decided to wait for a sentiment until I have a use for this card.

Many thanks to Spellbinders for allowing me to play with these new dies!

Thursday, May 2, 2019

A Sympathy Card

I needed to make a sympathy card, and used my brand new stamps from The Greetery.


supplies: white and Cornflower Blue cardstock, The Greetery Fleur Impressions, Altenew mini inks from Lapis Lazuli, Golden Sunset, and Green Meadow sets, sentiment from Simon's Sketched Flowers, Spellbinders Becca Feeken Hemstitch Oval die, adhesive foam squares to pop up smaller rose

These lovely layered stamps are easy to line up and not too much to fussy-cut, for now......there are matching dies, though.  And I really love these new blue ink shades from Altenew - FINALLY just the right cornflower/skyblue!

Tuesday, March 26, 2019

Lilac Love

Today I'm CASEing an idea by Cindy to use the tiny flowers in this month's Simon Card Kit to make lilacs, my favorite of all flowers.


supplies: white, Lavender and Green Apple card, Simon's Hello Darling flowers and leaves, Altenew mini inks and a matching green marker,  Simon Stitching Butterflies die, Tammy Tutterow Tiny Sentiments, Becca Feeken's Hemstitch Oval die, Doodlebug rainbow hearts sprinkle

I first cut my hemstitch oval and trimmed it to fit inside a lavendar mat.  Next I lightly sketched 2 branches for my lilacs, then, starting with the tops of each, stamped my little flowers in what I hope to be a lilac blossom shape, adding leaves at the bottom.  Then I just stamped my sentiment, adding an enamel heart, and the butterfly.

Thank you, Cindy, for your idea!  

Saturday, March 23, 2019

Welcome Spring

I'm a bit late officially, but I made a card that uses happy spring colors to celebrate the coming of the season we've all been waiting for.


supplies: white and Green Apple card, dps from various Doodlebug 6" paper pads, Spellbinders Oval Hemstitch die, My Favorite Things Stitched Blooms dies,  Simon's Big Scripty Greetings, various enamel dots

These flower dies have such fun stitched details!   And I used Doodlebug patterned papers because of their fantastic array of colors and darling diminutive prints - here I mixed florals with dots and gingham and their reverse patterns.  And you can see that I finally hunted down a Hemstitch Oval set of dies, too.


Enjoy your weekend!

Sunday, March 10, 2019

Becca Feeken Shadowbox

I have a really fun project to share today, which uses 3 sets of Becca Feeken's Shadowbox Vignette collection.  I was a bit intimidated to make the shadowbox part of this project, but I am so pleased to show you my first try at it.  Everything is engineered perfectly and plays together nicely!  I chose some pretty pastels since I'm feeling in a spring mood today.......


supplies: white, robin's egg, cotton candy, and green apple cardstock, Becca's Adjustable Shadowbox Frame with 1" Border, Callista Rectangle, and Layered Sweet Birdie Thanks Scene, Scor Tape, adhesive foam strips

I followed Becca's video to construct my shadowbox.  The magical thing about these dies is that you can make ANY size frame which will measure 1" wide on each side; in my case I cut my starting paper panels at 4" wide by 4 1/2" long for the short horizontal sides, and 4" wide by 5 3/4" long for the vertical sides, after measuring the Callista Frame to make sure it would fit over the top.  My shadowbox isn't perfect, but for a first try, I was thrilled with how it fit together so nicely, and it's really sturdy!

Next I cut my Callista Frame from pink and glued that to the top of the box.  And then I cut and constructed the Birdie Scene, cutting each of the 3 layers in a different color and separating them with adhesive foam strips for dimension.  I was ecstatic that it fit perfectly down into the shadowbox.  And can you see the little details dies that are included: flowers, a wing detail, and more that I didn't use this time?


As I said, the shadowbox dies will adapt to any size you want to make, squares or rectangles.  It is free-standing, but you could hang it, or add a hinged cover that opens so that it could hold a little gift!  And, as I showed you in yesterday's post, you can use the accessory dies on cards, too.  I am so blessed that Team Spellbinders asked me to play with them!  I hope you'll consider giving them a try, too!

Saturday, March 9, 2019

Shadowbox Collection from Becca Feeken

Recently I received some Becca Feeken Shadowbox dies from Spellbinders.  Here is my first play with some of them. 

First up, I used her Layered Sweet Birdie Thanks dies.


supplies: white, Cotton Candy, Surf Blue, and Green Apple card stock, Layered Sweet Birdie Thank You dies, sentiment from Mandy's Flowers, 3D Botanical embossing folder, adhesive foam strips

I die cut the 3 layers from 3 different colored card stock, then separated them with some adhesive foam strips and popped that above my dry-embossed and stamped card base.  Love the fun dimension!

As soon as I saw these next dies, I thought "wedding card".


supplies: white and Rose Gold pearlized card, Spellbinders Becca Feeken Callista Rectangle Shadowbox Frame dies, Simon's Congratulations sentiment, Tattered Rose distress oxide ink, Hero Arts retired heart pearls

I hope I was able to capture just a bit of the lovely glimmer that the rose gold pearlized card gives, perfect for a festive occasion like a wedding.  I was happily surprised to see that the oxide ink matched it nicely.  To finish I cut another of the dies from the rose gold and added them to the sentiment area of my card, and added just 2 pale pink heart pearls to them.

I'll be back again soon with another of the new dies from Becca.  Thanks for stopping by!