Showing posts with label metallics. Show all posts

Friday, October 6, 2023

Spellbinders October Club Kits: Clear Stamps and Dies and Embossing Folders

 The Spellbinders Club Kits for October are now available!

The Clear Stamp of the Month is darling!  It's called Festive Penguins.  As always, there's a matching set of dies, too.


supplies: white and bright pink cardstock, Festive Penguins stamp of the month for October, markers to color, glue pen and prisma glitter

I love the idea of a pile of penguins, and colored them in some non-traditional colors.  Because there's so much black and white, I chose bright pink, lime, and turquoise, and added sparkle on their hats and the star.  I enjoyed working with this set!  It includes 2 more separate penguins, and a total of 3 different sentiments.  

Here are my cards using the 3D embossing folder: Flowering Christmas Tree Burst, and the Embossing Folder of the Month: Christmas Tile.


supplies: red and kraft cardstock, Flowering Christmas Tree Burst 3D embossing folder, festive berries distress ink, Make It Merry Sentiment die 

The sentiment reads "Tis the Season".

And for my last card, I combined another of the penguins with the Embossing Folder of the Month called Christmas Tile.


supplies: red and white cardstock, Christmas Tile folder, swiped with red ink, Festive Penguins stamp and matching die, tiny white pom-pom, circle and scalloped dies, puffy sentiment from this year's Make It Merry Christmas Card Kit


You can look HERE for information on Spellbinders Clubs.  Each is available only from the 6th until the 27th of each month.  If you click on my links under each card, you can see the specifics of each product.  You can subscribe to the kits separately, but there are also lots of ways to combine several of them (scroll down and look under Value Clubs).  And you can "unjoin" a subscription at any time without any penalty.  

Sunday, July 30, 2023

Stitched for Christmas

 Spellbinders has released a new collection of stitching dies, called Stitched for Christmas!  Here are my samples.


supplies: white, cream, pink, yellow and greens cardstock, pink metallic cardstock, Stitched Poinsettia and Holly dies, cream, pink, and green embroidery floss, 3 strands, Holly & Foliage 3D embossing folder, sentiment and pine sprigs from Mix & Match Holiday Greetings dies, pink metallic sequins

I've always loved pink poinsettias, so that's the direction I went for this first card, and I made a cream flower, also, then used cream and pink floss for my stitching.  After arranging the elements, I decided to bring in some glitz with a metallic sentiment, matting, and sequins.

Next I have 2 cards using the fun Stitched Starry Argyle plate.


supplies: red and teal green cardstock, pewter metallic kraft cardstock, Stitched Starry Argyle stitching plate, holly and berries from Stitched Poinsettia and Holly set, Joy dies, adhesive strips to lift word and holly

I love this argyle plate!  I used 6 strands of a teal green and a wheat floss to stitch it, then trimmed it very slightly so that I could mat it with a peacock green card.  I used the same cardstock colors for my holly and berries, stitching tone-on-tone for them.

Next is a winter card using the same Starry Argyle plate, done in blues this time.  After stitching in 2 shades of my favorite blue, I pulled out 4 ancient snowflakes from my scrapbasket and layered them as the focal point.  I left off a sentiment for now.


supplies: white and 2 shades of blue cardstock, white glitter cardstock, 2 shades of blue embroidery floss, Stitched Starry Argyle Stitching plate, a dark blue gem 

It doesn't show up here, but the largest white snowflake was cut from white glitter card, so between that and the blue gem in the very center, this is very sparkly!  I separated the 4 layers with adhesive foam squares for some dimension, but everything compacts back nicely when put into an envelope.

This plate is called "Starry" Argyle, but I think it looks like teensy snowflakes in between the stitches, so I changed to blues for something a little different.  Of course, this plate doesn't have to be holiday or winter themed, either - choose other colors and make a masculine card.  

Hope you've enjoyed my take on these new dies - thanks so much for stopping by!

Wednesday, March 8, 2023

Simon Says........Tags!


Welcome to the new challenge at the Simon Says Stamp Wednesday Challenge!


 Our theme this week is Tags, and the team is featuring Tim Holtz products.  I went shabby-chic this week for my tag.


supplies: Ranger #8 Craft Tag as my base, a variety of patterned paper scraps, Metallic Confections foil/kraft cardstock, Tim Holtz Idea-ology Botanical Layers ephemera, a Clippings sticker, Floral Frame Impresslits die/embossing folder, lace, and a seam binding bow dyed with Spun Sugar distress ink

I'm sure that most of these patterned papers came from Simon Card Kits down through the years and by now are retired.  I just went through my collection with a pink and cream color scheme in mind and pulled things I thought would work, then pieced them onto my tag base and started adding embellishments - it was fun, and I'm pleased with my results.

Now it's your turn!  We have a $25.00 gift certificate 


to the amazing Simon Says Stamp store for 1 lucky random winner of this week's challenge!  

Friday, February 10, 2023

Sending Love

 I have a card today using an embossing folder and sentiment die set from the newly released Four Petal Collection.


supplies: cream and gold foil cardstock, vellum, Spellbinders Four Petal Floral 3D embossing folder, Thanks Enclosed sentiment dies

These embossing folders are so wonderfully detailed - they need nothing to show off their loveliness!  I love cream mixed with gold, so I made this simple card that could be used for a sympathy card, a wedding, or just a classy "just because".

The new sentiment dies are just what I've been looking for - there are 21 individual words that you can string together for your own phrases, and each has its own matching shadow die.  I like the font, and the size is good, too.

As always, I'm glad you stopped by - have a good one!

Friday, February 3, 2023

Spellbinders February Club Kits

 Here are my cards using some of this month's Spellbinder's Club Kits.  We have changed things up a bit beginning this month, and new subscribers will be able to order beginning the 6th of each month through the 27th.

First, my Glimmer of the Month card.  The Kit is called Tulip Border, and I used Magenta glimmer foil.

supplies: 2 shades of pink cardstock, Tulip Border Glimmer Kit, Magenta glimmer foil, markers

I foiled on the slightly darker pink cardstock, colored in the details with markers, and used the included die to trim the panel along the top of the tulips.  On the paler pink I foiled one of the 2 sentiments, then added that to a card base and affixed the tulip panel onto that.

Next is the Stitching Kit of the Month: Pocketful of Spring. There's also a set of add-on dies called Pocketful of Spring Sentiments add-on dies.


supplies: Soft Navy, 2 greens, white, cream, yellow, pink, blue, and red cardstock, Pocketful of Spring and Pocketful of Spring Sentiments dies, 3 strands of each floss color, yellow enamel dots

This fun set consists of 22 dies, some of which have incised guides for stitching.  I had classic Levi jeans in mind when I stitched the pocket in gold floss and added my sentiment from red to mimic the tag on their jeans.  There are 2 sentiments, Happy Birthday and Happy Spring in the stitching kit.  There is also an add-on set of sentiment dies that gives you 4 more options; that's where this one came from.

Here is my card featuring the Small Dies of the Month: Floral Mini Tiles.


supplies: gold foil cardstock, navy, medium blue, and red cardstock, Floral Mini Tile dies

This set contains 4 different shapes that can be cut, decorated with florals, and repeated.  I used this onion shape; the others are a hexagon, a diamond, and a teardrop.  I pieced 5 of these, arranged them as you see, and for now anyway, skipped a sentiment, because everything is so nicely balanced.

You can see some of the same florals in the Large dies of the Month: Spring Reflections.  This is a set of 21 dies, and has several variations you can change up: the framing, (there's also a trellis design) and the floral image in the center.  And there are 3 options for sentiments.


supplies: white, lavender, purple, 2 pinks, yellow, and green cardstock, Spellbinders Spring Reflections dies, tiny white pearls

And lastly, here are the Embossing Folders of the Month: Hydrangea Blooms and Spring Burst.  Both are pretty special, imo!

Using the Hydrangea Blooms, I made a mini slimline card and colored the details with markers, adding a sentiment to finish. This is the "regular" embossing folder.


supplies: white and periwinkle cardstock, Hydrangea Blooms embossing folder, markers in blue, purple, and green, Wonderful Script Sentiments

I cut the shadows of the sentiments 3 times to make them stand out from the busy background.

And here is the 3D embossing folder, Spring Burst!  I took that title to heart for my design.


supplies: black, pink, and a pale yellow cardstock, Spring Burst 3D embossing folder, white pigment ink, Stitched Glimmer Butterflies dies, sentiment from Sentimental Greetings, yellow enamel dots

I embossed my pink panel, rubbed it gently with white pigment ink, then added a big butterfly and a fussy-cut stamped sentiment.

You can look HERE for information on Spellbinders Clubs.  Each is available only from the 6th until the 27th of each month.  If you click on my links under each of my cards, you can see the details of each kit.  There are many ways to combine these products, and you can cancel a subscription at any time without penalty.

Hope I've inspired you!  Thanks for stopping by!

Wednesday, November 30, 2022

Simon Says......Anything Goes


Welcome to a new challenge at the Simon Says Stamp Wednesday Challenge blog!


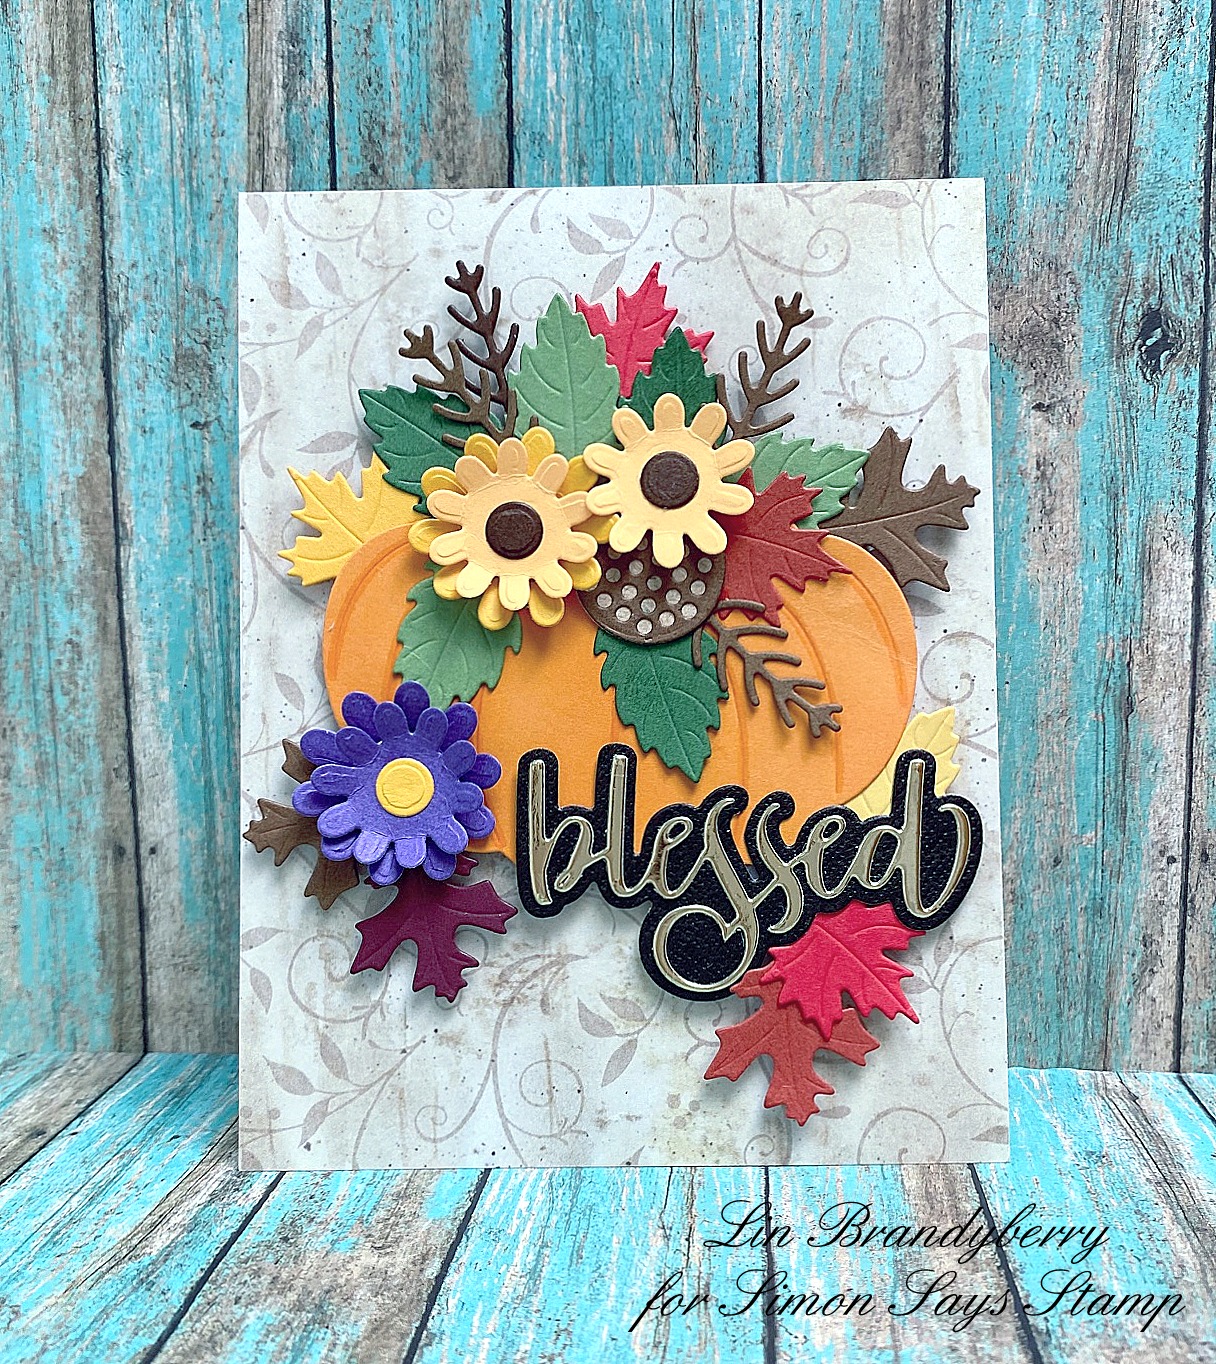
Our theme this week is Anything Goes, and the team is featuring Honey Bee products!  Having just celebrated Thanksgiving here in the States, I wanted to play with this gorgeous set of dies from them.


supplies: Green Leaf, Sunshine, Burnt Orange, Dark Chocolate, and other fall colors of cardstock, Gold Mirror Card, an unknown neutral flourish patterned paper, Honey Bee Fall Bouquets and Bitty Buzzwords dies, adhesive foam

This lovely die set has everything you need to make a seasonal bouquet.  I chose to put mine into a pumpkin base, but there's also a canning jar included in the set!  After arranging everything, I held it all together with some Press 'n Seal, secured it on the reverse, then added some adhesive foam to pop the whole thing above my card base. 

Now it's your turn!  We have a $25.00 gift certificate 


to the amazing Simon Says Stamp store for 1 lucky random winner of this week's challenge!  I can't wait to see what you all make this week!

Friday, August 19, 2022

Spellbinders Fall Label Motif

 Here's my first card for fall, featuring Spellbinders new Fall Label Motif dies!


supplies: Cream, Surf Blue, beige, and white cardstock and copper metallic kraft cardstock, Fall Label Motif dies, distress inks to color, sentiment from Newton's Nook Autumn Newton, Falling Leaves embossing folder

Isn't this grid-work pretty?  I cut it this time from copper metallic paper.  The fall leaves, berries, etc were cut from white cardstock then colored with distress inks before assembling into my little groupings.

This die set is part of a 4-season collection by Becca Feeken called.Seasonal Label Motifs.

Many thanks to Spellbinders for sharing these dies with me!

Friday, May 27, 2022

Rainbow Wreath

 I love Pink Fresh Studio's washi tapes;  here is a CAS card using one of their latest.


supplies: white cardstock, Tim Holtz rose gold Metallic Kraft stock, Pink Fresh Studio Rainbow Floral Washi wreath and Folk Edge Rectangle dies, Simon Blessings die, gold sequins, adhesive foam squares

With this sentiment and the softness of the washi wreath, this card could be used for many occasions, from a sympathy card to a feminine birthday one.

I lifted the inner rectangle and the wreath for some dimensional interest.  

Thank you for stopping by - enjoy your weekend!

Tuesday, October 12, 2021

October Birthday Cards

  Here are some birthday cards that look like October to me!


supplies: kraft, white, and copper metallic cardstock, Spellbinder's Autumn Leaf Border glimmer plate and copper glimmer foil, oxide inks in tumbled glass and autumn colors, copper and teal sequins

I foiled the border then colored in the details and the background with oxide inks and blender brushes.  Then I fussy-cut one edge of the image and trimmed my panel to fit an A2 kraft panel, on which I had foiled this sentiment (I think it came with the glimmer machine).

Here's another one, with gold foiling instead of copper.


Same process here, except I painted the foiled image with metallic watercolors and dropped the trimmed panel down a bit more this time to allow room for the sentiment.  As above, I added a skinny metallic strip to bring in more shine.

Thanks for coming by today - have a fantastic week!

Saturday, July 24, 2021

Washi and Gold

 Playing again today with some pretty washi tape that is highlighted in gold, so I followed suit and used gold sentiments.  These washi tapes come with a large focal point, like a wreath or a bouquet, plus 6 or so smaller images that can be used alone or layered over the focal point.  I chose those smaller images for my cards today, and mixed them with a variety of supplies from lots of companies.


supplies: white, Doll Pink, and Metallic Gold cardstock, Pink Fresh Studio English Garden washi, PTI (retired) mix & mat Scallops dies, Simon Happy Birthday dies, adhesive squares to lift up focal panel

I hadn't played with this pretty mix & mat scallops set for a long time.  It has a lovely floral lace center, plus stitching and a scalloped border.  Then I proceeded to cover up most of it with the little rose bouquets!  As I said, because the washi highlights the designs with gold, I added a metallic gold sentiment die, then lifted that whole panel above the card base.  

My next cards brings in my favorite gingham motif, using a peachy color that matches these florals from the Joyful Bouquet washi.


supplies: white and peach cardstock, Doodlebug peach Buffalo Check dp, Pink Fresh Studio Joyful Bouquet washi and Perfect Sentiments stamps and dies, Simon Ultrafine detail gold embossing powder, Penny Black Stitched Stacker dies in 2 sizes, adhesive foam to lift florals

I just stacked up my gingham and stitched backgrounds, added my gold-embossed sentiment, then popped up the washi florals.

When I use something gold, I'm finding that I can get better pictures when I take my cards outside and photograph them.  Taken in the usual place inside, the gold shows up pretty dull.

Thanks for your visit today - hope your weekend is a fun one!

Tuesday, January 12, 2021

Spellbinders Expressions of Love Collection

 I was lucky enough to receive some products from Spellbinders Expressions of Love collection.  I put a hot-foiled background together with a beautifully detailed heart for today's card.


supplies: Hero Arts (retired) Carnation and a darker pink cardstock, Tim Holtz rose gold metallic kraft cardstock, Spellbinders Scattered Hearts Background Hot Foil glimmer plate, their Rose Gold glimmer foil,  and a Forever Love Hearts Etched die, sentiment from a retired Hero Arts card kit, embossed in copper

I LOVE this new background glimmer plate full of hearts!  I got perfect results with my Glimmer Hot Foil machine!

Many thanks to Spellbinders for this treat, and to you for stopping by today!

Tuesday, December 1, 2020

It's DieCember!!

It's Simon Says Stamp's annual DieCember release - what a fun assortment of dies!


I received the new Detailed Rose die set, and I have 2 cards for you.


supplies: tan, black, Schoolhouse Red, a burgundy, Green Leaf, and a darker green cardstock, Detailed Rose dies, Sunny Studios Quilted Hearts embossing folder

I used the detail dies to cut the black outlines, then the solid images to fill in with color.  I also pieced in a few more burgundy pieces to add extra depth to the image. This is such a big die that I decided to forego the sentiment on this one, until I use it.  I placed the rose over a background with tiny hearts.  Since it's a red rose, it could be for Valentine's Day!  

Then I decided to make a more elegant card and changed to gold details for my next one, and put it against a gold hot-foiled background on cream.


supplies: metallic gold, cream, Schoolhouse Red, Green Leaf and a darker green cardstock, Detailed Rose dies, Christmas Blessings dies, Spellbinders Essential Glimmer Rectangles and Glimmer Hot Foil machine, gold glimmer hot foil

Since these colors reminded me of Christmas, I used a Blessings sentiment die.

To see the entire release, just click HERE.  And for ideas on how to use the products, visit our gallery HERE.  There will be 2 blog hops, too; tomorrow and Thursday this week!

Thanks for visiting today!

Monday, November 2, 2020

25 Days of Christmas Tags!


I'm so pleased to be participating in Tracey's 25 Days of Christmas Tags today as Simon Says Stamp joins in her annual feature!  It's her 10th year!!  All month long, she'll be featuring a different company, and today is Simon Says Stamp's day!   Simon will be offering a $50.00 gift card to the store!


I have 2 tags today using Simon Says Stamp products.


supplies: white, Audrey Blue, Peacock Teal, pink, and silver metallic cardstock, dps from Sunny Studio Classic Gingham and Holiday Cheer paper pads, Simon Christmas Foliage and Joy dies, a snowflake embossing folder, Pink Fresh Studio bow dies, My Favorite Things Stitched Tag dies, organza ribbon

I enjoy playing with this mix of pink and aqua for the holidays!  Here's another in classic red and white.


supplies: white cardstock, dps from Photo Play Kringle & Co paper pad, Simon's Lil' Gnome die and Gnome for the Holidays sentiment, My Favorite Things Stitched Tags dies, tiny cotton puff, red and white bakers twine      

Be sure to visit Tracey's Blog, In My Creative Opinion, every day to get lots of ideas for your Christmas tags, and to see how to enter your own tag inspired by what you see this month!  There are lots of prizes to be won!

Visit THIS PAGE at Tracey's blog for all the rules and to add your own tag - you can win prizes from these companies either by commenting or by entering your own tag!  The contest ends Dec 3 at midnight, and the winners will be announced on December 10 at Tracey's blog!