Monday, October 31, 2022

My Favorite Cards from October

I had lots of fun this month - here are my personal favorites that I made in October.


.....seasonal things and a bevy of birds!  I try to put these in chronological order, so if you're interested in seeing something closer, just keep on scrolling down on my blog.  The first ones will be at the beginning of the month, the last ones towards the end.

Thanks for coming by! 

Saturday, October 29, 2022

Vellum Cards - Thank you, Jennifer!

 Jenn McGuire recently did a post featuring vellum as a card base in all different ways - I was enchanted!  So as soon as I could, I gathered together my own supplies, a good many of which are retired,  and did a CASE of one of her cards.


supplies: heavyweight vellum, white, kraft, black, 2 blue-greens, Lipstick Red, Schoolhouse Red cardstock,  snowflake Snow Flurry embossing folder, Spellbinders Label die, Taylored Expressions Cardinal die, branch die, Tim Holtz Mini Holiday Greens dies, Spellbinders Joyful Christmas Sentiment, red glimmer foil, red stickles for berries

Jennifer had a great tutorial video which I followed pretty closely to construct my card.  Here's another card, using a different embossing folder.  I CASEd my own card from 2016.


supplies: heavyweight vellum, 2 greens, white, and gold cardstock, white glitter cardstock (star), a piece of blue polished stone from my stash, another Spellbinders label die, Simon Pinpoint Starlets embossing folder, Churches and Holy Couple star dies, Poppy Stamps Evergreen Trio dies, sentiment from Mark's Finest Papers clear stamp set, pearls

Jennifer also had ideas for using glimmer plates and foil, and stencils on vellum.  I can't wait to experiment some more - stay tuned!

Friday, October 28, 2022

More Sealed by Spellbinders

Today's cards feature the new Background Glimmer Plate and matching stencils called Geometric Flower.  The foiling is very subtle, but gives a lovely shimmer to the design.

supplies: white and gold mirror cardstock, vellum, Spellbinders Geometric Flower Background Glimmer plate and matching stencils, Polished Brass glimmer foil, spun sugar and cracked pistachio distress ink, Baby Pink ink, 2 sentiments from Mix & Match Holiday Greetings dies, microdot adhesive

After foiling the design, I used 3 of the 4 matching stencils to color it in, then added a gold foil sentiment on a circle of vellum.

Next I went seasonal, thinking of sunflowers.


supplies: white, cream, and kraft cardstock, Geometric Flower Background Glimmer Plate and matching stencils, Aura glimmer foil, Chamomile, Snapdragon, Lime, and Vintate Photo ink, banner and sentiment from Concord & 9th Autumn Hues, adhesive foam squares

This time I used all 4 of the stencils.

I love these kinds of designs, as different motifs pop out depending on how you focus on them.  On this one, besides the obvious flowers, I can see spools of thread repeated vertically and horizontally!  Hint: the small squares in the design would be the "thread" on the spools.

These products are from the Sealed By Spellbinders collection.  Be sure to check out the whole collection - it's a big release!

Wednesday, October 26, 2022

Simon Says.......Anything Goes


Welcome to our weekly challenge at the Simon Says Stamp Wednesday Challenge Blog!


Our theme this week is Anything Goes, and the team is featuring Pink & Main products.  Here's my card.


supplies: Audrey Blue cardstock, printed papers from Doodlebug Pumpkin Spice pad, Pink & Main Java Nice Day clear stamps (coffee and sentiment), adhesive foam squares

Now it's your turn!  We have a $25.00 gift certificate 


to the amazing Simon Says Stamp store for 1 lucky random winner of this week's challenge!  I can't wait to see what you all make this week!

Monday, October 24, 2022

Cards from the Sealed by Spellbinders Collection

 A new collection that revolves around wax seals is releasing today.  It's called Sealed by Spellbinders, and there are some lovely products in it!  I have a new die from that line to show you today, and I'll have another post in a few days with more.

Sealed Birds is a delicate leafy die with birds.  


supplies: white and aqua cardstock, Spellbinders Sealed Birds dies, markers to color, (retired) The Craft's Meow sentiment, heart die, adhesive foam

The set consists of the branch with birds and 2 extra birds that can be popped up.  After die-cutting them all out, I colored with markers, then secured them to a panel with a heart window, and lifted the whole thing above my card base.  Here's a closer picture to show the sweet details.


I enjoyed working with this die so much that I made a 2nd card, in fall colors this time.


supplies: Cream cardstock, Sealed Birds dies, markers to color, (retired) Taylored Expressions Leafy Vine embossing folder, Sugar Pea Fall Fox sentiment, rectangle die

This time I lifted only the bottom bird and left the branches unattached for some dimension.

I hope you'll give this collection a look - it's got something for everyone!  

Thanks for visiting me today!

Sunday, October 23, 2022

Sunflower Fields

 I'm just now getting around to playing with the stamp set from Simon's October card kit, which sold out in record time.  It has a lovely sunflower stamp set and stencils to color it with.  


supplies: white, tangerine, and dark chocolate cardstock, Sunflower Fields stamp set and matching dies, natural twine

Many years ago we planted a pack of assorted sunflower seeds and were rewarded with a lovely collection of all colors and sizes.  We have tried several times since to grow these again, but with no success.  At first I blamed it on squirrels digging up the seeds to eat, but recently we started them inside, and they never germinated.  Such a disappointment!  Guess I'll have to be content with these stamped ones!

Thanks for stopping by!

Saturday, October 22, 2022

Dove of Peace, take 2

 I love it when I can pair a brand new something with a well-loved oldie!  Today's card is just such an example.


supplies: white and aqua cardstock, Memory Box retired Peace Collage woodblock stamp, embossed in white, MFT Dove of Peace, old Wplus9 snowflake die

Not much different from yesterday's card, but I'm so thrilled to use this beautiful script collage again, and I think they go together beautifully!

Friday, October 21, 2022

Dove of Peace

 When I saw the lovely dove dies recently released by My Favorite Things, I pounced!  


supplies: white cardstock, My Favorite Things Peaceful Dove dies, tumbled glass oxide ink, (retired) The Craft's Meow sentiment from Christmas Lanterns, Pink Fresh Studio Folk Edge dies, adhesive foam 

The dies include the dove body, a wing, which I cut twice, the beak, and the leafy branch.  I suppose you could ink blend some grey to bring out the details on the dove, but really, I think it's beautiful as is. I popped it above my card base, and pulled the top wing forward a bit for some dimension.

The price point is wonderful too!  I am so glad I got this; it may be the easiest card EVER, and if I need any last-minute Christmas cards this year, it's in contention!

Thanks for stopping by today.  Happy Friday - enjoy your weekend!  

Wednesday, October 19, 2022

Simon Says........Spooky!


Welcome to our weekly challenge at the Simon Says Stamp Wednesday Challenge!


 Our theme is Spooky! this week, and the team is featuring our own exclusive Simon Says Stamp products.  You don't have to use this brand to enter, but we'd love to see you using it if you do!


supplies: white, black, and Green Apple cardstock, Simon Halloween Sentiment Strips card, Jack O Lanterns stencil, spiced marmalade, peeled paint, and black soot distress inks, Spooky Boo spider web die, (retired) Hero Arts Upper Case Alphabet dies, googly eyes, micro dot adhesive, adhesive foam squares

I used a card of Simon's Halloween sentiment strips as my background, and stencilled and cut out 4 different pumpkins, which were lifted above the card front.  I added a few googly eyes to make them a little scarier (and yes, I meant to have only 1 eye on 1 of them).

Now it's your turn!  We have a $25.00 gift certificate 


to the amazing Simon Says Stamp store for 1 lucky random winner of this week's challenge!  I can't wait to see what you all make this week!

Tuesday, October 18, 2022

Another Foiled and Stencilled card!

 Earlier this month I spent a few fun days using some Taylored Expressions products.  I shared some reults HERE.  Today I have another card that uses an older fall set.  This will be for our son and daughter-in-law and will go into the package of Halloween cards for our Grands, since these colors remind me of Halloween.


supplies: orange and Royal Purple cardstock, Taylored Expressions Foil It Fall Foliage panel, Lilac foil, Fall Foliage Background layering stencils, Altenew Midnight Violet, Chamomile, and Snapdragon mini inks, Handlettered Thanksgiving cling sentiment, Hero Arts Nested Rectangle dies, adhesive foam squares

After finishing the panel, I used a rectangle die to cut out a panel from the center, and the next size up to mat it.   Then a sentiment was stamped and clear embossed over top before lifting it above the rest of the card.

Here's a tilted photo to show off the fun foiling of the leaf veins.


And before I go, just a share of another colorway that has yet to be made into a card.  I used a Summer Rainbow foil, and then pulled some of the colors out in my inks for stencilling: Fresh Lemon, Fuschia, and Lagoon.


These are addictive!  Thanks for stopping by today!

Sunday, October 16, 2022

Holiday Floral Swag

 Spellbinders kindly sent me a 3D embossing folder from their newest Holiday Embossing Folder release.  It's a big 5 3/4" x 8 3/4", so it's easy to get at least 2 completely different impressions from it, or a slimline.  Here are 3 cards I made with it.


supplies: white, Surf Blue, and Lipstick Red cardstock, gold glitter cardstock, Holiday Floral Swag embossing folder, markers to color, Merry Christmas die

And card #2:


supplies: white and Lipstick Red cardstock, Holiday Floral Swag 3D embossing folder, markers to color, Simon Joyful Season sentiment, VersaFine Satin Red ink

Both cards were embossed, colored, then trimmed a bit and matted.  They are so detailed that all you need to add is a sentiment.  On the first card I used a sentiment die, and on the second,  a stamped sentiment

For my 3rd card, I embossed on colored cardstock, swiped with a white ink pad, then just added a stamped and die-cut sentiment, adding some glitz with white glitter paper.


supplies: Doll Pink and white glitter cardstock, Holiday Floral Swag 3D embossing folder, white ink, (retired) MFT Joy die and stamped sentiment from Hero Arts Joy stamp and cut set

Many thanks to Spellbinders for sharing this with me - I love it!

Friday, October 14, 2022

Boughs & Holly

 Concord and 9th brought out another set of layering stencils, this time for Christmas, and I couldn't wait to get my hands on them!  Here are 4 cards resulting from my first play with them.  


supplies: white and Lipstick Red cardstock, Concord & 9th Boughs & Holly wreath stencils, twisted citron, mowed lawn, rustic wilderness, abandoned coral, and festive berries distress inks, (retired) Winnie & Walter In a Word Merry die, My Favorite Things Wonky Stitched Rectangle die, micro dot adhesive

On card #2, I attached my sentiment to a vellum circle


supplies: white,, dusty pink, and Audrey Blue card, vellum, Concord & 9th Boughs & Holly Wreath stencils, Sea Shore, and Floral pink inks, Penny Black Joy to the World die, Lawn Fawn Fancy Scalloped Rectangle die, 2 shades of pink pearls, micro dot adhesive

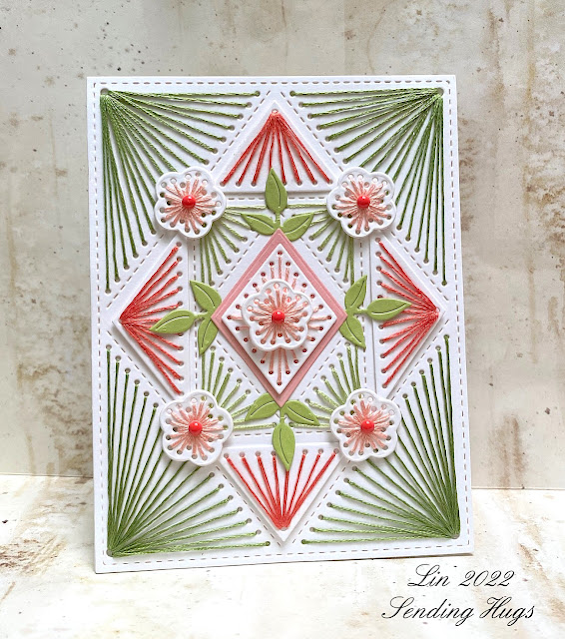
On my next card I stamped a sentiment in the center and cut it out, then popped it above a snowflake background.  


supplies: white card, Concord & 9th Boughs & Holly Wreath stencils, twisted citron, evergreen bough, rustic wilderness, abandoned coral and candied apple distress inks, (retired) Simon Merry & Bright sentiment, (retired) snowflake embossing folder, adhesive foam to raise wreath, enamel dots to match

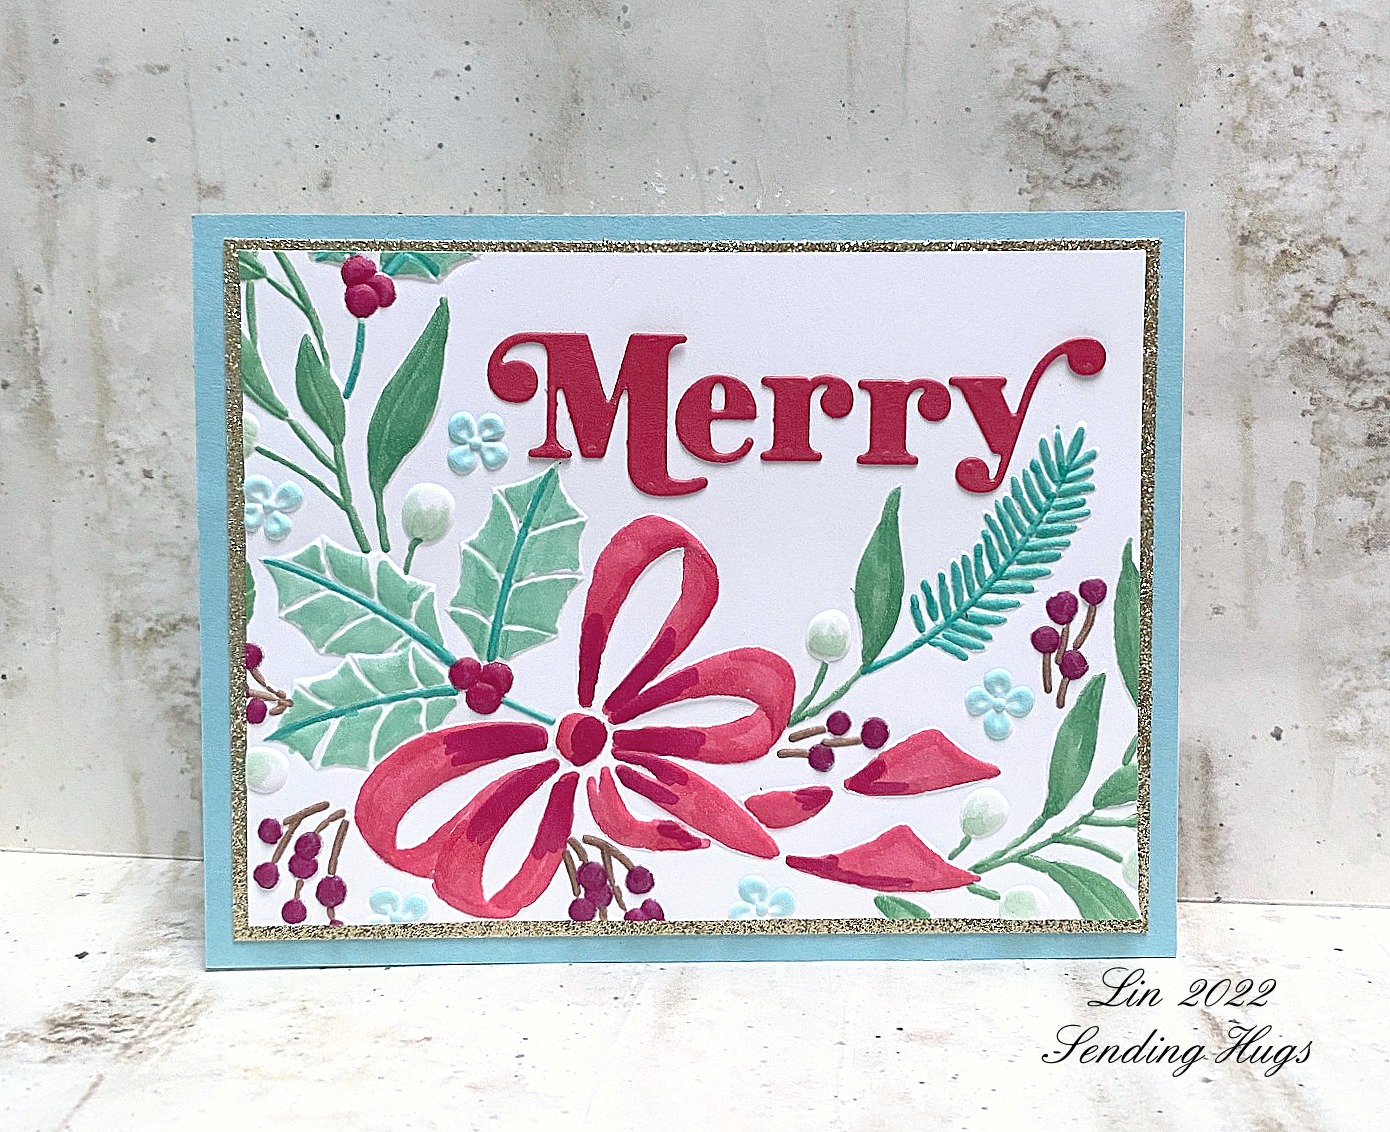
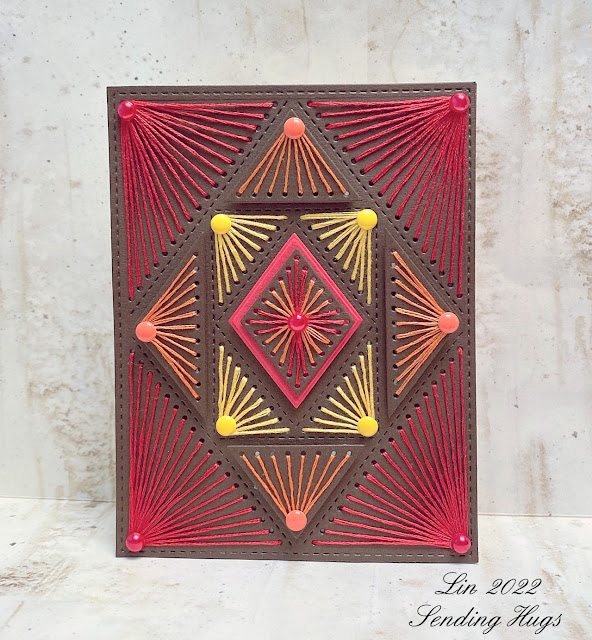
There are 2 different designs in this stencil pack - I preferred the wreath which I used above, but here is the other design which, after finishing, is quite growing on me!  You just need to find a sentiment that will fit in the 3 areas that it creates, or use a really large sentiment to cover that area.  Here I used an old set of Tim Holtz sentiment dies.

supplies: white and Lipstick Red card, Concord & 9th Boughs & Holly background stencils, same ink colors as card #1, Tim Holtz Holiday Words dies, Pink Fresh Studio Folk Edge Rectangle die, red pearls, micro dot adhesive

These stencils fall into the turnabout category because you use each of 3 stencils twice, turning it 180 degrees to complete each area of the design.  As someone who is not skilled at coloring with markers, I much prefer these stencil or stamp turnabouts!  The fun is all about choosing ink colors!

Thanks for sticking with me for my long post today!

Wednesday, October 12, 2022

Simon Says......Fall Colors


Welcome to the new challenge at the Simon Says Stamp Wednesday Challenge blog!


This week our theme is Fall Colors, and the team is featuring Colorado Craft Company products. Our teammate Kim made us a mood board to inspire us!
 

I used a stamp that's a bit over an A2 size and put it into a frame for something different this week.


supplies: white cardstock, Colorado Craft Company Whatsoever Things clear stamp, markers to color

I have always loved this quote from Philippians 4:8, especially in these times when we are surrounded by negativity.  This is a gentle reminder to put our minds to something beautiful and worthwhile rather than thinking about all the bad in the world.  Here's a closer shot so that you can read better.


Now it's your turn!  We have a $25.00 gift certificate 


to the amazing Simon Says Stamp store for 1 lucky random winner of this week's challenge!  I can't wait to see what you all make this week!

Monday, October 10, 2022

Some Foiled Cards!

I fell head over heels for the latest Taylored Expressions fall release!  They arrived quickly and I spent 1 day foiling and then stencilling, and another day making them into mini slim-line cards.  Here are just 3 of 7 results from those days.


supplies: burnt orange and a Foil It Mini Slim Falling for You panel, Triple Slim Falling for You layering stencils, copper foil, fall tones of ink, a Spellbinders Sentimental Words sentiment

To make all of these, you start first with a toner-printed slimline panel, add your foil of choice with a laminator, then use the 4 layering stencils to add details.  I really enjoyed trying out all kinds of ink combinations!

Here's another.


supplies: perwinkle purple cardstock, another Foil It mini slim Falling for You panel, Triple Slim Falling for You layering stencils, Lilac foil, Pink Fresh Studio Perfect Sentiments stamp and matching die, Altenew hydrangea, snapdragon, aqualicious, and mocha inks

And my final one for today.


supplies: pink cardstock, the same Foil It Mini Slim Falling for You panel as above, Triple Slim Falling for You layering stencils,  another of the Perfect Sentiments stamp and die, Altenew Baby Pink, Aqualicious, Snapdragon, and Mocha inks, Turquoise foil

The main Falling for You stencil set is made to make 3 different designs at one time, which are then cut apart into mini slim-line size.  (There is a 3rd design, which I haven't shared today)  That set includes a clear set of leaf veins to add to your stencilling for details.  If you want to foil the same designs, then you also order the Foil It panels in the same Falling For You, as I did today, and use a laminator to apply your foil to them before stencilling.

I'll share another similar card  soon - thanks for visiting me today! 

Saturday, October 8, 2022

Simon Hurley's Christmas Collection

 Simon Hurley has a new Joyful Christmas collection at Spellbinders!  I was fortunate to get a couple of his designs, and I have 2 cards for you today using some of them.

First up, a die set called Floral Stag and a glimmer sentiment set.


After cutting out at least 2 of each of the florals, plus the deer and his details, I first pieced what needed to be put together, (the deer, poinsettias, mistletoe, and holly branches), then arranged everything as you see.  Thank goodness for Press 'n Seal to hold everything together while I secured it all on the back before adding the whole arrangement to my card front.  

Here's my 2nd card using a new striped die and another of the Joyful Christmas glimmer plate sentiments.


supplies: white, Schoolhouse Red, and Peacock Teal cardstock, Simon Hurley Candy Stripes die, pine sprig from Floral Stag, and reverse foiled sentiment from Joyful Christmas Sentiments glimmer plates set, red glimmer foil, tiny red pearls

I cut out lots of the little pine sprigs and attached them to a skinny circle I cut using 2 circle dies.  I added a bow from my stash and some teensy red pearls, and lifted it above my Candy Striped background.  I foiled the sentiments - they came as one plate with a matching die, and then used the foil along with my solid oval glimmer plate to get a 2nd foiling in reverse.  (I was able to transfer 3 of the 5 sentiments using the oval plate - a rectangle one would do them all, but I don't have one yet.)

This Candy Stripe die will sure to become a staple, and the plus is that you can cut a 2nd one, reverse it, add it to the first, and you have a plaid background!

Congratulations to Simon Hurley for his fun collection!  And thanks to Spellbinders for sending these to me!

Friday, October 7, 2022

Layered Stitched Diamonds

Spellbinders kindly sent me a new set of Limited Edition dies to stitch with - these are made so that you can layer them, and that's just what I did.  

For my first card, I pulled out some green and peach floss and embellished the design with stitched flowers and leafy die-cuts from a previous stitching set.


supplies: white and Green Apple cardstock, Layered Diamonds die set, flowers and leaves from Stitched Flower set, 2 shades of green and 2 shades of peach to coral embroidery floss, 3 strands, coral enamel dots

Given the time of year, for my second card I used fall colors of embroidery floss against a dark chocolate base.


supplies: dark chocolate  and Lipstick Red cardstock, Spellbinders Layered  Diamonds dies, 3 strands of embroidery floss in bright red, orange, and yellow, enamel dots and red pearls to match, adhesive foam squares to lift orange and center panels.

The orange and center panels are lifted with adhesive foam above the rest of the card - I wish my photo showed that better.  When I finished this card I was struck with how much it looks like an Amish quilt!  They use dark backgrounds behind their patterns, as opposed to the usual white that the rest of the world uses.

I did not add a sentiment to either of my cards - I'm fussy about messing up the symmetry.  BUT I may have done if I'd had the matching set of diamond sentiments that was made to coordinate - what a nice variety!

As always, many thanks to Spellbinders for sharing this new set with me!