Showing posts with label acetate. Show all posts

Monday, October 14, 2024

Woodland Tales

 Spellbinders has released a new collection called Woodland Tales!  It consists of some gorgeous papers, dies, and a beautiful 3D embossing folder.  Today I have some cards using these new goodies.


supplies: white card base, gold foil cardstock, Woodland Tales Printed Vellum and Foiled AcetateWoodland Tales Sentiments dies, framing dies

 I couldn't wait to open the vellum/acetate paper pack, and I was blown away by this autumn scene!  It truly does bring back memories of walks in the woods in the fall, an activity that became a tradition even more so after we were all grown up and away from home.  I chose this autumn scene on vellum and the gold-foiled acetate sheet of script, and cut out A2 panels of each.  To be able to fasten them to my card base without glue or adhesive showing, I also cut out a framing panel from gold foil and affixed that to the acetate script panel first, then I could turn it over and add dots of glue underneath the frame to attach it to the vellum scene, and then to my card base.  And I thought the sentiment dies made the perfect greeting.  I love these papers!  

Next I played with the die sets that I got from this collection: Finley the Fox and Woodland Tales Fern.


supplies: cream, krafts, green, autumnal shades of cardstock, Woodland Tales Fern die, Finley the Fox dies, Fresh Picked Labels dies, sentiment from Fall Thoughtfulness

We recently returned from a trip to Maine, and while there we took lots of walks in the woods when we could.  One of the things I noticed at that time was that the ferns turned colors, too, all shades from golden to rust, while some remained green.  So those were the colors I put together behind this adorable Finley Fox!  Don't you love how he's prancing?!

Next I used the 3D embossing folder, Fresh Picked Floral Frame, along with some soft floral ephemera from this collection.


supplies: white and Peach Sorbet cardstock, Fresh Picked Floral Frame embossing folder, Woodland Tales Die Cut Shapes ephemera, Woodland Tales Die Cut Sentimentadhesive foam squares

I hope my cards have given you a feel for all the possibilities this collection has.  Thanks so much for stopping by today!

Tuesday, November 17, 2020

A Clear Christmas Card

 I used a brand new stamp set along with a cover die that I got last year.


supplies: white cardstock, clear acetate, Wplus9 Pine Frame cover die, Stampendous Festive Season stamps, markers, Small Talk Occasions sticker

After cutting the pine frame and gluing it to my acetate card base, I also cut 2 oval dies; 1 will go on the inside of the card for my sentiment, and on the very back of the card to cover the tape I used to secure it (see picture below). Then I stamped, colored, and fussy-cut the birch log arrangement, and glued it onto the front.  I wanted a sentiment that wouldn't cover up the design, so I chose a Small Talk sticker and edged it in red ink.

Here's a shot of the inside.  I used the heart and holly stamp from the Festive Season set, as well as an old Hero Arts woodblock sentiment - love the font!


I haven't made one of these clear cards in ages - it's nice to do something different for a change!

Thanks for stopping by!

Wednesday, December 26, 2018

Simon Says ............ Anything Goes!

Happy Wednesday!  Welcome to our final challenge of 2018 at the Simon Says Stamp Wednesday Challenge Blog!  

wed-newchallenge-header


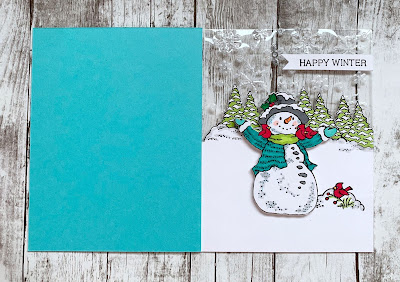
Our theme is Anything Goes this week, and the team is playing with Stampendous goodies.  I chose a darling stamp/die set for this week.  I love snowmen and birds, so a combination of the 2 is a winner in my eyes!


supplies: white and Audrey Blue cardstock, heavy acetate panel, Stampendous Snowman Cardinals stamp and die set, Nuvo Creative Pen markers to color, sentiment from Simon's An Arctic Christmas, adhesive foam, snowflake embossing folder

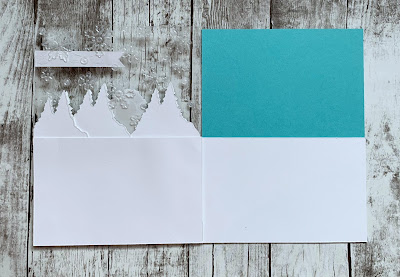
I started with a side-folding A2 white card, and on the front, I stamped the trees and the little cardinal on the ground.  I colored in the details, then fussy-cut the top edge and trimmed the back of the card to the same height.  Next I embossed the acetate with snowflakes, then secured it to the back of the front of the card.  Similarly, I attached an A2 piece of blue card to the back of the inside.  So what's holding everything together is the lower half of the side-folded card.    Then I stamped, colored, and die-cut the cute snowman, and die-cut a piece of foam, then glued them together.  I made a banner sentiment and attached it to the acetate, also adding the popped-up snowman.  Here's another pic to show you the effect.


If you look closely you can see that the top-half of the front of the card is clear.  On the inside the card is about half blue and half white, and the white area is where I'll put an inside sentiment.  In order to tidy things up, I also added a plain piece of white card to hide the adhesive I used to secure the acetate to the front of the card.  Here are a couple of pics to illustrate:


These dies cut right up against the images, and were a wonderful thing to have in order to cut the foam for behind my snowman.  I used the tree die to do the same thing in paper to line the back of the trees.

Now it's your turn!  We have a $50.00 gift certificate 

50dollar_voucher_600px

to the amazing Simon Says Stamp store for 1 lucky random winner of this week's challenge!

Saturday, June 16, 2018

Foiling

I recently added a few more foiling supplies to my arsenal, and today I made a card with them.  I really like the results!  Here's what it looks like standing upright:


supplies: black, Island Blue, and DCWV silver foiled card stock, Gina K. Designs Floral Sketch Clear Designer Toner Sheet, Sparkling Silver Fancy Foil, and a toner sheet, Chameleon Cool Tones alcohol markers, Penny Black Stitched Stacker die, Simon's Script Thanks dies, adhesive foam strips, laminator

To begin I cut a piece of the clear acetate designer toner sheet and a piece of foil and ran it through my laminator.  I set aside the foil, and colored the reverse of the acetate with alcohol inks.  Then I framed it.  


Next I placed the used foil piece over a piece of toner sheet and again ran it through the laminator.  You can see that the reverse image comes through, a silver background with the design in black.  Lying flat like this, you can see the iridescence of the foil


This was attached to a white card base and, after adding my die-cut sentiment to the clear panel, I popped it above and a teensy bit off-center from the silver layer.  Here is the finished card laying flat:


As you can see, the light plays with the foiling and gives all kinds of different looks.  From a distance, depending on which way you tilt your head, the background turns to purple, gold, green, or blue - so fun!

What I was unable to capture in my photos was the dimension, almost a shadow-box effect that lifting the clear panel gives to it.  You can kind of think of this design as a shaker card minus the shakings!

Thanks for stopping by today - I hope your weekend will be a fantastic one!

Thursday, April 20, 2017

Simon's May Kit - Animation

My Simon Card Kit arrived this afternoon, and I had a play with the animation stamps and grid line acetate paper in it that makes the stamps appear to move.  The stamp set this month is exclusive to this kit only.


supplies: Doll Pink cardstock card base, white cardstock to stamp on, butterfly dp from Illustrated Faith Basic collection, butterfly stamp from Uchi's Designs Animation clear stamp set and grid line acetate paper, sentiment from acetate Happy Things sheet, glossy accents to secure it to card, My Favorite Things Peek-a-Boo Window die as frame (not in kit)

When the grid paper is used in conjunction with the stamps, and one slides over the other, it appears that the images are moving!  So by pulling and pushing the stamped butterflies back and forth, they appear to be fluttering!

Here's all that is in this month's kit - there's even a set of Crayola markers to use to color the 2 Suzy watercolor cards, and a fun ready-to-use animated gift card slider!

Card Kit, Reveal, Monthly Card kit

Tuesday, October 25, 2016

Hero Hostess Reunion Blog Hop!


Welcome to Day 2 of our Hop, featuring stamps from the new 2016 release and Winter Catalog!  

From 2009 - 2012, Hero Arts put together classes of 4 to 8 "Hero Hostesses" for a 4-month term.  Our job was to make people feel welcome in the Hero Arts Flickr group, and to contribute our work using Hero Arts stamps.  There ended up being 36 of us before the program was discontinued, and as we were a kind of crafting sorority, we coined "sista" as the name we called each other.  I treasure these ladies, and have a soft spot in my heart for each of them and Hero Arts.  I am so excited to be reunited with my Hostess sisters again this year, and I thank Hero Arts for enabling this reunion!  

You should have arrived here from the amazing Kathy Racoosin's blog.  If you want to start from the beginning of today's hop, just visit the Hero Arts Blog to get our lineup. 

I love their birds this year, so I chose 2 bird sets, Vintage Christmas Post and Color Layering Cardinal, and made 2 cards with each set.


supplies: white and red cardstock, Hero Arts Vintage Christmas Post, Ombre Green, Wet Cement, old paper, and Onyx Black inks, Joy Stamp & Cut die and matching stamps

I love the faint script in this set and stamped it randomly all over my panel before adding my other elements.  I used my mini Misti and Jennifer McGuire's tutorial for mirror stamping to make a 2nd cardinal, and then colored them as a male and female.  We always see cardinal couples together at our feeders, and they add such lovely color to our dull winters!  

My 2nd card with this set is much more CAS in design.  I paired it with one of my all-time Hero Arts sentiment sets, which is sadly retired.  When you listen to cardinals outside, "Cheer, Cheer, Cheer" is one of their songs, so I thought this sentiment was a good one.


supplies: white and red cardstock, Vintage Christmas Post, (retired) Miracle of the Holidays sentiment, Punch ink, evergreen bough distress ink, snowflake stencil and modelling paste, Prisma glitter, adhesive foam squares

My next cards use the fabulous Color Layering Cardinal.


supplies: white and green cardstock, acetate panel, watercolor wash design paper, Hero Arts Color Layering Cardinal and Beauty of the Season woodblock stamp, schoolhouse red, fired brick, and aged mahogany inks, pine branch die, Winter Flurry snowflake embossing folder, sparkling clear sequins, adhesive foam squares

Isn't this multi-step stamp amazing?  And it's not hard at all to line everything up.  I used 3 different red inks and my misti to stamp him, then fussy-cut him and set him aside.  Starting with a white card folded at the top, I trimmed and added a blue watercolor wash design paper.  Next I embossed a piece of acetate with the snowflake folder, trimmed it, leaving about an inch at the top, scored it close to the design, and then secured it to the card with double-stick tape on the back.  To finish I cut the pine branches and stamped and trimmed my sentiment, and added them to the front of the card over the acetate.  And lastly the cardinal was popped above everything else, and I sprinkled on a few sequins for sparkle.  I think this sentiment would work for all seasons, not just for winter/Christmas!

I liked the way the snowflakes looked with him, so I made another card using the same embossing folder, and this time I used more of the accessory stamps in the set, and added a woodgrain panel. 


supplies: white cardstock, board dp, Hero Arts Color Layering Cardinal stamp set and Joy die, Pale Tomato, Red Royal, and Raspberry Jam red inks, Ombre green ink, Winter Flurry embossing folder, adhesive foam squares

Hero Arts is offering TWO $25.00 shopping sprees to our hop readers!  One will be chosen from those who comment on the blogs along yesterday's hop and one from those in today's hop, and there will also be a bonus prize chosen from comments left at the Hero Arts blog on each day!  The more commenting you do, the better your chances - deadline for commenting is Sunday, Oct. 30, by 11:59 pm Pacific time.

Now it's time to hop on over to my friend Linda Wetterlin's blog - I know you'll love what she's made for today!  

Here's the list for today's hop, in case you get lost:


Lin Brandyberry  - that's me!

Thursday, December 6, 2012

CASE-ing Jennifer

Jennifer McGuire had a tag video at the Ellen Hutson CLASSroom blog as part of Ellen's 12 Tags of Christmas with a Feminine Twist series, and I couldn't wait to try this lifted acetate panel technique for myself:


supplies: aqua, white and red glitter cardstock, acetate panel, Memory Box Peace Collage, Stazon White ink, Hero Arts CG229 Classic Holly, VersaFine onyx black ink, Spectrum Noir markers, Memory Box Perched Reed Bird die, Wplus9 Seasonal Sentiments snowflake die, red pearls

I'll let you watch Jennifer's video, but basically I stamped an acetate panel, embellished it, and then lifted it with foam squares above my card base, hiding them behind the holly, bird, and snowflakes.  Doing this gives an interesting shadow effect on the base from the stamped image on the acetate.

This was really fun to make, and it makes for an unusual card!  Thank you, Jennifer!

Saturday, June 16, 2012

Best Wishes

The CAS-ual Fridays challenge this week is a favorite of mine: using acetate or vellum.  I ADORE making acetate cards......they're just that little bit different, and always get a wow review because of it.  The background paper I used is VERY pale, so I had to brighten my card quite a bit for you to see the details.  Here's my entry:


supplies: clear acetate card, design paper from Melissa Frances "5th Avenue", Hero Arts CL267 Card Messages, Stampology Black ink, Hero Arts/Studio Calico #331065 Lattice Background, StazOn white ink,  Cheery Lynn butterfly die (thank you, Yvonne), pink pearls, Ranger Glossy Accents to secure butterfly to front of card

I have a wedding and a shower coming up this summer, so this will come in handy......

Wednesday, August 4, 2010

Sunshine and flowers


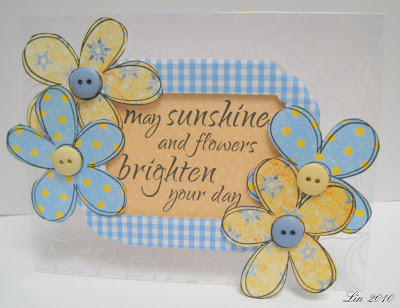
I made this card for 2 challenges: the monthly Hero Arts "Keeping in Touch", and since I used chipboard for the frame, Jenny's Challenge 16.  She is offering up some yummy Cosmo Cricket goodies! 

I haven't made a clear card in a long time; I know how much I enjoy receiving one, because they're just a little bit different.  Blues and yellows always make me happy, and they seemed to match the sentiment I chose, which fits perfectly inside the chipboard frame.  All stamps are Hero Arts: CL322 Artistic Borders (flowers), E4147 Sunshine and Flowers, CG119 Flourish Background.

Friday, November 13, 2009

If at first you don't succeed..........


This is what I had in mind a few days ago, an acetate card with a butterfly glittered from behind and its trail of snowflakes. Once again, there was glitter everywhere, and it REALLY sticks everywhere on the acetate - BUT it comes off nicely with a Swiffer hand duster! If you want to know the steps I took to make it, see my Flickr post here.