Showing posts with label patterned paper. Show all posts

Friday, February 23, 2024

New Paper Rose products at Spellbinders!!

 I was thrilled to see that Spellbinders is adding products from other companies to its store!  Today I'm playing with a new 6" pad of paper and a package of die cuts that coordinate, called Rainbow Twirl, from Paper Rose.  

Being an old quilter, I love playing with beautiful papers, mixing and matching patterns!  I made 4 cards with these lovely products.

For my first card I had to use this gorgeous wreath that is printed on one of the papers in the paper pack.


supplies: Paper Rose Rainbow Twirl 6" paper pad, sentiment from Sending Sentiments clear stamps and  matching die 

I trimmed down the paper to a 5 1/2" square, then simply added a stamped and die-cut sentiment.

Next I used 2 more of the papers and one of the lovely smaller wreath die cuts for a 4 1/4" square card.


supplies: circle design and background papers from Rainbow Twirl pad, Rainbow Twirl 2.0 die cut, stamped sentiment from (retired) Sentimental Greetings

Next is ,another 4 1/4" card, this time using a striped paper and a heart-shaped die cut.


supplies: background and striped papers from Rainbow Twirl 6" pad, heart from Rainbow Twirl 2.0 Die Cuts, sentiment from Happy Hello Floral 

And finally, I chose one of the gorgeous floral papers once again, and made a card featuring it with a die cut sentiment.


supplies: Paper Rose Rainbow Twirl floral paper, orange and black cardstock, sentiment from Mix & Match Holiday Greetings

I just cut out an A2 panel of the floral design, then made 2 diagonal cuts, lined them with an orange cardstock and framed my die-cut sentiment.

Be sure to check out the other Paper Rose collections now available at Spellbinders!  They are fast becoming one of my favorite sources for beautiful patterned papers!

I'll be sharing these cards with the Simon Says Stamp Wednesday challenge, which is Beautiful Blooms.  They're featuring Paper Rose products, also!

Tuesday, February 20, 2024

Full Bloom

Daffodils are for sure a sign of spring, and who can resist those nodding happy blooms?  I wanted to make 1 more card today using some of the February Spellbinders Club Kits, and here's what I came up with. 


supplies: tiny floral print on black from Doodlebug Hello Again, pinks, white, yellows, green cardstock, Rainboot Bouquet small dies of the month, Swirling Blooms embossing folder of the month, white pigment ink, sentiment and matching die from Lily Arch stamp and die kit of the month, adhesive foam squares

I mentioned earlier this month that I wanted to make the boots out of a ditzy floral, and I think they are really cute this way.  This time I filled them only with daffodils, and a few of the teensy white flowers to fill out the bouquet.

These sets will last until the 27th of this month before they disappear to make room for the March sets, so if these are something you think you'd like, don't wait too long!  

Thanks for your visit today - have a great day!

Wednesday, December 20, 2023

Willow Snowflake

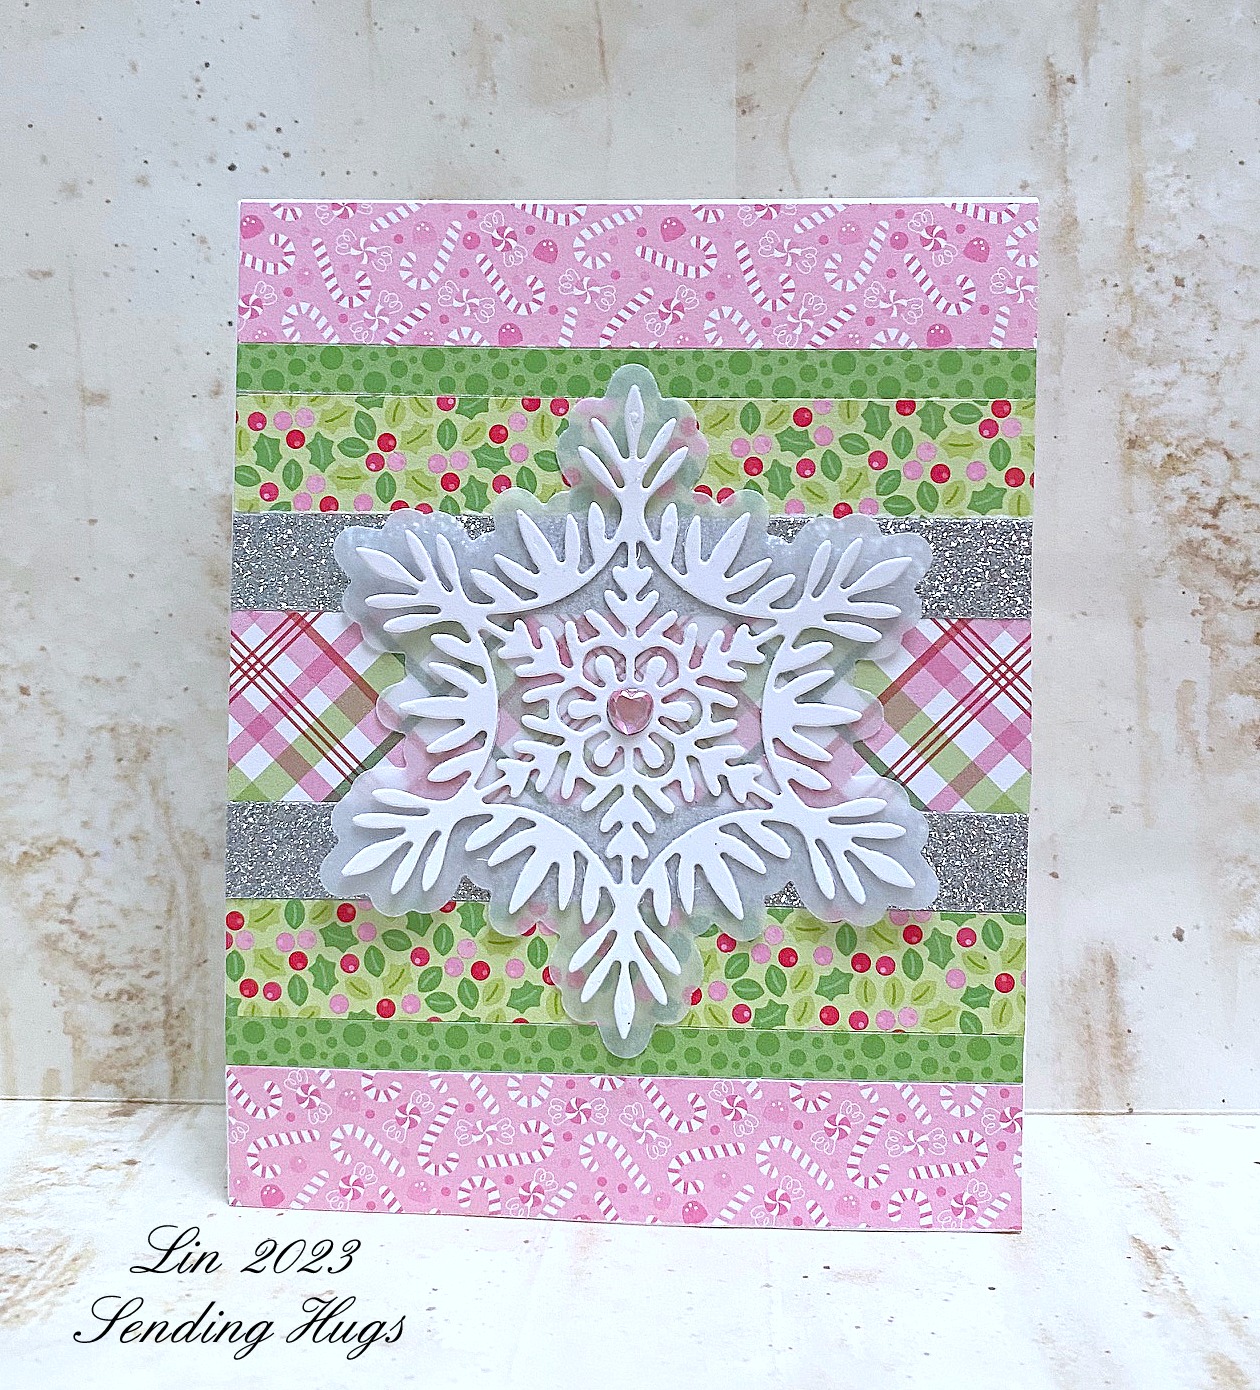
 Here are 2 cards that features the Willow Snowflake die from Simon's Season of Wonder release back in October.  I love snowflakes, and don't have many this large, so I scooped this one up!


supplies: white cardstock, silver glitter cardstock, vellum, various Christmas print dps in pink and green, Simon Willow Snowflake dies, pink heart gem

I used a sketch that my friend Mary Anne shared with me recently - it's a great way to use up leftover scraps!

Here's card #2.


supplies: Surf Blue and aqua glitter card, Willow Snowflake die, Snowflake Visions embossing folder, sentiment from Warmest Wishes clear set, white pigment and High Dive inks

This die is very delicate!  It comes with a matching shadow die that you see on my first card in vellum, but for this card I wanted only the snowflake by itself.  Adding the small circle sentiment in the center gave me a place to put an adhesive foam square so that I could lift it above my card base.  

Wish I could capture the extreme sparkle the glitter card adds.

Hope your week goes well - thanks for stopping by today!

Sunday, December 3, 2023

Using Up Some Scraps!

I have lots of 6" square patterned paper pads, and when I cut up a sheet to make an A2 background, I have little bits of that paper remaining.  I have been throwing these into a ziploc bag just to corral them and keep them neat.  Today's card makes use of those little leftovers.


supplies: white, kelly green and lipstick red cardstock, kelly green glitter cardstock, various red and green Christmas dps, Simon Chunky Merry dies, holly leaves and berry sprig dies

My friend Mary Anne came up with this recipe to fill an A2 card panel with strips. Thank you, my friend!

I also added in some skinny strips of green glitter paper - it makes this design that much more festive!

Hope you're having a great day - thanks so much for visiting! 

Tuesday, November 14, 2023

Joy to the World

 I'm finishing up on making Christmas cards.  Here's a clean and simple one that is a fun mix of lots of supplies!


supplies: white and Schoolhouse Red cardstock, a scrap of red checked dp, Tim Holtz Big Tidings Joy dies, sentiment from The Greetery Opposites Attract Holiday stamps, leaves and berries from Taylored Expressions Wreathed in Joy stamps, stencils, and die, Honey Bee Pierced Fancy Flakes cover plate, adhesive foam to lift central motif

I wanted to see if the small wreath from Wreathed in Joy would work where the "O" is in Joy, and unfortunately it won't.  But I had previously stamped and stencilled these leafy berry sprigs from that same wreath set, and thought I could try to use them to accessorize the word.  I think they play nicely together, and here is what resulted!  

This card would be fairly easy to make in multiples, also.  

Thanks for stopping by today.

Friday, October 27, 2023

Sending Warm Wishes

 Here's another set from The Greetery that can be used all year long, but I made it into an autumn card today.


supplies: pool and white cardstock, plaid dp from Lawn Fawn's Perfectly Plaid Fall, woodgrain plank dp from SN@P Wood and Notebook Basics, The Greetery Cozy Cup layering stamps and matching dies, Cozy Cup Coaster, stamped flower from The Greetery Banner & Bough, Altenew mini inks

After choosing my pattern for my coaster, I chose colors that matched it for my stamping.  The sentiment reads "sending warm wishes".

This is the perfect season for enjoying a cup of coffee or cocoa or tea with a friend, isn't it?  

Wednesday, October 25, 2023

Woodblock Wednesday for October

This month I used 2 Hero Arts woodblock stamps from 2009: Traditional Pumpkin and Tall Pumpkin.

supplies: black dot and halloween stripe dps, white cardstock, Doodlebug orange tiny prints, Hero Arts Tall Pumpkin and Traditional Pumpkin, faces from Clearly Besotted Boo to You and Pink and Main Hey Pumpkin, bat and Boo from Spellbinders Hey Boo die set, MFT Wonky Stitched Rectangle die 


Hope you'll join us this month!


I'll be adding this card to this week's Simon Says Stamp Wednesday challenge: Anything Goes.

Tuesday, October 17, 2023

Tim Holtz Big Tidings

I loved all of Tim's new Christmas dies from Sizzix this year!  This set of Big Tidings is the first of them to come home with me, and I made a card with each of the big words, first in traditional colors and a woodsy theme.


supplies: cream, Lipstick Red, and green cardstock, woodgrain and buffalo plaid patterned papers, Big Tidings (word, shadow, and bow), Mini Holiday Greens (pine sprigs), and Funky Festive (berry sprigs) dies, sentiment sticker from Idea-ology Christmas 2023 sticker book

And the second is in frosty cool colors.


supplies: white, glitter white, 2 shades of aqua cardstock, Tim Holtz Big Tidings Noel and star dies, Plaid stencil, sentiment from his collaboration with Simon Says Stamp in 2013, pine needles distress ink, a retired snowflake folder

I really liked the effect that stencilling on the words has - got that idea from several of Tim's Makers when this set was first introduced last month.

So many wonderful possibilites with this new set of dies!  

Thursday, September 21, 2023

Harvest Blessings

Here's a fall card that uses a sketch I have made in many variations.


supplies: cream, gold, orange, red, and green cardstock, gingham papers from Echo Park's Autumn Dots & Stripes Gingham paper pad, Spellbinders Autumn Leaves and Autumn Wonder (acorns) dies, Simon Stitched Circle die, sentiment from (retired) Newton's Nook Autumn Newton

In the past, there have been flowers where the leaves and sentiment are now, I'm glad to change things up a bit today!  

Sunday, September 10, 2023

A Harvest of Blessings

 We're almost midway through September, so I take that as my okay to bring on the fall cards!  This design is a CASE of one I made back in 2018.   I simply changed up the papers this time around.  The prints are all old Doodlebug patterned papers and almost everything has long been retired.


supplies: aqua and dark brown cardstock, various Doodlebug prints, Simon Says Stamp Stitched Alphabet clear stamps, circle die, unknown leaf dies, stamped sentiment from MFT Harvest Mouse, twine, wood adhesive dots

Thanks for stopping by today!  

Wednesday, August 30, 2023

Woodblock Wednesday!

 I was thrilled to be asked to be a guest designer at Amy's Woodblock Wednesday challenge this month!  

I had fun trying to decide which of my wood stamps to play with, and in the end, I chose this one by Hero Arts from 2010, and updated it by making it into a mini slim-line.  Since it's almost officially the end of summer, I thought I'd showcase this lovely stamp that features a summer hollyhock.


supplies: white card base, peach and black cardstock, Doodlebug peach gingham, and a script pattern paper, Hero Arts Garden Silhouette woodblock, VersaMark ink and white embossing powder, peach and green inks, blending brushes, sentiment from Clearly Besotted Sweet Little Sentiments

Starting with a skinny panel of a script pattern paper, I stamped using VersaMark ink, and white embossed the image.  This particular stamp inks the negative of the image, leaving the details alone so that the background paper shows through.  Then I used small blending brushes to add peach ink to the flowers and green to the leaves and bugs.  The panel was then matted in peach cardstock, and affixed to a mini slimline card base 3" X 6" on which I'd added panels of peach gingham and the same script I used to stamp on.  To finish I added a simple script sentiment embossed in white on black.


Since woodblock stamps are how most of us began stamping, I think it's genius that Amy gives us a forum for bringing back these beauties!    I hope you'll play along, too - you can find more information HERE.

Saturday, August 26, 2023

Bibi's Snowflakes: Delicate Snowflakes

 Here is the last instalment of my cards featuring some of the Bibi's Snowflakes Collection.  This last set of dies is called Delicate Snowflakes, and they are just that, 4 different 'flakes with dies to accent them with, and shadow dies, too; 17 dies total.  Here are my 2 cards. 


supplies: white and silver metallic cardstock, oxide inks, white paint splatters, Delicate Snowflakes, Snowflake Wishes sentiment die and stamp, blue ink, a retired snowflake embossing folder

I inked a panel using oxide inks and splattered it with white paint, then embossed some small snowflakes on it.  Then I simply cut out 3 of the snowflake designs from silver metallic cardstock and a sentiment to match.

The next card uses the largest snowflake, along with some coordinating dies to add some color to it.


supplies: white and Audrey Blue cardstock, various Doodlebug christmas patterned papers, Delicate Snowflakes, stamped sentiment and banner die from Snowflake Wishes, red enamel dot 

I started with a square panel and cut out the snowflake, then matted the negative with Audrey Blue.  I pulled colors from the heart paper to add details to the snowflake, then turned it and popped it above the square panel.  The little sentiment worked well with the hearts, I thought!

I hope I've given you some ideas for using these fun dies - they can be as simple or as detailed as you like, and they're a good size also! 

Thanks for visiting me today!

Monday, August 14, 2023

Nutcracker Sweet

Here are my card samples using the newly released Nutcracker Sweet Collection from Spellbinders. 

The paper pad has some lovely designs, and that's where I started for both my cards today, then adding ephemera to match.


supplies: red, green, and white cardstock, holly design from Nutcracker Ballet paper pad, ephemera (sentiment, sprigs, and bow) from Nutcracker Ballet Printed Die Cuts pack, adhesive foam to lift central motif


supplies: white cardstock, background paper from Nutcracker Ballet paper pad, ephemera (florals, bow, and sentiment banner) from Nutcracker Ballet Printed Die Cuts pack, adhesive foam to lift sentiment banner

It's so unusual to see this lovely shade of blue being featured, especially at Christmas, so I had to make a card with these lovely elements. I formed them into a wreath, then just added a bow and the sentiment.

There is also a Chipboard Sticker pack available, but I didn't use that this time.  These bundles really help at Christmas time when we need to produce in quantity quickly!  

Hope I've inspired you to give this collection a closer look.  

Sunday, August 6, 2023

Spellbinders Club Kits for August, part 1 - Small and Large Dies

 The Spellbinders Club Kits for August are now available!  

Look at the details in this Small Die of the Month Kit: Breezy Swing!


supplies: various solid colors of cardstock, a tiny Doodlebug print dp, Breezy Swing dies, sentiment from Happy Hello Floral (this month's Stamp of the Month)

How fun is this little scene?!  I'm adding this card to the Simon Wednesday Challenge: Summer.

The Large Die of the Month is called Blooming Pomegranate.


supplies: cream, 2 reds, 2 greens, and blue cardstock, Blooming Pomegranate Large Die of the Month

I was a bit intimidated with this kit at first - lots of pieces!  But I'm glad I took my time - it's a lovely image!

You can look HERE for information on Spellbinders Clubs.  Each is available only from the 6th until the 27th of each month.  If you click on my links under each card, you can see the specifics of each product.  You can subscribe to the kits separately, but there are also lots of ways to combine several of them (scroll down and look under Value Clubs).  And you can "unjoin" a subscription at any time without any penalty.


Wednesday, July 26, 2023

Woodblock Wednesday for July

 Here's my entry for this month's Woodblock Wednesday.  I used one of a set of 4 stamps from Hero Arts called Words & Flowers, dated 2008, and did some easy paper-piecing..


supplies: white cardstock, Doodlebug floral dps, Hero Arts Words & Flowers woodblock, sentiment from Clearly Besotted Sweet Little Sentiments

I've always loved text on a stamp, and adding in a flower is icing on the cake!


And a detail photo:


I hope you'll join us and have a play with your woodblock stamps, too - you can find all the info here.  


I'd like to enter this card into this week's Anything Goes challenge at Simon Says Stamp.

Thanks for stopping by!

Friday, July 14, 2023

Spellbinders Make It Merry Limited Edition Holiday Cardmaking Kit!!

Today I have 5 cards that I made using the supplies in the Make it Merry Cardmaking kit from Spellbinders.  This kit contains everything you will need to make lots and lots of cards for Christmas, even adhesive, envelopes, and card blanks in 2 sizes, not to mention a pad of printed papers, matching cardstock, including gold and silver metallic, and lots of ephemera to mix and match.  This kit has gold metallic accents and there are 2 each of the ephemera pieces.

Here are my cards. 


supplies: Make It Merry Cardmaking kit, and an add-on set of ephemera called Make it Merry Florals


Playing with a kit like this that has everything coordinated is almost like making little quilts, just a matter of choosing what appeals to you and then building around it with papers and a sentiment.  Which is your favorite?  Mine is that sweet little fawn done in pastels.  

Here's a picture of the kit.


There are also some more add-ons: an embossing folder, and 2 sets of dies, that will coordinate with this kit.  I'll be back soon to show you what I did with those.  

Wednesday, June 28, 2023

Summer Fruits

 I have 2 neglected rolls of washi tape that I thought I should give a little love to; they both feature summer fruits and flowers.


supplies: white cardstock, Doodlebug Gingham dp, Pink Fresh Studio Blossoms and Berries washi sprigs, Sunny Studio Fancy Frame Circle die, sentiment from Berry Bliss


supplies: white cardstock, green dotted dp, Pink Fresh Studio Lemons and Blueberries washi sprigs, Stitched Scallop Rectangle dies, sentiment from Altenew Painted Greetings

I think these little sprigs are perfect for last-minute cards.  I have found that fussy-cutting the designs is pretty easy, though there are dies to match.  I store what I don't use all together.  Then it just takes some color coordination with design papers or inks and you've got a card!

Hope these have given you some inspiration!

Tuesday, June 20, 2023

Old and New

 Since I have a little more time now, I've been revisiting some of my old cards for inspiration.  Today's card is a result of that, using some elements from THIS (first) card, mixed with a new embossing folder just released at Spellbinders.


supplies: white cardstock, various Petite Prints design papers from Doodlebug, Wplus9 Doodle Buds clear stamps, Pink Fresh Studio Perfect Sentiments stamp and matching die, Spellbinders new Splish Splash embossing folder, teensy enamel dots for flower centers

I chose 3 bright colors from the Doodlebug spectrum, a bright royal blue, bright orange, and hot pink, and stamped the flowers from teeny florals, the centers from gingham, and used a yellow dot for the very center of each flower, then paper-pieced them, adding a weensy enamel dot.  For the leaves I used all kinds of patterns: stripes, gingham, dots, graph, woodgrain, etc.  To me, this is quilting all over again, but in a fraction of the time!

Usually when I use more than 1 flower, I cluster them in a group, but this time I marched them down my card in a line, then just added a simple sentiment.  I think this embossing folder is going to be a favorite!  

Thanks for stopping by today!  

Friday, June 16, 2023

Lacey Stitched Butterfly

 Now that I have a bit more time, I've been enjoying pulling out my existing supplies and enjoying them again!  Today I have a butterfly card.


supplies: white and pink cardstock, Memory Box (retired) Cottage Meadow design paper, Spellbinders Stitched Glimmer Butterfly dies, pink variegated embroidery floss, 6 strands,  Wonderful Script Sentiments dies, Mini Blooms & Sprigs dies, stamped sentiment from Winnie & Walter (retired), enamel dots

I wanted to use some of my Mom's variegated floss again, and chose pink this time.  After constructing my butterfly, I went looking through my old printed papers for a background for it - don't you think this Cottage Meadows paper is perfect?  So pleased to use up something "old"!  I also really liked Yana's lovely font that she used for her "beautiful" die - it reinforces the femininity of this design!  As I did once before, I added some teensy flowers to the butterfly - these ones mimic the paper well!  

Hope you're having a great day - thanks much for stopping by today!

Friday, May 19, 2023

Simon's June Card Kit: Etched Greetings

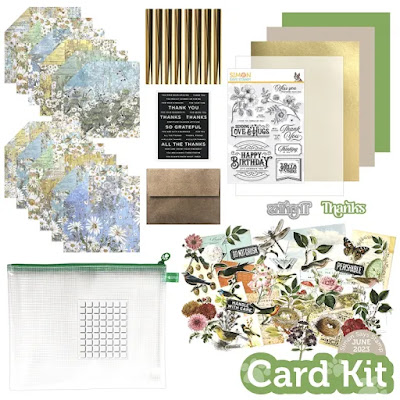
 The Simon Card Kit for June is a keeper!  I made 3 cards this month with it.


I'm waiting for a stamp and die set that's called Tuck It, from Papertrey Ink, so in the meantime, I thought I'd try to achieve the same effect: a sentiment with slits at top and bottom where you can tuck in flowers and leaves.  After a bit of experimenting, success!  After stamping the sentiment and embossing it in gold, I used my paper cutter to slit it above and below just enough to tuck in some of the ephemera from the kit.  The panel was then matted in gold, and attached to my card base.  

I won't lie, I think my favorite part of this kit are the Delightful Daisies patterned papers.  This next card uses one of them, along with the Thanks die from the kit and my own butterfly, one that was in my scrap basket and matched nicely to the blue details in this paper.


supplies: white cardstock, Crafter's Companion Delightful Daisies dp, Simon's Fancy Thanks die, and a Pink Fresh Small Butterflies stamp and stencils, Lapis Lazuli inks

The papers each have a daisy motif of some kind, usually over a woodgrain background, and the reverses are just as pretty; woodgrain only.  They look very impressionistic, and come in lovely soft colors.

I used the reverse of another of the papers for my final card, stamping and embossing repeatedly using the lovely etched flower, one of 2 from the stamp set.  Stormy sky distress ink was a pretty close match to the blue in the background paper.


supplies: white cardstock, Crafter's Companion Delightful Daisies reverse dp, Etched Greetings flower and large birthday sentiment, white embossing powder, stormy sky distress ink

Here's the kit - I'm betting it will be a sell-out!