Showing posts with label Stampendous. Show all posts

Wednesday, June 25, 2025

Woodblock Wednesday!

 "Tis the season for picking posies from my garden to bring inside to enjoy and I often pop them into a canning jar to sit on our kitchen table.   So this month I chose a Stampendous stamp dated 2013 and a Hero Arts sentiment dated 2009 for my Woodblock Wednesday entry!


supplies: white and pale aqua cardstock, Stampendous Jar Bouquet, Hero Arts To Be So Nice woodblocks, Spellbinders Perfect Touch rectangle die, Winnie & Walter (retired) Audrey's Cutaways scalloped rectangle die, tiny punched butterfly from my scrap basket


 I really enjoy seeing these wood treasures being used again.  I hope you'll play along too!

You can see all the other entries at Amy's blog HERE.

Wednesday, February 12, 2025

Butterfly Heart

 Today I have a Valentine's card using a lovely, but sadly retired, stamp.


supplies: white and black cardstock, Stampendous (retired) Laurel Burch Butterfly Heart cling stamp, sentiment from Hero Arts (retired) Sending Love Mail, tiny colored gems

It's always fun for me to color this one, because everything is so small scale.  This time I added some tiny sparkly gems to the centers of the flowers.

I'll enter this into the new Neglected Stuff Challenge.

Thanks so much for stopping by!

Wednesday, December 25, 2024

Woodblock Wednesday

 Merry Christmas!

Woodblock Wednesday has become a nice post to look forward to each month; this year I've done one every month, so I don't want to break my record now!  Here's a stamp dated 2001 from Stampendous, and named Tiny Babe.  I think it's perfect for this month, since the challenge falls on Christmas day!


I kept it simple, with minimal coloring.  I popped up the "Tiny Babe" part, added a glittery gem to the star, and cut the whole thing out with an arch die, matting it with gold.


supplies: cream and matte gold metallic cardstock, Stampendous Tiny Babe woodblock, Spellbinders Essential Arches dies, glittery gem, adhesive foam squares

You can see all the other entries at Amy's blog HERE.


My friend Linda had a blog post to share her lovely Christmas decorations, so I thought I'd tag on a few pictures of our tree this year.


We wanted a smaller tree this year, so my engineering husband figured out how to smallify our larger 9 foot tree of the past.  This one stands at about 5 feet now, much more manageable for us.


I took a ceramics class maaaaany years ago to make this nativity scene.  

And here are some closer shots of some of the ornaments we've collected and made over these 50+ years.  The hand-made ones are my favorites!


Thanks for indulging me!

Friday, October 18, 2024

Simon Hurley's Mantle Decorations!

 What a fun idea Simon Hurley has come up with: Mantle Decorations!  They are part of his Timeless Trees Collection released about a week ago!  Here are 2 cards I made using the mantle goodies.


supplies: colored cardstocks, It's beginning to look a lot like Christmas dp from  Spellbinders 2023 Make It Merry Christmas kit, Mantle Village and Mantle Decorations die sets (also available as a bundle)

Here's another card using both the mantle sets.


supplies: cream card base, krafts and colored cardstocks, deer, greenery, and cranberry swags from Mantle Decorations set, trees and mantle from Mantle Village set. sentiment from Stampendous Christmas Blessings Sentiments, Perfect Touch rectangle die

That sentiment couldn't be more perfect, could it?  

The Mantle Decorations set also has a set of 3 Christmas Stockings with etched details that can be hung from your mantle, so these sets are packed with possibilities that you can mix and match to your liking.  I hope I've inspired you to give these an extra look.

Thanks for coming by today - I appreciate your visit!  Please stop by again soon to see some more of Simon's newest release.

Tuesday, October 1, 2024

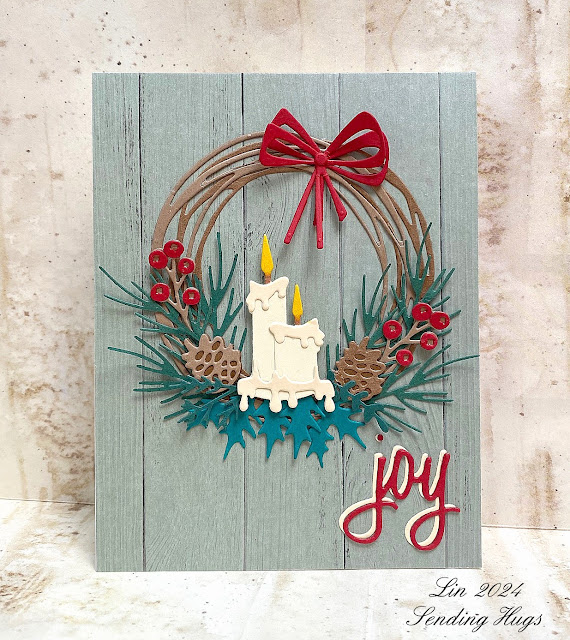
Tim Holtz' Festive Wreath

 Tim recently had a release of Vault dies from Sizzix and I wanted them all, but decided on this Festive Wreath set, I think because of the candles in it.  And you know how I am about wreaths.........


supplies: colored cardstocks, green plank paper from a Spellbinders Christmas Card kit, Vault Festive Wreath dies, Holiday Words Script die

I cut the bow, wreath and the word twice, just to make things fuller.  

Here's a second card; a very simple design; I thought I'd put the candles and some greenery on a mantle.


supplies: parchment, red, and various greens cardstock, a piece of wood panel dp, Vault Festive Wreath dies, Stampendous Christmas Blessings Sentiments

I cut the candles in red this time and made 2 sets of them, since they are the focal point for my card.  then I just surrounded them with various greens from the set, and added this lovely sentiment.  

Thanks for stopping by!

Thursday, September 19, 2024

Season of Wonder: Peace Dove

 Here's another card that I made using products from the Spellbinders/Stampendous Season of Wonder release.


supplies: white, silver metallic, and 3 shades of teal cardstock, Peace Dove dies, In the Pines embossing folder

Today I paired these dies with an embossing folder from last year.  This pretty die set contains what you see here, along with 3 other sizes of doves, 1 of which is large enough to make into an ornament!  How clever! 


supplies: white and green cardstock, Peace Dove dies, twine

This set contains a large wing die that is meant to be cut from a folded piece of paper and used with the largest dove, and a little tab to make a hanger.  I cut 2 of everything to make it good and strong and to make it look good from front and back.  It measures roughly 4" long and 2" tall, with the leaf sprig.

Tuesday, September 17, 2024

Season of Wonder: Christmas Morn Nativity

 Stampendous and Spellbinders have a joint release this month called Season of Wonder.  My card today uses a lovely die set and sentiment from it.


supplies: cream and black cardstock, a Color Blend cardstock, Christmas Morn Nativity dies, Christmas Blessings sentiment, cream embossing powder

The die set creates a lovely silhouette of the Holy Family.  I cut it from black, and the backing from a pre-printed panel that gives the effect of a soft sunrise.  The sentiment set has 14 different sentiments.  I thought a slim-line card would show off them the best; mine measures 3 1/2" wide by 6 1/2" long.

I hope you'll come back here again in a few days to see another die set from this same collection.  Thanks for visiting!

Wednesday, July 31, 2024

Simon Hurley Birthday Bash

 Simon Hurley recently launched another collection at Spellbinders, and I was intrigued by 2 of the embossing folders in it.  Both of them are 3D. Embossing folders are one of my favorite things to create with, and can be used simply just on white to add some texture, or as the focal image; it's up to you!

This first one is called Plaster, and I thought it would be a great one to have on hand for masculine cards.  So that's the direction I went for my first play with it.


supplies: white and various green cardstock, Plaster 3D embossing folder, (retired) Susan Tierney-Cockburn Ferns and Ivy dies, a Twilight butterfly sticker, sentiment banner from my stash

  I added some ferns cut from different green cardstock, one of the Twilight Butterfly stickers released earlier this year, and a sentiment that was in my sentiment box, all ready to go in the perfect color!

When you get this embossed, it also reminds me of the icing on a cake, so there's an idea for next time!

The next folder is called Flourish.  I made an easy card using some printed Stampendous artwork and a press plate sentiment..


supplies: white and bright yellow cardstock, Flourish embossing folder, fussy-cut sunflower from Stampendous Hope of Spring Quick Card Backgrounds, All Seasons Summer press plate sentiment (coming soon)

Thanks for stopping by - I hope you have a great day!

Monday, May 13, 2024

Timeless Butterflies

 Spellbinders has a new Timeless release, several of which are these gorgeous silvery-edged butterflies!  I received 2 sets, the Twilights, and the Summer Days; each consists of 7 different butterfly stickers in various sizes and colors, each 2 layers: a sticky bottom layer edged in silver, and a heavy acetate top printed with all the gorgeous details.  Here's what I made.


supplies: white and metallic silver cardstock, Spellbinders Efflorescent Flora 3D embossing folder, purple Twilight butterfly sticker, pink Summer Day sticker, sentiment from Snowflake Wishes stamp/die set, silver embossing powder, clear rhinestones

I wanted these butterflies to be the focal point, as they were a real WOW! when I opened my package; each one is edged with a silvery kaleidoscope and make quite the impact!  So I found an embossing folder with flowers and leaves in scale to them, and just added a sentiment in silver and some rhinestones on their bodies.

Here's a 2nd card, this time mixing just one of the larger butterflies with some Doodlebug 6" design papers that feature butterflies, too.


supplies: white cardstock base, Doodlebug Hello Again design papers (including sentiment), yellow Summer Day butterfly sticker

I used the largest of the butterflies on my first 2 cards today; the packs contain 3 large and 4 smaller designs, each one different.  For my final card, I used 2 of the smaller ones from the Summer Day set.


supplies: white and black cardstock, a plaid dp, Summer Day butterflies stickers, sentiment from Stampendous All the Sentiments, Doodlebug tiny heart sprinkles

My phone finally captured the sparkles on the top green butterfly - that's how all of them look - a lovely twinkle!

There are 6 different sets of these butterflies, each one prettier than the one before.  I hope you'll give them a look!  

Friday, April 12, 2024

Stampendous All the Sentiments Release

A few days ago Stampendous had a new release called All the Sentiments.  There are sentiment sets for sympathy cards, birthday cards, and 1 for all occasion.  Today I have 3 cards that use sentiments from 3 of these new stamp sets.


supplies: white, black, pale yellow, and pale green cardstock, All the Sentiments stamps and die set, Criss-Cross Motif 3D embossing folder, white pigment ink, a daisy die, gold enamel dot

I particularly like the font on the script sentiments in this set, and that the accompanying/finishing sentiments are in block print - makes for a nice mix! 

It's a good idea to have a set of sympathy sentiments in our arsenal, as these cards are so hard to make to begin with.  Having an appropriate sentiment is a big help!  This particular set also includes this leafy sprig stamp, too. Here I colored it a bit like a forget-me-not, and tucked it behind the sentiment.


supplies: white and pale blue cardstock, new Stampendous Sincere Sentiments, Essential Arches dies

And lastly, I mixed some sentiments with some other Stampendous pre-printed images that I fussy-cut to add to my design.


supplies: white, black, and dark coral cardstock, new Birthday Messages stamps, Hope of Spring Background (coneflowers and butterfly), Postage-edge dies

You can never have enough sentiment stamps - I hope you'll give these new ones a 2nd look!  Thanks for stopping by today.

Tuesday, October 10, 2023

Snow Glad

 Did you know that you can now get Stampendous goodies at Spellbinders?  The latest release from them is called Cool Fransformers - these clear stamps are made so that they can be stretched and reshaped into lots of different variations!  I chose the Snowy Friends set - here's my card.


supplies: white and aqua cardstock, Snowy Friends clear stamps, markers to color, tumbled glass distress ink, glue pen and Clear Rock Candy distress glitter

I love snowmen and these are pretty cute, don't you agree?  I have been on the search for a tall skinny one and this set did the trick!  I stretched the bottom of the largest snowman downwards, and while I was at it, I stretched the smaller snowman's body horizontally to make him shorter and fatter!  I also like that there are a fun variety of sentiments and smaller elements to allow us to build our own little scene!  Today I used the snowy house on a hill, a weed, and some snowflakes.  After stamping and coloring everything I used a glue pen to outline the shadows under the snowmen and along the hill and the snowflakes, and then tilted on some glitter to add some fun sparkle!

Here's a sketch of what the stamps look like when you get them:
Thanks so much for coming by today - I'll see you again very soon!

Wednesday, September 27, 2023

Woodblock Wednesday!

 Time for my Woodblock Wednesday monthly post!  This time I chose a wood stamp from Stampendous called Autumn Words.


supplies: white, gold, pale and darker orange, and aqua cardstock, Stampendous Autumn Words, inks in Altenew Fresh Lemon, Chamomile, Orange Cream, Ocean Waves, and Dusk inks, blending brush, Spellbinders Autumn Leaves die, sentiment from Concord & 9th Harvest Wreath stamps

This stamp is dated 2012, and it's one I try to use every year.  

Do you have a favorite fall woodblock?  


I'll be entering this card into this week's Simon Wednesday Challenge: Anything Goes.

Friday, March 24, 2023

Stampendous Spring Quick Cards

Did you know that Stampendous products can now be found at Spellbinders?  They have a new Spring release right now, and among them are some pre-printed images (Hope of Spring) and backgrounds (Joy of Spring) that are wonderful to have when you need to make a card in a hurry!  The images are in a package of 4 8 1/2 X 11 sheets, 2 of each design, and the same goes for the backgrounds.

Here are some cards I made with them.


supplies: lavender and white cardstock, Stampendous Hope of Spring hummingbird images and sentiment, Spellbinders Floral embossing folder, foam squares

Aren't they lovely?  These are just 2 of the images that you just cut out, and the sentiment is from the same set.  I just popped them above an embossed background.  My Mom loved hummingbirds, so this makes me think of her.

On my second card, I used another of the images, and a panel of one of the backgrounds.


supplies: white cardstock, Joy of Spring Background, Hope of Spring image and sentiment, foam squares, moonlight sequins

This one is a gorgeous shade of blue.  All I did was cut out the image, pop it up over a colorful background, and add a trimmed sentiment from the same set, along with some clear sequins in the flower centers for sparkle.

And my 3rd card, another sweet bird!


supplies: mauve and brown cardstock, Joy of Spring BackgroundHope of Spring image and sentiment, Spellbinders Flower Frenzy embossing folder

This time I used the other, more neutral background design.

These were really fun to work with - the images are beautifully colored and detailed, and the backgrounds work well with them.  If you're interested in seeing similar Stampendous Quick Card products, look HERE.  I hope you'll give them a try!

Wednesday, April 27, 2022

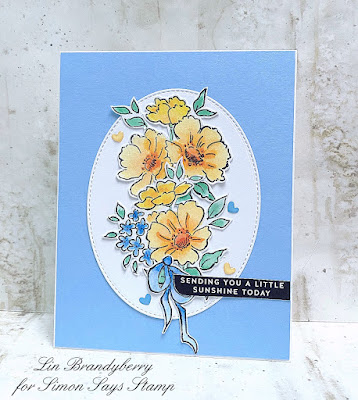
Simon Says........Anything Goes


Welcome to the new challenge at the Simon Says Stamp Wednesday Challenge Blog!


This week our theme is Anything Goes, and the team is featuring Stampendous products.  You don't have to use this brand to play along with our challenge, but if you do have any of their products, we'd love to see them used.


supplies: white and a sky blue from Memory Box Ocean Blue paper pad, Tim Holtz watercolor paper, Stampendous Lovely Flowers clear stamp set, Zig markers and water, a Simon Reverse sentiment strip, stitched Oval die

Now it's your turn!  We have a $25.00 gift certificate 


to the amazing Simon Says Stamp store for 1 lucky random winner of this week's challenge!  I can't wait to see what you all make this week!

Wednesday, December 8, 2021

Simon Says........Cold as Ice!


Welcome to our challenge at the Simon Says Stamp Wednesday Challenge blog!


Our theme this week is "Cold as Ice!", and the team is featuring products from Stampendous.  Here's my card. I fell in love with these darling little birds, and I used silver embossing and glitter to get my icy feel.


supplies: white and Lipstick Red card, Stampendous Heavenly Birds cling stamp, silver embossing powder, glue pen and Prisma glitter, adhesive foam to lift central oval

I stamped the image twice, embossing first in silver, and then again with black ink.  I applied blue ink around the edges of the silver embossed panel and trimmed it, and colored, glittered, and trimmed out the oval from the other panel.  I added glitter with a glue pen to the hats and anywhere there was snow in the image, along with the large diamond star on the silver embossed panel.  I also embossed my sentiment in silver and attached it to the oval before popping it above the silver-embossing.


Between the silver embossing and the glitter, it puts on quite a shimmer show from across the room; sorry I wasn't able to capture that in my photos.

Now it's your turn!  We have a $25.00 gift certificate 


to the amazing Simon Says Stamp store for 1 lucky random winner of this week's challenge!  I can't wait to see what you all make this week!

Thursday, September 16, 2021

Wreath Season!

 It's almost offically fall, and I couldn't wait to play with some new Greetery goodies, mixed with lots of other supplies for the season..

First I pulled out a favorite woodblock background stamp and added a wreath consisting of layering dies.  It's a shame that this text background has been retired, but that won't stop me from using it every year - it's becoming a tradition now; it isn't fall until I use it!


supplies: cream, 3 kraft colors, and Orange Peel card, Stampendous (retired) Autumn Words,  Hero Arts Latte ink, The Greetery Rustic Wreath Base dieRustic Wreath Twigs dies, Fit to be Tied bow die, one of the Mighty Oak twig dies, and Spellbinders Welcome Fall (berries) dies, carved pumpkin distress ink and a red marker

After constructing my wreath using 3 colors of kraft card, I decided to decorate it with bittersweet berries.  The berries from Welcome Fall are the perfect size - I cut them from card that had been colored with carved pumpkin distress ink, and added a little red circle to each, then glued them onto a branch from the Mighty Oak Botanicuts set, and inserted them randomly around my wreath.  Then I just added a bow and popped it above the text background.  

My next card is a little fussier, and it uses the stamped version of the Rustic Wreath die.


supplies: cream and kraft card, The Greetery Tartan Builder Diagonal stencils, Rustic Wreath stamps and die, leaves from Honey Bee Fall Bouquets, berries from Spellbinders Welcome Fall, and twig and acorn from the Greetery Mighty Oak, distress inks in fossilized amber, carved pumpkin, festive berries, fired brick, aged mahogany, tea dye, and vintage photo, sentiment from Sunny Studio Autumn Greetings

I first stamped and cut out the wreath, then went hunting in my stash for autumn dies to adorn it with.  They were all cut from cream cardstock and colored with distress inks.  I used some of the same inks to stencil my plaid background.  Since it's so busy, I reinserted the center of the wreath so that I could stamp my sentiment there, and then popped it above the card base.

Hope your day is a great one!