Friday, June 30, 2017

Patchwork Frame

It's been slow around here lately - we've just returned from spending some time with our Grands in Texas, and it's hard to get going again!  I thought I'd share a card I made at the same time as THIS COFFEE CARD, using the leftover frame that resulted.


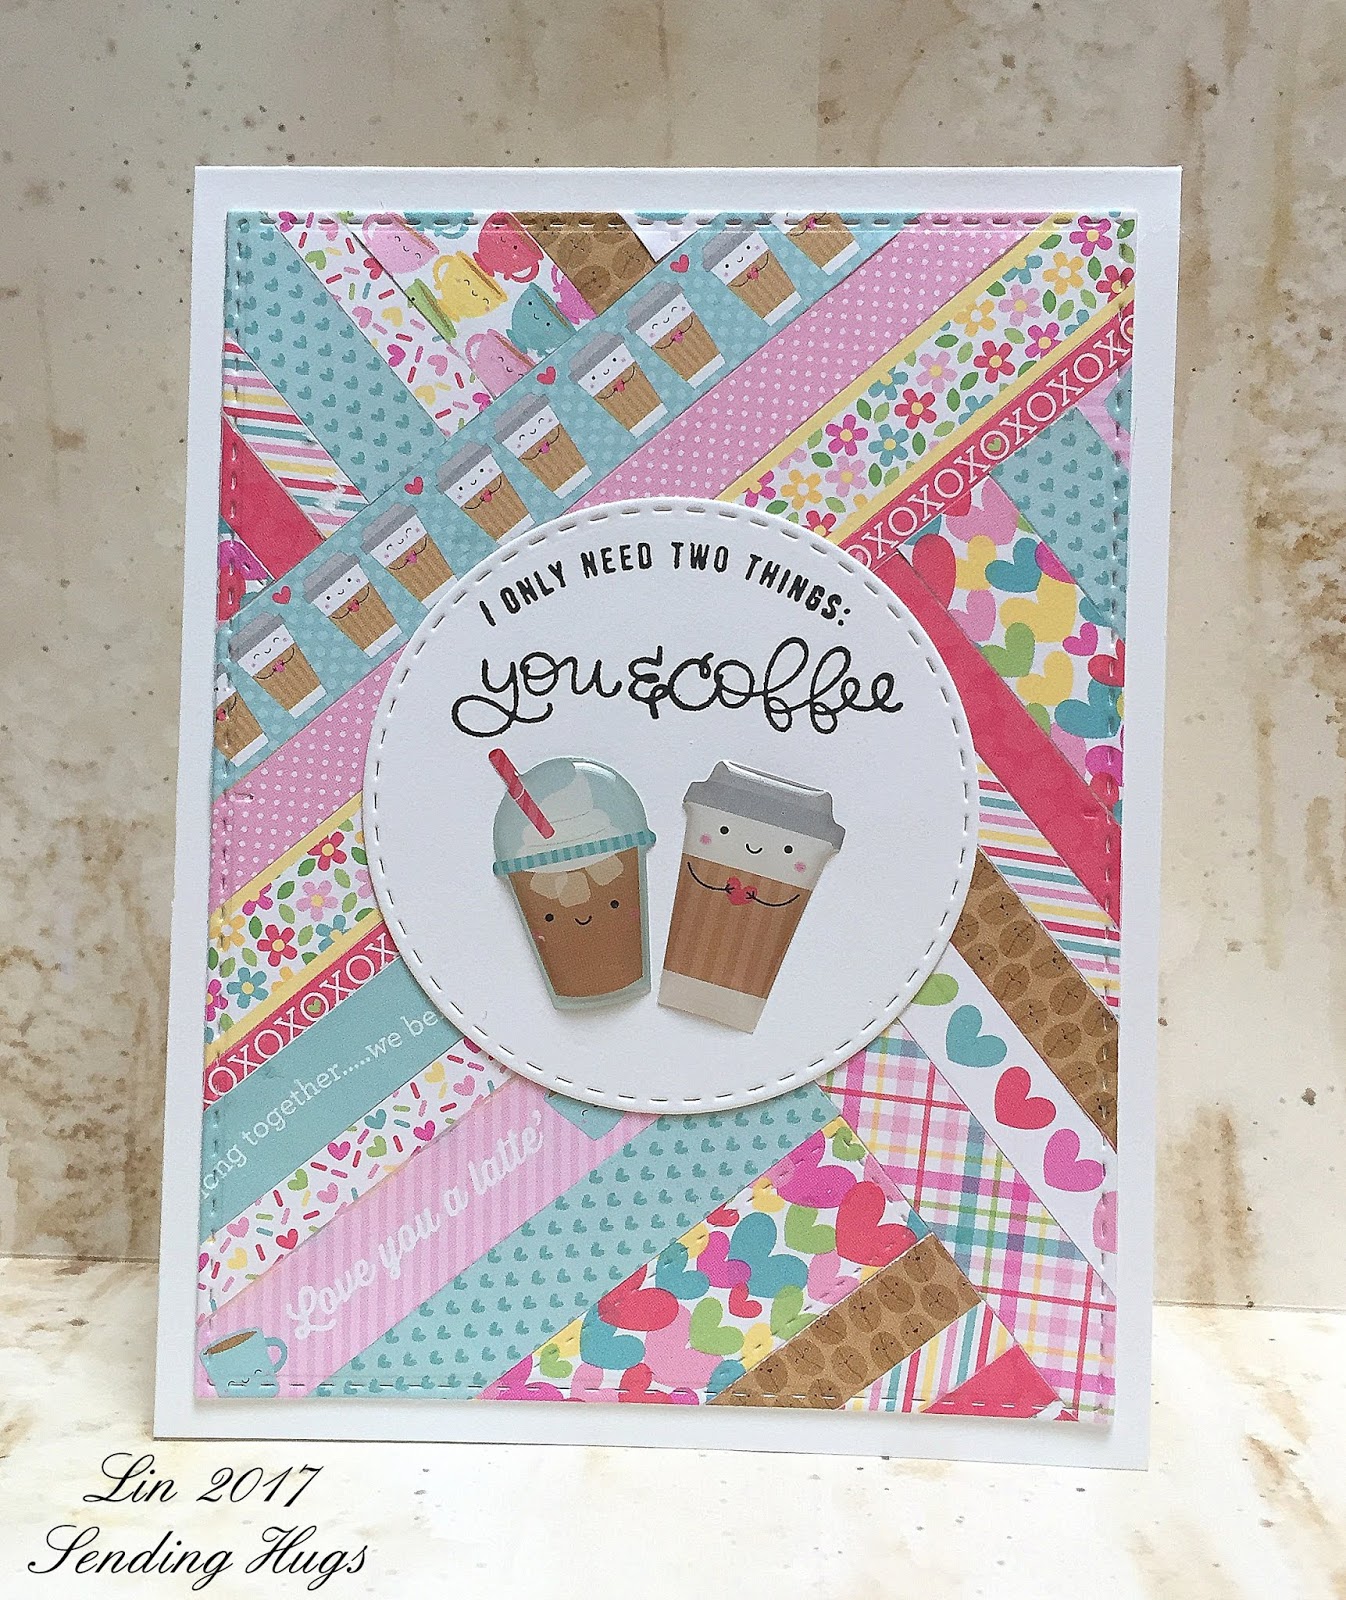
supplies: white cardstock, Doodlebug Cream & Sugar collection, plus other small-print papers, Simon Single RosesPainted Hugs, and Stitched Rectangle dies, tiny buttons

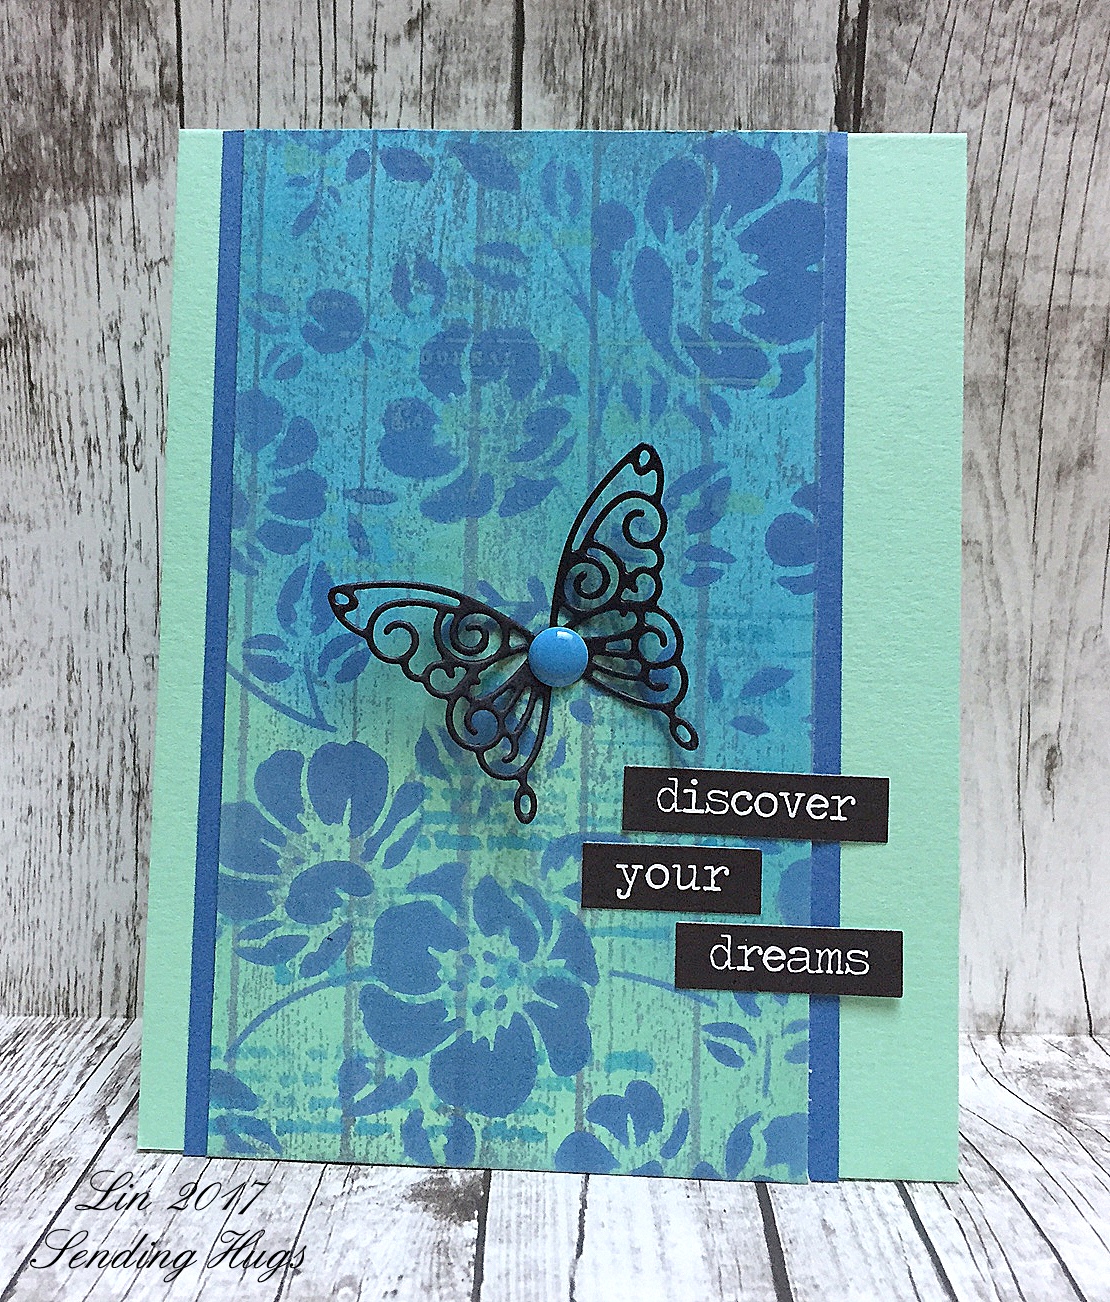
I simply glued the leftover frame onto a white card base, then filled in the center with some favorite squiggle-flower die-cuts and a sentiment - look, Ma, no stamping!  I love it when I can get 2 cards from 1 work session!

Hope all of my USA friends have a fantastic 4th!  

Wednesday, June 28, 2017

Simon Says..........Anything Goes

wed-newchallenge-header

Happy Wednesday!  Welcome to another challenge at the Simon Says Stamp Wednesday Challenge Blog!


This week it's Anything Goes, and the team and I are playing with Art Impressions goodies!  I chose another Window to the World stamp and used some fun tropical, summery colors!


supplies: white, Simon's Audrey Blue, Green Apple, Green Leaf, Sunshine, and Orange Peel cardstock, Art Impressions ISLAND Window to the World cling stamp, Zig markers and water, Memory Box Pinpoint Rectangle and Hibiscus dies, leaf die, Simon Dream die, carved pumpkin and candied apple distress inks to shade flowers

The writing reads: "Wiggle your toes in the sands of the Sea, dream of tomorrow and all that can be."  

These Window stamps are fun to work with - they're fun and easy to color, and you can stamp directly onto a white card for a CAS look, or trim them out and add some embellishments for something a bit more detailed, like I did this time. 

Now it's your turn - I can't wait to see what you create!  Heidi has provided another $50.00 gift voucher

50dollar_voucher_600px

to the amazing Simon Says Stamp store for 1 lucky random winner of this week's challenge!

Friday, June 23, 2017

Welcome Summer

Here's my card for our bi-weekly team post at Tammy Tutterow's blog.  Since summer officially started just a few days ago, I decided to make a card using colors to reflect the season.


supplies: Bristol paper, Hero Arts kraft and Simon Audrey Blue and Orange Peel cardstock, Tammy's Sunflower Bunch and Dear Ruby clings, Impression Obsession Wooden Plank cling, My Favorite Things Peek-a-Boo window die, Winnie & Walter Big Bold Seasons sentiment and summer cutaway, Zig brush markers, adhesive foam squares

I started by  horizontally stamping the wooden plank with a medium brown ink onto kraft cardstock, then overstamping in black the Dear Ruby script background.  I die-cut the window from the center of that panel.  Then I stamped the bouquet twice and colored and cut it out, along with just a single sunflower to pop above it.  The bouquet was glued across the window and I added my sentiment before popping the whole panel above the card base.  You can't see the dimension from my photo, but I like it better popped up than flat......

This card is part of Tammy's bi-weekly post where my teamies and I get to show off our work using her amazing products.  I hope you'll pop over there to see what they've done this time!


Wednesday, June 21, 2017

Simon Says..........Use Patterned Paper

wed-newchallenge-header

Happy Wednesday!  Welcome to another challenge at the Simon Says Stamp Wednesday Challenge Blog!


Our challenge this week is to use patterned paper, and the Design Team are playing with my favorite paper maker, Doodlebug!  They make the most adorable papers, all scaled down in their 6" pads for us cardmakers!

My first card uses a favorite stamp from Wplus9, called Doodle Buds!  What a perfect match for today's challenge - Doodle Buds stamped on Doodlebug papers!


supplies: white card base, patterned papers from these Doodlebug 6" pads: Hello Sunshine, Dot-Grid-Daisy-Stripe Rainbow Petite Prints, Gingham Rainbow Petite Prints, and Kraft in ColorWplus9 Doodle Bud stamp set, Simon Scallop Stitches die, assorted enamel dots

I started by choosing the floral panel and then found other papers to pull the colors from it.  These flowers and leaf stamps are perfect for this, as they're not to small to cut apart the individual parts and piece them back together again.  After everything was assembled, I stamped a few of the squiggles and added some enamel dots.

My next card uses a patchwork background technique that my friend Mary Anne taught me years ago, and materials from a Simon Card Kit from February this year:

supplies: white cardstock, Doodlebug Cream & Sugar paper pad, sentiments from Simon's Coffee & Tea set, Stitched Rectangle and Stitched Circle dies, Doodlebug Latte Love shape sprinkles

Here's a little tip to help you curve a straight sentiment: use the negative circle die-cut (the panel with the circular hole) as a guide to stick your sentiment stamp onto your Misti or stamping block.

Now it's your turn - I can't wait to see what you create!  Heidi has provided another $50.00 gift voucher

50dollar_voucher_600px

to the amazing Simon Says Stamp store for 1 lucky random winner of this week's challenge!


And just a reminder to check out the Simon Says Stamp store for a fun holiday sale on our own Simon brand products!

Mothers Fathers, and Florals

Monday, June 19, 2017

A Basket of Rose Petals

Sometimes it's hard to come up with a title for each blog post; since I used  basketweave embossing and Rose Petal inks, that's what I'm calling this one!


supplies: kraft, pink, and white cardstock, Darice embossing strip, Painted Flowers, Rose Petal collection, Green Hills, and Grass inks, MFT Smile die

I still love these Painted Flowers as much as ever, and they look especially pretty in pink - the kraft background makes them even prettier, I think!  This Hero Arts brown paper bag color of kraft is my favorite, as opposed to the washed out colors I've seen elsewhere.  I ombreed, if that's a word, my sentiment with the same inks as I used to stamp the flowers.

Hope you're having a good day - thanks for coming by!

Sunday, June 18, 2017

White on White Focal Point

The Altenew June Inspiration photo made me think immediately of weddings, and since they're asking for a white-on-white focal point also, I wanted to throw my hand in.  I decided that I'd use vellum that is white embossed, and that's how this started.


supplies: cream cardstock and vellum, Altenew Beautiful Day (flowers) and Garden Treasure (leaves) stamps, sentiment from a retired The Craft's Meow set called Side by Side, Wplus9 silver ink, Zig markers, (light carmine, wine red, yellow, and light green), Sizzix Ornate Frame embossing folder, adhesive foam squares

I clear stamped, embossed in white, colored them with Zig markers, and fussy cut the flowers, leaves, and sprays from vellum.  While they were drying I dry-embossed the panel and stamped my sentiment.  Then I trimmed the leaves and sprays to look like they were behind the large flower, and affixed them to the embossed panel only at their bases, allowing the outer parts of each to stand away a bit from the base. The big flower has a 2nd layer - if you look really close you can see the foam adhesive, but I don't think it's very obvious, and I wanted it to stand up above the main flower.  This main panel is also popped above the card base.

Here's the inspiration photo:

June 2017 Inspiration Challenge – White On White Focal Point

Saturday, June 17, 2017

For a Friend

I am always on the lookout for lilac stamps - they're a sentimental favorite of mine, and until this year I only had one option for lilacs.  When I saw this sweet set from Memory Box a couple months ago, it went right onto my wishlist, but it's taken me this long to get it home.  Here's it's first stamping:


supplies: white, lilac, and watercolor cardstock, Memory Box Spring Lilacs, VersaMark ink and white embossing powder, Spectrum Aqua markers and water, Simon's Stitched Rectangle die, Altenew Layered Plaid cover die, silk ribbon

I paired it with an Altenew cover plate that is supposed to make a plaid when paired with it's sister cover plate.  A friend cut me a few of each, and I'm hoarding them, so I only used this one - I thought it gave a Frank Lloyd Wright kind of feel.

Altnew, if you're reading this, a lilac would be a GREAT flower for your Build a Flower series..... Pretty Please?

Thursday, June 15, 2017

A Beachy Feel

.....is what I was going for with today's card, made to enter the Camp Create Day 2 challenge, and inspired by this photo I found on Pinterest:


The challenge at the MFT blog is "Remarkable Resist", and since I am currently in love with all thinks wood plank, I knew I'd have fun making this one.


supplies: white and Surf Blue cardstock, MFT Flashy Florals stamps and dies, and their Hello die, VersaMark and white embossing powder, hickory smoke, Berrylicious, silver, frayed leaf and forest glades inks, Impression Obsession Wooden Plank cling stamp, Simon's Stitched Rectangles dies, silvery sequins

I white embossed my wood plank stamp on white cardstock, then sponged on hickory smoke distress ink.  I used MFT's berrylicious ink for my flowers and to ombre my sentiment.  I LOVE the effect that white embossing the plank design gives - it really looks like weathered wood!

Wednesday, June 14, 2017

Simon Says........Embossing

wed-newchallenge-header

Happy Wednesday!  Welcome to another challenge at the Simon Says Stamp Wednesday Challenge Blog!


This week our challenge is "embossing", and the design team are using WOW! products.  

For my first card, I thought I'd try using colored embossing glitter as one of the layers in a floral multi-step stamp.


supplies: white cardstock, Altenew Garden Treasure set, Altenew Volcano Lake, Lavender Fields, Orange Cream, Frayed Leaf and Forest Glades inks, VersaMark ink, Wow! Spring Breeze and Shrinking Violet and a copper glitter embossing powder, Simon's Sending Happy Thoughts sentiment and Stitched Rectangle die, Nuvo Caribbean Ocean crystal drops, mini Misti tool, heat gun

I stamped 3 layers of the larger flowers and leaves, using VersaMark ink with an embossing glitter for the final layer.  These were cut out and arranged on the panel that I had already stamped the sentiment.  I stamped the small flower sprays near the bouquet, then used Volcano Lake and Forest Glades ink mixed with water to color them.  When they were dry, I added the fussy-cut elements, popping the big aqua flower up above everything else.  

You can see that the embossing glitter does add the detailing very well.

For my 2nd card, I did both wet and dry embossing, using the Spring Breeze embossing glitter and VersaMark ink to stamp my flowers on vellum and my sentiment, and an embossing folder to make my background..


supplies: white and Simon Mint cardstock, vellum, Taylored Expressions Leafy Vine embossing folder, a retired DieNamics Insta-Frame die, Penny Black Petal Party flower and Winnie & Walter's Big, Bold & Happy sentiment, both stamped in Versamark ink and heat embossed with Wow! Spring Breeze embossing glitter, My Mind's Eye mint enamel dots

I like the freshness of this mint color, as we go into the heat of summer!

Now it's your turn - I can't wait to see what you create!  Heidi has provided another $50.00 gift voucher

50dollar_voucher_600px

to the amazing Simon Says Stamp store for 1 lucky random winner of this week's challenge!

Tuesday, June 13, 2017

More oxide inks

Just playing today, using the oxide inks to color and stamp, without water or smooshing.  I love a wood plank background, so I started there......


supplies: white, black, denim blue, and mint cardstock, Impression Obsession  Wooden Plank cling, Hero Arts Charcoal, and broken china, cracked pistachio, and faded jeans distress oxide inks, Tim Holtz Floral stencil, an old Pink Paislee garden text stamp, Simon Leanna butterfly die, Tim Holtz Big Chat stickers, Doodlebug blue enamel dot

I started by stamping my plank background in charcoal, then sponging it with broken china and cracked pistachio oxide inks.  Next I covered it with the stencil and sponged through with faded jeans, followed by the text stamp in a random fashion (pistachio over the broken china areas and vice-versa).  The panel was then allowed to dry naturally, then it was trimmed and framed with a denim blue and affixed to the mint card base.

I chose a butterfly to go along with the garden feel and the stickers tied in well with that.  I REALLY love the way these 3 oxide inks look together!

Thanks for your visit - I'll be back tomorrow with our regular Wednesday Simon Wednesday challenge post.

Monday, June 12, 2017

Heart Mandala

Here's a card using Simon's brand spankin' new Heart Mandala stencil from their Cherished Collection........I bought it because I love lace, and there are hearts in it!


supplies: white cardstock, vellum, Simon's Heart Mandala stencil, broken china distress oxide ink, Simon's Thankful Heart sentiment, VersaFine onyx black and Simon clear embossing powder, Simon's Stitched Circle die, white pearls

I first dry embossed the stencil, then inked through it with my favorite color of the new distress oxides.  The sentiment was heat embossed on vellum, then cut into a circle, and the glue was covered with pearls to hide any residue (but there really wasn't any that I could see).  I liked the way the pearls looked with the lace, so I added some smaller ones, following the design.

Thanks for stopping by - hope you're having a great day!

Saturday, June 10, 2017

Hello There, Summer!

Today is the first day that I've felt that summer is really here, and so I made a card to celebrate!


supplies: white and black cardstock, various BoBunny DoubleDot 12" cardstock, Simon Summer Flowers and (retired sentiment) from Sketchy Banner Greetings, (retired) sketchy banner die, Impression Obsession Painted Stripes, Simon's Fresh Fruit ink cubes, Zig markers, moonshine sequins

I didn't feel like coloring today, so I just stamped the hibiscus and leaf on a variety of subtle dotty cardstocks in tropical colors, then used markers to add some tone-on-tone details before cutting them out.  I LOVE this painted stripes cling stamp, and also the Fresh Fruit colors - because the inks were mini cubes, it was easy to make each stripe a different color.  I added some sequins in the flower centers and sprinkled more around the flower spray for some subtle glitz.

Hope your day is beautiful wherever you are today!  Thanks for stopping by for a visit!

Friday, June 9, 2017

Love is.......

Today I have another card using a Tammy Tutterow cling stamp.  It seemed appropriate for this month of weddings and anniversaries.


supplies: Bristol paper, Tammy Tutterow Rose Border, sentiment from Penny Black Love Chapter, by Nina Brackett, VersaMark ink and Simon white fine detail embossing powder, Zig markers, broken china distress oxide ink, adhesive foam squares

On Bristol paper, I stamped and colored the gorgeous Rose Border, then cut it out so I could pop it above the card base, which was stamped, white embossed, and sponged with broken china distress oxide ink.

This card is part of Tammy's bi-weekly post where my teamies and I get to show off our work using her amazing products.  I hope you'll pop over there to see what they've done this time!


Wednesday, June 7, 2017

Simon Says..........Masculine

wed-newchallenge-header

Happy Wednesday!  Welcome to another challenge at the Simon Says Stamp Wednesday Challenge Blog!


We have a fun theme this week - Masculine, and we're playing with Tim Holtz goodies.  You don't need to use them to enter, but if you have any, we'd love to see how you use them!  And since our Monday challenge has the same theme this week, you can enter your card into both challenges if you'd like, and get 2 chances to win!

I must confess that I thought I'd have a hard time with this one, but in actuality I had a blast putting it together!


supplies: white card base, Tim Holtz idea-ology corrugated cardboard from Textured Surfaces,  Alpha Tile, Menagerie paper pad, sticker sentiment from Small Talk, Stampers Anonymous Tim Holtz Robot 1 wood stamp, metal sheet, silver brads for eyes, metal button, washers from DH's workshop, My Favorite Things Wonky Stitched Rectangle die

I used a light and a medium grey paper to stamp the image, then cut out the light robot and paper-pieced it back onto the medium panel, which had been die-cut with a wonky stitch.  Then I used anything silver I could find to accessorize him.  The panel was then attached to a silver metal sheet, and that went onto the corrugated cardboard background.  The "R" and the sticker sentiment went on last.

Here's a closer shot to show you some of the fun details I added:


Now it's your turn - I can't wait to see what you create!  Heidi has provided another $50.00 gift voucher

50dollar_voucher_600px

to the amazing Simon Says Stamp store for 1 lucky random winner of this week's challenge!

Sunday, June 4, 2017

Thank You Very Much

I fell in love with the new Bold Blooms stamps and dies from Pretty Pink Posh and received them yesterday - here is my first play with them.


supplies: white cardstock, Pretty Pink Posh Bold Blooms stamps and matching dies, inks from Altenew, (retired) Hero Arts sentiment woodblock stamp, My Favorite Things Peek-a-Boo Window die, Simon's Stitched Rectangle die, Simon tiny flower sequins, adhesive foam squares

This sentiment fits perfectly inside the window - I'm sorry that it's a discontinued one from 2001.  

My next card will be a wreath......that's one of the reasons I bought this set.  

Hope you're having a good Sunday!  See you soon!

Thursday, June 1, 2017

Hello Friend

Okay, one more card with the large Garden Treasures flower in my favorite color, and I'll put this set away for awhile!


supplies: white cardstock and periwinkle glitter paper, Altenew Garden Treasure and Vintage Flowers (leaves) stamps, Hero Arts, Simon, and Altenew inks, Simon Painted Hello die, Wplus9 Hand Lettered Hello stamp, DieNamics Stitched Mini Scallop and Simon Stitched Rectangle dies, Taylored Expressions Garden Frame embossing folder, adhesive foam squares

I had an awful time getting this picture right.  If I could capture the glittered sentiment, then the rest of the card washed out.  I finally decided to try taking it outside in our little courtyard - bright light, but no direct sunlight.  Success!

Can you believe it's almost Friday again?  Hope you have a fantastic weekend!