Showing posts with label silver. Show all posts

Monday, May 13, 2024

Timeless Butterflies

 Spellbinders has a new Timeless release, several of which are these gorgeous silvery-edged butterflies!  I received 2 sets, the Twilights, and the Summer Days; each consists of 7 different butterfly stickers in various sizes and colors, each 2 layers: a sticky bottom layer edged in silver, and a heavy acetate top printed with all the gorgeous details.  Here's what I made.


supplies: white and metallic silver cardstock, Spellbinders Efflorescent Flora 3D embossing folder, purple Twilight butterfly sticker, pink Summer Day sticker, sentiment from Snowflake Wishes stamp/die set, silver embossing powder, clear rhinestones

I wanted these butterflies to be the focal point, as they were a real WOW! when I opened my package; each one is edged with a silvery kaleidoscope and make quite the impact!  So I found an embossing folder with flowers and leaves in scale to them, and just added a sentiment in silver and some rhinestones on their bodies.

Here's a 2nd card, this time mixing just one of the larger butterflies with some Doodlebug 6" design papers that feature butterflies, too.


supplies: white cardstock base, Doodlebug Hello Again design papers (including sentiment), yellow Summer Day butterfly sticker

I used the largest of the butterflies on my first 2 cards today; the packs contain 3 large and 4 smaller designs, each one different.  For my final card, I used 2 of the smaller ones from the Summer Day set.


supplies: white and black cardstock, a plaid dp, Summer Day butterflies stickers, sentiment from Stampendous All the Sentiments, Doodlebug tiny heart sprinkles

My phone finally captured the sparkles on the top green butterfly - that's how all of them look - a lovely twinkle!

There are 6 different sets of these butterflies, each one prettier than the one before.  I hope you'll give them a look!  

Tuesday, November 22, 2022

Let It Snow

 I recently brought home a Gina K. Master Layout set of dies, my first, and mixed it with a bunch of retired snow-themed products for my card today.


supplies: white, a blue from the Ocean Blue collection paper pad, and Chrome Silver mirror card, Master Layouts 11 dies, oxide inks in mermaid lagoon, prize ribbon, and wilted violet, blending brushes, (retired) Hero Arts Snowflake Circle cling stamp, clear ink and white embossing powder, an unknown snowflake die, (retired) Birch Press Design Let it Snow dies, a silver snowflake sequin

I used the largest master layout die to make a mask to sponge on my inks, then left it in place and overstamped a small snowflake stamp, white heat-embossing it.  The snowflakes were the perfect size for these windows, don't you think?  The panel was then matted in silver foil card.  I used that for my sentiment dies, too.  I seem to remember that the large snowflake may have come with Cuttlebug machines when they first came out?  I don't actually have it, but I used to borrow it from a friend and cut bunches of them at a time, which I still have after all these years!

This shade of blue cardstock is the perfect blue, just right for a crisp clear winter sky, but more importantly it matched my ink blending nicely.


Thanks for stopping by today.

Wednesday, December 8, 2021

Simon Says........Cold as Ice!


Welcome to our challenge at the Simon Says Stamp Wednesday Challenge blog!


Our theme this week is "Cold as Ice!", and the team is featuring products from Stampendous.  Here's my card. I fell in love with these darling little birds, and I used silver embossing and glitter to get my icy feel.


supplies: white and Lipstick Red card, Stampendous Heavenly Birds cling stamp, silver embossing powder, glue pen and Prisma glitter, adhesive foam to lift central oval

I stamped the image twice, embossing first in silver, and then again with black ink.  I applied blue ink around the edges of the silver embossed panel and trimmed it, and colored, glittered, and trimmed out the oval from the other panel.  I added glitter with a glue pen to the hats and anywhere there was snow in the image, along with the large diamond star on the silver embossed panel.  I also embossed my sentiment in silver and attached it to the oval before popping it above the silver-embossing.


Between the silver embossing and the glitter, it puts on quite a shimmer show from across the room; sorry I wasn't able to capture that in my photos.

Now it's your turn!  We have a $25.00 gift certificate 


to the amazing Simon Says Stamp store for 1 lucky random winner of this week's challenge!  I can't wait to see what you all make this week!

Friday, October 15, 2021

Christmas Traditions Collection

 Once again, Spellbinders was kind enough to send me some new goodies from their new Christmas Traditions Collection!  Here are the projects I made with them.

I was excited to play with these new Holiday Florals Background glimmer plates, so much so that I made 3 cards with them!  

supplies: white and pink card, gold metallic card, Holiday Florals Background glimmer plate set (includes sentiment), bright gold glimmer foil, Hemstitch rectangle die, markers to color flowers and leaves

These florals come as half of the design you see here - just line it up in 1 corner, foil, then line it up at the opposite diagonal corner, and foil again.  There is also a 3-piece sentiment included in the set, and I  foiled the largest in the center.  After trimming my panel so that I could put it on a card base, I used my old favorite Hemstitch rectangle to cut out the design around the foiled sentiment, then matted the whole panel on gold metallic card, then onto a pink card base.

Here's another pink card, using silver foiling, with a die-cut sentiment.


supplies: Cotton Candy and Chrome Silver Mirror card, Holiday Florals Background glimmer plate and silver foil, sentiment from Santa Parade die set, silver sequins, markers to color flowers and leaves

And the 3rd card is much simpler, using a rich burgundy card with gold foiling.


supplies: burgundy and Polished Gold mirror card, Holiday Florals Background glimmer plate and gold foil, sentiment from Joy die set, gold sequins

Next I played with the Rejoice Nativity dies.

This die set has a little die which I couldn't figure out at first, until I saw that it was a piece to make this set into an ornament!  So that's what I did first, using silver mirror cardstock, along with an old piece of polished stone made years ago for the starry background (there's an oval die that makes teensy holes for light to shine through!).  I just cut out all the pieces and assembled them, adding a silver sequin to the center of the star, and some silver thread to hang it with.  If placed in front of a Christmas bulb, I think the effect will be magical!


supplies: silver mirror card, my own blue polished stone background, Rejoice Nativity dies, a silver sequin


So then I decided to make a really simple card that this ornament can be placed inside for presentation.  I used silver glitter and soft navy cardstock and silver-embossed the sentiment (which is from another new stamp set in this collection: Three Kings). I didn't use the starry background for this version.  


supplies: Soft Navy and silver glitter card, Rejoice Nativity dies and sentiment from Three Kings stamps set, silver embossing powder

As always, I thank Spellbinders for the chance to play with these lovely products!

Monday, August 30, 2021

An Elegant Snowflake?

I have another card to share with you that uses new dies from Spellbinders/Becca Feeken.  She has a new holiday collection out called Holiday Medley, and I used her All is Calm dies to make a glitzy snowflake card.


supplies: white and Audrey Blue card, silver mirror card, Spellbinders All is Calm dies (includes 2 sentiments), a snowflake embossing folder, silver and aqua pearls

When I think of Becca, I think of elegant designs, so I chose some silver metallic cardstock and paired it with aqua for my card.  I paper-pieced in some of the tile design, adding pearls, then cut a 2nd frame from silver and turned it 90 degrees before attaching it to the ornate one to make an 8-point snowflake.  There are 2 sentiments in this set - I chose the snow one and cut it twice from both colors and layered them a bit offset to carry the sparkle all the way down the card.

I also considered making this "snowflake" into a tree ornament by adding a hanger to the top, and that could still be done if the card is dismantled and backed with a 2nd pieced square.  The silver would certainly reflect the tree lights nicely!

As always, my thanks to Spellbinders for allowing me to play with their goodies! 

Wednesday, December 9, 2020

Simon Says.......Let It Snow!


Happy Wednesday - welcome to our challenge at the Simon Says Stamp Wednesday Challenge!


Our theme this week is "Let it Snow!", and my teamies and I are showcasing Lawn Fawn goodies!  Here's the card I made.


supplies: white cardstock, silver glitter card, Doodlebug and an unknown buffalo check  patterned papers, Lawn Fawn Stitched Snowflake dies, Memory Box (retired) Let it Snow dies, glittery silver ribbon and silver sequins

I die-cut 2 snowflakes, from 3 different colored and white dps, and also a white ring using 2 circle dies.  The flakes were layered, topped with a silver sequin, and then arranged around the ring before popping it above my buffalo check background.  I added a silver bow and my sentiment cut from silver glitter card to finish.

Now it's your turn!  We have a $25.00 gift certificate 


to the amazing Simon Says Stamp store for 1 lucky random winner of this week's challenge!  I can't wait to see what you all make this week!

Sunday, December 6, 2020

Pine Cones and Snowflakes

Another Christmas card share today.......this one is a mix of lots of different supplies!


supplies: 2 krafts, Peacock Teal, and silver foil cardstock, patterned silver foil paper from a retired KaiserCraft Christmas pad, Tim Holtz pine branch and berry branch dies, The Greetery bow and Pine Cone dies, Spellbinders sentiment dies from Santa Parade, Christmas Red stickles

I've not used much silver for the holidays in the past, so I'm glad that this pretty patterned paper got me moving in that direction!  I got smart when I made this card and did a duplicate design using another similar background from the same pad.  And you can see that I can't seem to make a card lately without this gorgeous bow die from The Greetery - it's just so pretty! 

Thanks for stopping by - have a good day! 

Wednesday, December 2, 2020

Simon Says.......Fun with Dies!


Happy Wednesday - welcome to our challenge at the Simon Says Stamp Wednesday Challenge Blog!


Our theme this week is Fun with Dies.  The team is playing with our own Simon Says Stamp products this week, and I have 2 cards for you.  

First up, here's a card that uses a brand new snowflake from the DieCember release.


supplies: white, glitter white, and Bristol cardstock, mermaid lagoonpeacock feathers, and lucky clover distress oxide inks, Simon Jewel Snowflake and Holiday Frames dies, Lots of Snowflakes embossed in white, silver sequins

I smooshed an oxide background, then overstamped various sizes of snowflakes.  The panel was attached to a white cardbase, and then I simply added the sentiment frame and a glittery snowflake.

Here's another card, using a mix of dies and stencils.


supplies: white and silver glitter cardstock, Simon's Christmas Gnome Home stencil and Joy die, bow die, pink and aqua inks, Petal Pink Liquid Pearls

This Gnome Home stencil was part of a card kit from 2019, and I hadn't used it yet.  But when I saw the little leaf sprig and dots in it, I decided to try to make a wreath from it.  I started by using a circle die to lightly draw in a circle on my white panel, then repeatedly moved the stencil around the circle.  Then I haphazardly filled in with the single dots.  After matting my panel with silver cardstock and adding the sentiment and bow, I went back in and added some liquid pearls here and there for a little more dimension. I love this modern Christmas color palette of aqua, pink, and silver!

Now it's your turn!  We have a $25.00 gift certificate 


to the amazing Simon Says Stamp store for 1 lucky random winner of this week's challenge!  I can't wait to see what you all make this week!


Thursday, January 2, 2020

Winter Greetings

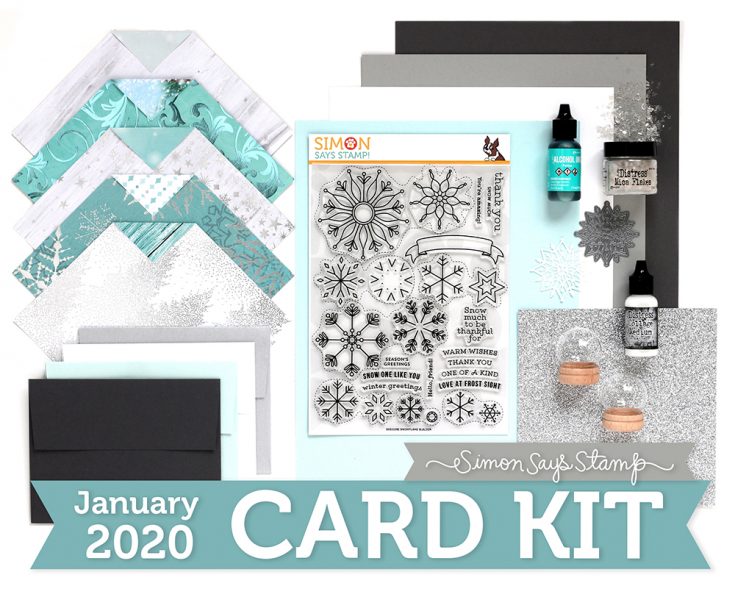
I got my Simon Says Stamp January 2020 Card Kit last week - what beautiful contents!  Here's my first card, using one of the designer papers, the die, and a sentiment and banner from the stamp set.


supplies: Sea Glass cardstock, silver glitter paper, Kaisercraft paper, Snowflake Mandala die, Snowflake Builder sentiment and banner, Ranger Super Fine Detail silver embossing powder

I simply cut a panel of the designer paper, bordered it with a strip of silver glitter paper, and added 2 snowflake dies, one in white, one in silver glitter, and a greetings banner embossed in silver.

I had to take a closer photo to show the beautiful silver foiling on the paper.


And a final shot to show the glimmer.


I can't wait to play next with the Snowflake Builder stamp set - what a fun concept!


Be sure to visit our Gallery to see lots more card ideas using this kit!

Wednesday, December 5, 2018

Simon Says......Wrap it Up!


Happy Wednesday!  Welcome to another challenge at the Simon Says Stamp Wednesday Challenge Blog!

wed-newchallenge-header


Our theme this week is "Wrap it Up!" - make a tag, a bag, a box.  The team this week is showcasing Tim Holtz goodies!  I continue to be drawn to the woodland style, and my tag today reflects that.


supplies: Schoolhouse Red, Green Leaf, an unknown green and Desert Storm cardstock, Tim Holtz Plaid stencil, black soot distress ink, Lumber embossing folder, a grey ink to bring out woodgrain, Mini Holiday Greens dies, Simon's Joy die, twine and jingle bells

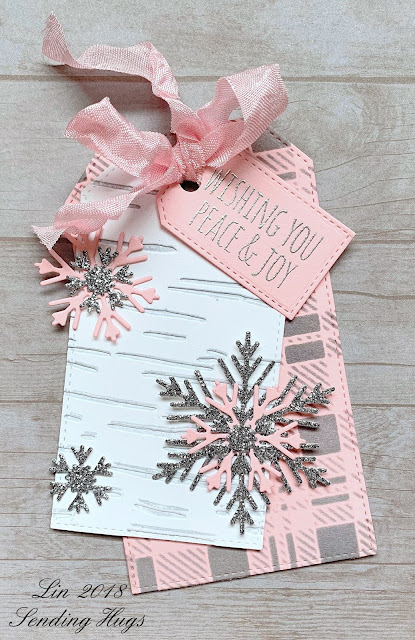
Here's a second version, more feminine this time:


supplies: white, Cotton Candy and dark silver glitter card stock, Tim Holtz Plaid stencil, hickory smoke distress ink, Birch embossing folder, sentiment from Scribble Woodland cling stamps, VersaMark ink and silver embossing powder, MFT Stitched Tag dies, 3 sizes, dyed seam binding various snowflake dies

Now it's your turn!  We have a $50.00 gift certificate 

50dollar_voucher_600px

to the amazing Simon Says Stamp store for 1 lucky random winner of this week's challenge!  I can't wait to see what you all make this week!


Tuesday, July 31, 2018

Happily Ever After

Here's another set of gorgeous dies that Spellbinders sent me - I paired it with a damask embossing folder for a wedding card:


supplies: white, cream, and silver metallic card stock, Spellbinders Layered Happily Ever After dies, Taylored Expressions Damask embossing folder, silver brads for flower centers, adhesive foam

I first cut an A2 panel in white card, and from that cut out the arched shape; then that panel was embossed with the folder.  On my white card base, I affixed a cream bride and groom diecut in the center.  On the embossed panel, I added the sentiment die cut in silver, and then popped that panel above my card base with some adhesive foam.  The flowers were also cut from cream card to make them stand out a bit better from the white background, and I added tiny silver brads to their centers.

What a great set to have for weddings!  Going forward, I think I'd use the bride's wedding colors for some of these details.......

Tuesday, May 1, 2018

....."One is Silver and the other Gold"........

I'm back with a couple more foiled cards.  This time I trimmed out  Gina K Design FoilMate panels and colored them first with distress inks before foiling.  The panels are not shiny, but there's something extremely smooth about them so that the inks sponge on beautifully.


supplies: Cornflower, Mint, and silver metallic and glitter card stock, Gina K Vibrant Vines Foil Mates panel, cracked pistachio, broken china, and blueprint sketch distress inks, Sparkling Silver foil, Tim Holtz Detailed Butterfly dies, Simon dream die

The bad thing about these cards is that they're impossible to photograph so that they look like the real thing.  This one uses all silver metallics, but you wouldn't know it from the picture.  You'll just have to take my word for it.   That Sparkling Silver foil is to die for!  It was included in a recent card kit, but I'll be getting a whole pack of it asap!  In real life it starts silver, but looks periwinkle in some lights.  I'm sure it will take on the hue of any other color it's put against...

Next up is a rose-gold card:


supplies: cream and rose gold metallic card stock, Gina K Designs Blooming Hearts Foil Mate panel,  carved pumpkin, picked raspberry, and mustard seed distress inks, Rose Gold foil, Spellbinder's Scalloped Heart die, Simon's Heart die, sentiment from Hero Arts With Sympathy, rose gold embossing powder

I again colored my panel before foiling it, then cut out the heart.  The die-cut sentiment was glued to the panel over the "hole" and after stamping and gold embossing the rest of the sentiment on the card base, the foiled panel was popped above it.

Thanks for stopping by - I'll see you again tomorrow, I hope, for a Simon Says Stamp Wednesday challenge post.  

Wednesday, November 8, 2017

Simon Says..........Snow White

wed-newchallenge-header

Happy Wednesday!  Welcome to another challenge at the Simon Says Stamp Wednesday Challenge Blog!


Our theme this week is "Snow White" - you can put some snow on your creation, use lots of white, or interpret this as you like!  The DT are playing with Reverse Confetti this week - I made 2 cards using their Snowflake Trio dies:


supplies: white and Simon's fog cardstock (for twig wreath used as snowflake base), foiled and glittered silver card stock, Reverse Confetti Snowflake Trio die, Impression Obsession Wooden Plank cling stamp, Hero Arts Soft Granite ink, Simon's Stitched Rectangle and Chisolm Wreath die, Tim Holtz Holiday Words dies, white seam binding bow, light blue gems

I cut the smallest of the snowflakes from foiled and glittered silver card stock, and arranged them on the Chisolm Wreath, then added a bow and glued the wreath onto my planked background, edged in silver, then added my sentiment.

Here's a closer look - it sure is a sparkler!


Here's one more card, white on white this time, and it uses all of the snowflakes in this set:


supplies: white and white glitter cardstock, Snowflake Trio dies, another Tim Holtz Holiday Words die, Swiss Dot embossing folder, pearls, adhesive foam squares, white twine

Now it's your turn.  As always, we have another $50.00 gift voucher

50dollar_voucher_600px

to the amazing Simon Says Stamp store for 1 lucky random winner of this week's challenge!