Friday, January 31, 2014

A card for Jacqueline

Deborah Nolan is starting up her Card Chain Challenge again, and here is the card that I made to send to my friend Jacqueline in France.  I know that she received it, so I'm sharing it today.  We share a love of flowers and birds, so that's where I started.  And I just got this new floral lace heart die, so that was thrown into the mix, also.


supplies: kraft, coral, and carnation layering paper, Impression Obsession Floral Lace Heart die, Memory Box Grove Branch, Perched Reed Bird, and Fancy Blossoms dies, Hero Arts Old Letter Writing, Technique Tuesday So Very Thankful (sentiment), Latte chalk ink, pink gems

Deborah always gives us several suggested options for our cards each month.  I used her color suggestions  
and 2 of her themes: Valentine's Day and Friends.  

Deborah will have a post tomorrow showing all of the cards that winged their way back and forth across the world.  And you can sign up HERE for next month if you'd like to play along, too.  It's fun getting a card in the mail from someone new each month!  I got a card this month from Lucille in Colorado!

Wednesday, January 29, 2014

Simon Says........Anything Goes......with twine or string!

wed-newchallenge-header

It's the end of the month, and that means an Anything Goes challenge at the Simon Says Stamp Wednesday Challenge Blog!!

Simon Wednesday Challenge Blog

We're changing things up a tiny bit with our Anything Goes challenges this year, and adding in an extra requirement.  This time we ask you to add twine or string to your creation.  The design team this week are using Mama Elephant products.  You're free to use anything you'd like, of course, as long as you include some twine or string somewhere on your design.

I knew just what stamp set I wanted to play with: Water Blooms!  And my card turned out just as I envisioned it!


I made a little bouquet of flowers using Hero Arts bubble gum, cornflower blue, and green hills inks, and added Doodlebug Designs Doodle Twine in cupcake and limeade.  I love this sentiment - it's something my youngest sister used to say to my Mom when she first was out on her own!

Now it's your turn - Heidi has provided us with another gift voucher for $50.00, to be given to the random winner of our challenge!

50dollar_voucher_600px

With all the new things coming out soon from CHA, I know you all could use it for some fun things at the Simon Says Stamp store!

Simon Says Stamp

Monday, January 27, 2014

Baby, it's COLD!!


Since I had my paste out earlier today, I thought I'd try using it with glitter.  This stencil  is called Let It Snow, and I used part of it on my plaid card HERE.  Thought I'd concentrate just on the snowflakes this time.  This isn't the best picture; it's taken at night, and I had to do some editing.....


After spreading the modeling paste on the stencil and lifting it, I carefully sprinkled on 4 different blues and greens and a white glitter (an old Martha Stewart Winter Wonderland set).  I let that dry most of the afternoon, and weighted it down around the edges, as it warped a bit as it dried.  To finish I stamped a sentiment from Kelly Purkey's Let It Snow stamp set and added various sequins. 

It's far from perfect, but I had fun making it!  Thanks for stopping by - keep warm!

This is the Day


Today is our last day of the Stenciled Online Card Class, and boy, did the instructors give us alot of ideas!  My mind is on overload, so I thought I'd start with the simplest idea this morning.  YAY that the snow has finally melted or blown off our skylight and I can get better pictures today!


Julie made a gorgeous card by first embossing her stencil into white cardstock and THEN sponging over the stencil for color.  This is a VERY subtle effect, at least with my cuttlebug and the paper that I used, but it is a pretty effect.  I used squeezed lemonade, peacock feathers and mowed lawn distress inks on my Mini Flower Frenzy stencil, and chose this favorite sentiment from the This is the Day stamp set.  And I had fun embellishing with sequins and sea mixed accents.  

This class today was packed with so many ideas - I'll be playing with just those ideas for weeks to come - a great way to get through the winter!  I highly recommend this class - you can start at any time by going HERE.  

All That Glitters

Donna's still our muse at CASE Study.  Here's her amazing card, using gold accents:


I started out by CASE-ing her card almost exactly, just changing up the stamped pattern (Tweed Pattern), using a different sentiment die (Wplus9's Seasonal Sentiments), and changing her colors a bit - I used a deep brown (Simon's Dark Chocolate) and picked raspberry distress ink.  I punched some hearts from gold glitter paper instead of using sequins.


And not being someone who wastes a thing, I decided to make a second card using that die cut:


So for a change, I'll enter this 2nd card into the challenge.  Thanks once again, Donna - everything you do is gold!

Sunday, January 26, 2014

Stenciled Day 3


Today in class we got into using embossing pastes, and we learned about all the different mediums we can use to add to stencils to give dimension to our cards.  Debby's card today was worth the price of admission - it is a perfect example of her delicate style.  Of course I had to CASE it!


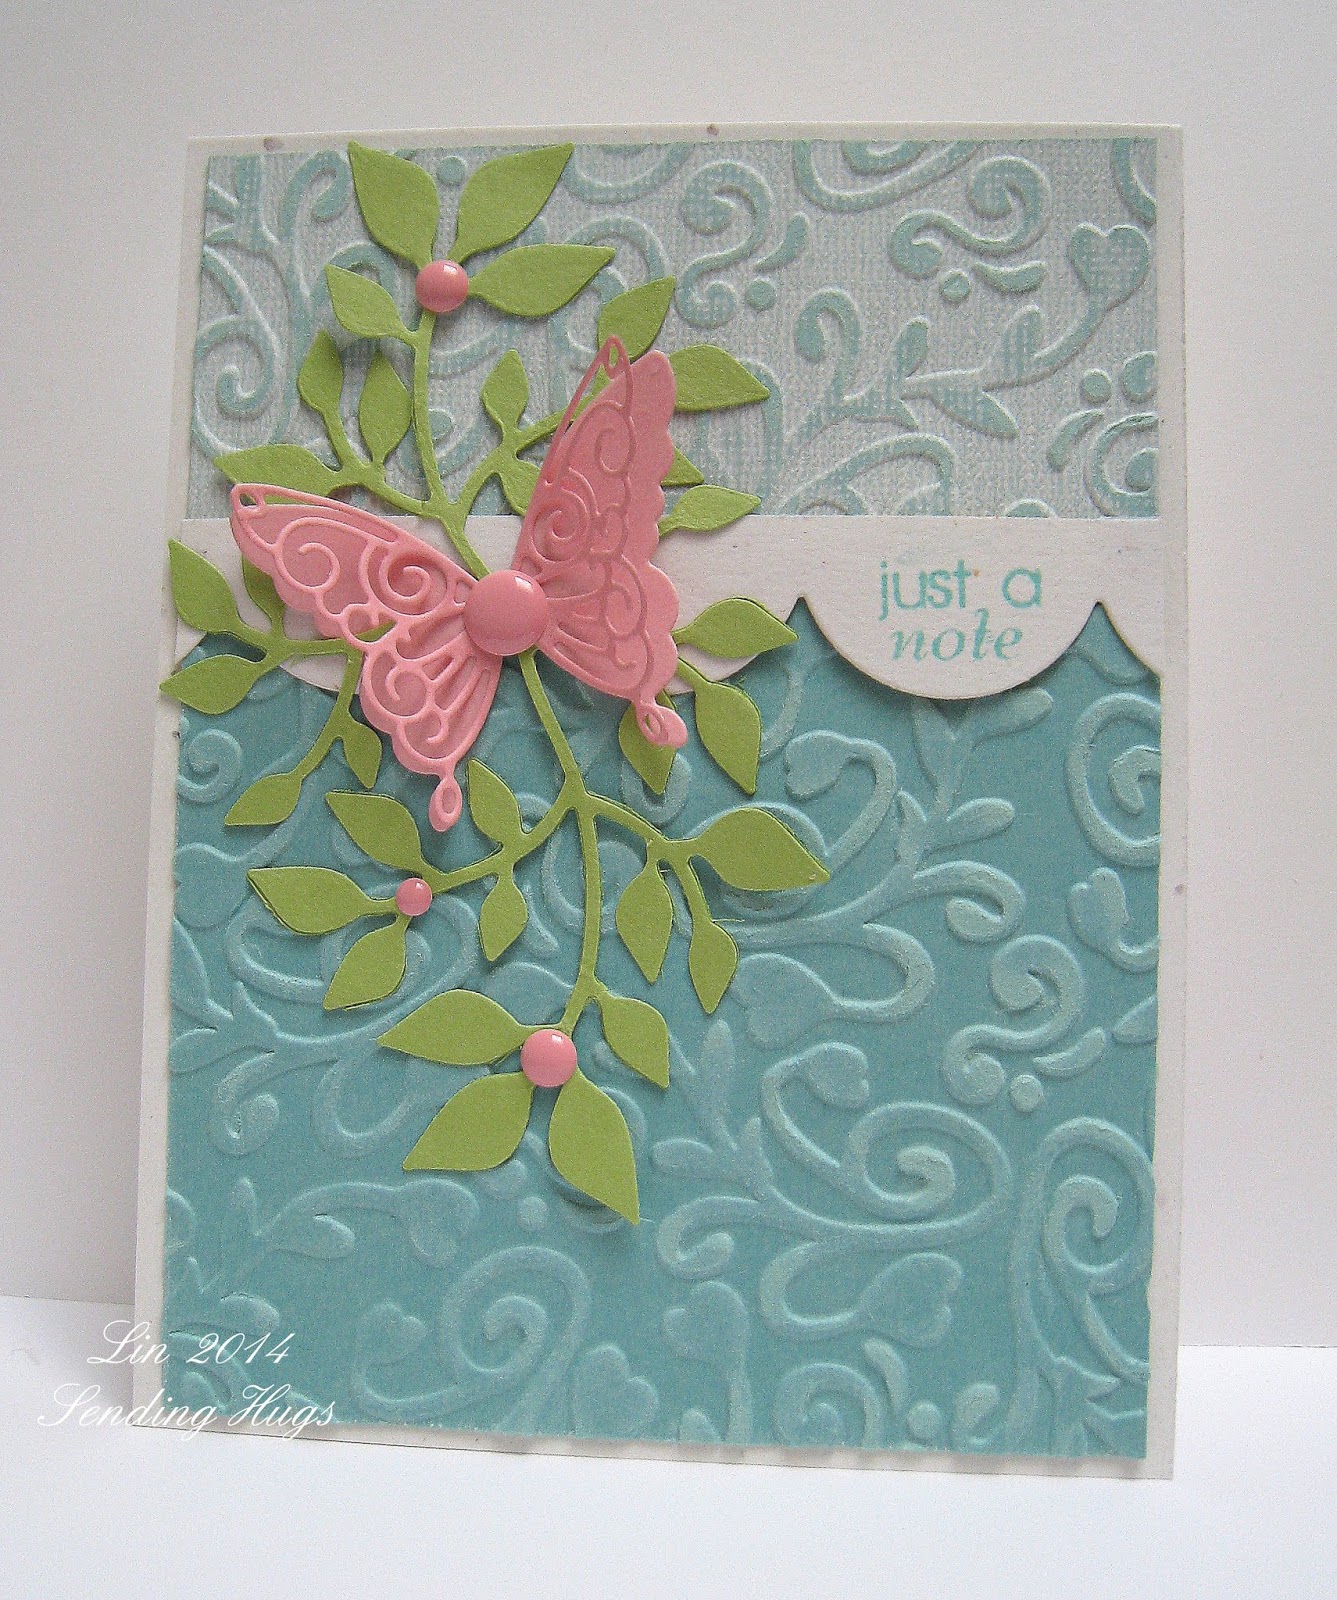
As Debby did, I first sprayed my cardstock panel with a pink spray, let it dry, then applied modeling paste through my stencil of choice, Mini Harlequin.  And in so doing, found out what the difference between embossing paste and modeling paste is.  My modeling paste took on the color of the spray behind it.  Debby's embossing paste stayed white.  But I persevered.......I used a die to cut out 2 sprays of leaves and popped them above the embossed panel.  Then I added my Leanna butterfly die and some pink and white pearls.  My sentiment is from a Simon exclusive stamp set, Happy Every Day, embossed in white on black.

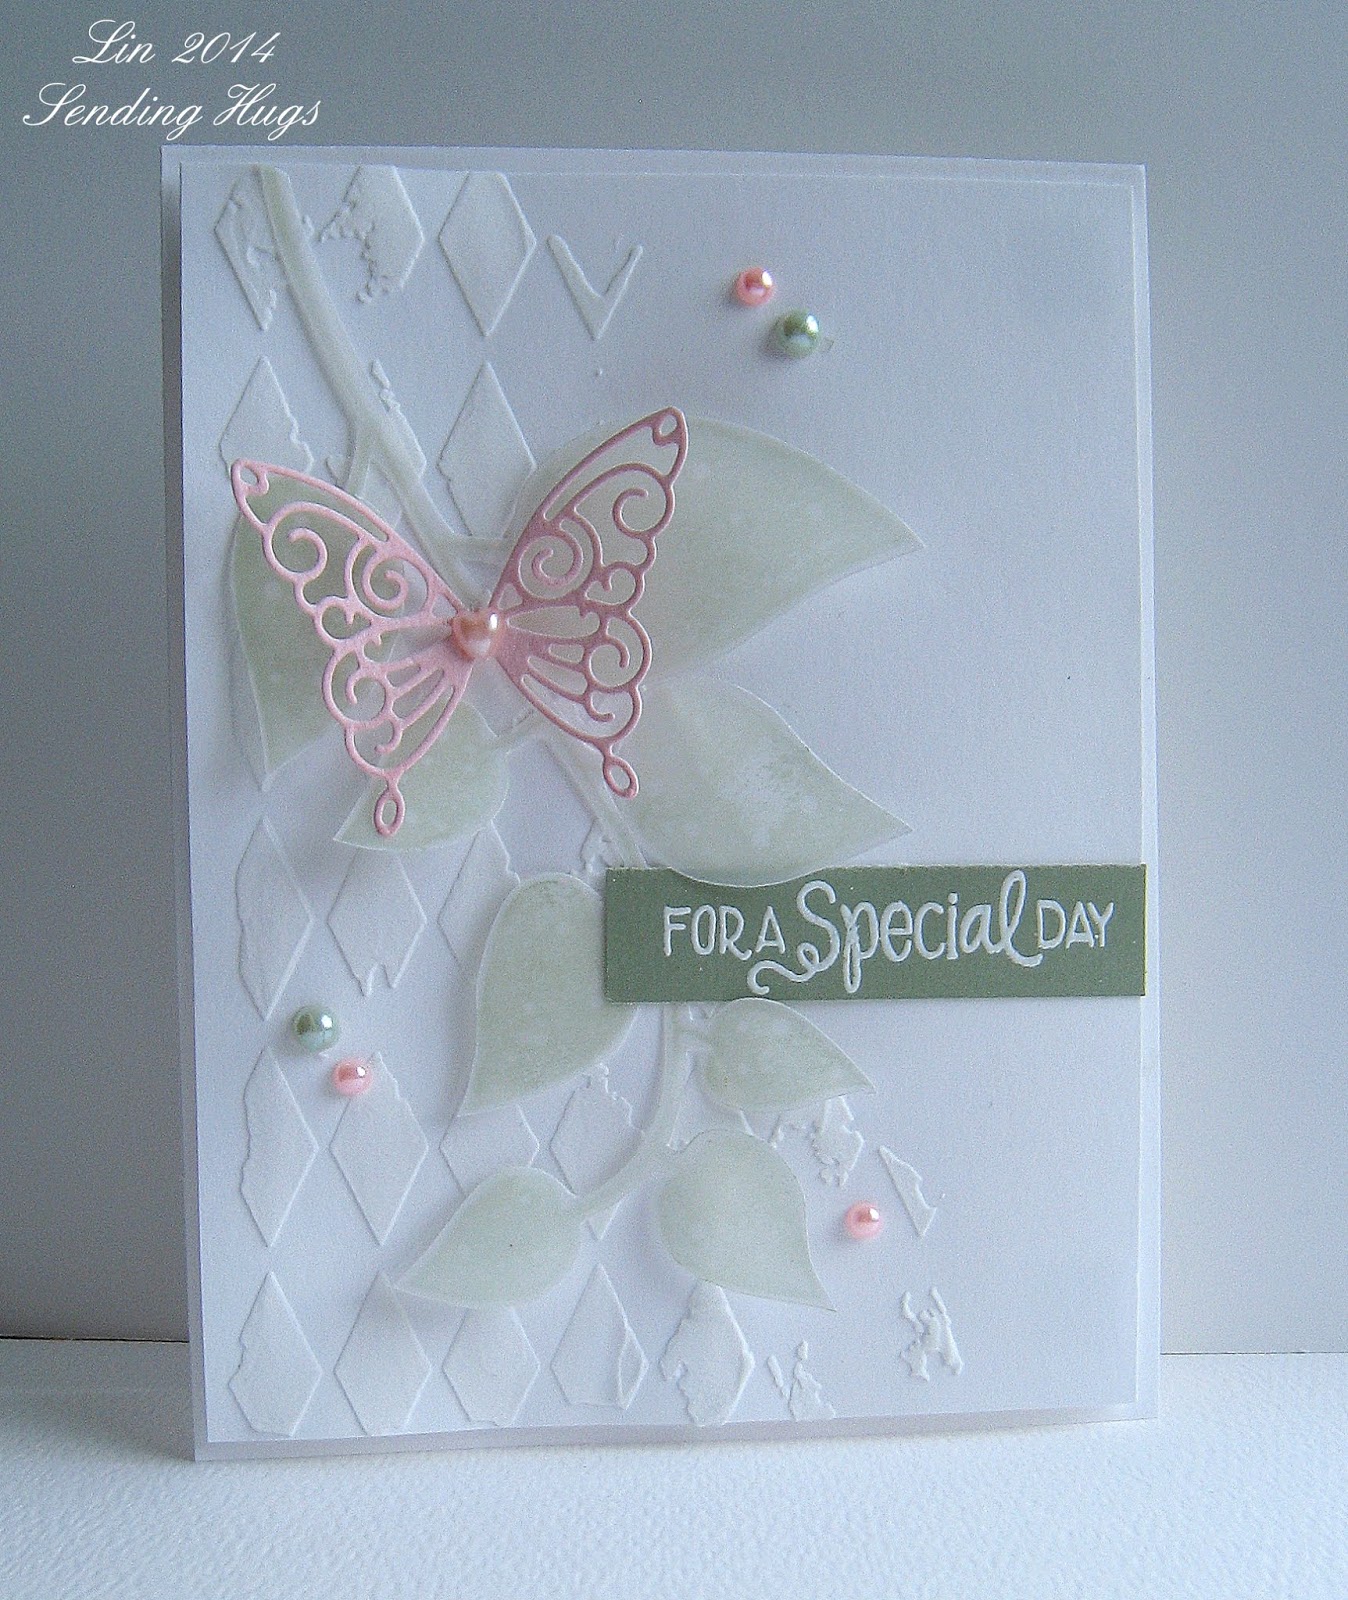
While I had all the equipment out, I decided to do a take 2:


Same stencil, no spray, same butterfly, but this time I stamped an old favorite Hero Arts leaf spray on vellum using bundled sage distress ink, and cut it out.  I wanted a pale, pale green, and this is exactly how I imagined it! The sentiment from Simon's Like Your Style was again white embossed, this time on a scrap of Tim Holtz bundled sage distress cardstock, and I added pink and sage pearls, one of them a heart pearl, on the butterfly body.  Of my 2 cards, this is the one that I prefer - what about you?  

Thanks for stopping today!  I think this will be it for me today - I'm losing my light here.......

Layered stencilling


Here I'm using the striped part of a stencil and layering in spiced marmalade and picked raspberry to create my own plaid.  I stamped my sentiment, then also embossed the panel before mounting it onto a card base and adding a favorite stamped flower and the die-cut sentiment.

Saturday, January 25, 2014

Stamping through a stencil


Lesson number 1 today was stamping through a stencil.  Kristina suggested using a stencil with a big open area, but since I don't have any that fit that description, I just chose this Mini Tri Mosaic one and experimented.  I like the results!


I used 3 distress inks, tumbled glass, broken china and peacock feathers, to sponge in the triangles.  I started from the top left with the darkest ink and worked downward and diagonally, lightening the inks as I went.  At that point there was a blank space at the upper right corner.  Next I found a tiny music stamp  (Skipping Stones Heartsong) and, while the stencil was still on, repeatedly stamped it with Splash ink across the surface.  When I removed my stencil the music filled in the rest of the design.  

I loved making the vellum tag yesterday, so I did another one today, using a Penny Black sentiment which I love, and then to illustrate it, I added the Memory Box branch and bird dies.  And to add more of the kraft and red colors, I used a Doodlebug doodle twine and some natural twine to tie my tag.  

Thanks for visiting me today!

CASEing Kristina


It's Day 2 of the Stenciled Online Class, and here in NE Ohio it's snowing like crazy, so I'm glad to be inside and playing!  One of the cards that is being shown in class is a masculine birthday card by Kristina Werner.  Cards for guys are so difficult for this flower-lovin' gal, and I just loved EVERYTHING about Kristina's, so I CASEd it using what I have here at home:


My stencil is called Confetti, and it has 3 different designs on it: these stars, plus hearts and little dots.  I tried using colored pencils as Kristina did, but the openings in this stencil are too small to accomodate that idea, so I used daubers and distress inks to add my stars after stamping the sentiment.  My punch is a binding edge design, and I used Core'dinations dark teal paper from their Darks collection.

I'm so pleased to have this design now in my arsenal for all the masculine cards I make during the year!  Thank you, Kristina!

Keep Smiling

Just sharing a couple of cards I made with the Simon Says Stamp February Card Kit - LOVE the papers and the stamps in this one!


This one uses 2 of the cardstock and just 1 of the gorgeous floral papers.  I added my own little doily, stamped with the dotted circle and one of the sentiments from the stamps, and a punched butterfly.

For my next card, I played with the floral and leaf stamps in the set and made my own patterned paper, then paired the panel with the lime gingham paper and used one of the Little Snippets labels that were also in the kit.


This month's kit is perfect for February - gives us hopes of our coming spring!

Friday, January 24, 2014

Stenciled Day 1, Layering


Today in class, Jennifer showed us a way to stretch a stencil by inking it, then moving it slightly and inking it a 2nd time.  A fun concept, and this will help me going forward as I choose stencils to buy!  Here's what I came up with:


I have always been a fan of periwinkle and this springy green together, so I chose shaded lilac and shabby shutters distress inks to ink my stencil called Intertwined Circles.  Before attaching my panel to my card base I also used that stencil to emboss the panel.  And as Jennifer did, I added a little something extra to the design, in this case, a little dot  (Simon's Lots of Dots) in the center of  the "petals".   I think it really does give the blended design more cohesiveness.  Because this looks kind of like a little quilt pattern, I chose the sentiment from Needle Little Love, and added a pretty satin ribbon to bring more of the green out of the pattern. 

Thanks for visiting!  I'm really enjoying this class, and it's only Day 1!

Stenciled Day 1: Inking


Today is Day 1 of  the Stenciled Online Card Class, and here's my first homework card.


supplies: Poppy layering paper, The Crafter's Workshop Mini Flower Frenzy stencil, mustard seed, worn lipstick, and picked raspberry distress inks, Hero Arts Made with Love sentiment, Doodlebug doodle twine, coral and orange enamel dots, Lawn Fawn sequins

This is a CASE of a card by Debby Hughes - I LOVE what she's been doing with vellum!  I am so glad I'm in this class - you can join at any time by going HERE.

A sketch at Core'dinations

I recently saw this sketch posted at the Core'dinations blog, and my mind instantly went to those little embossing folder strips that are starting to pop up. 

And here's what I made, using Core'dinations for all the colored cardstock.


supplies: Anna Griffin Rosa embossing strip, Simon exclusive Chrissy and Leanna butterfly dies, Martha Stewart pansy punch, aqua and white pearls.  The sentiment is from a now-discontinued The Craft's Meow stamp set called Easter Blessings.  

This was so much fun to work on - love these spring colors, especially as I look outside my window to see all that white!

Thursday, January 23, 2014

Sharing two more.......

...... easy cards using the Hero Arts Forever cling set.  (You can see 3 others from this set HERE).


I used a design paper for my background, and stamped the tag and sentiment in tide pool mid-tone ink, then just added a brad and a ribbon trim.


I used the 2 butterflies in the set and randomly stamped them in mint julep, soft pool, tide pool, and splash inks, then used pool layering papers for the card base and sentiment banner.  

Wednesday, January 22, 2014

Simon Says........Let's Have a Laugh

If you're here to see my cards for the Hero Hostess Blog Hop, please scroll down 1 post, or click HERE.


It's time for a new challenge at the Simon Says Stamp Wednesday Challenge blog!


With these cold grey days of January, we'd like you to make us something funny and lift our spirits.  The design team were all treated to our choice of Paper Smooches stamps by the generous owner Kim!  Thanks, Kim!

I chose this darling punny set called Needle Little Love !  I paired it with a BoBunny paper pad Pincushion - love the fresh peaches and greens; just what we need to brighten up these dull days.


I started by stamping the sentiment, and then surrounded it with repeated stamping of one of the hearts in this set.  That was die-cut into a circle and then I paper-pieced the hearts.  Can you see how they form an 8-pointed star around the sentiment?  I wanted this little motif to be the focal point, so I put it onto a 4 1/4" square card base, and just added the fun stitches and hearts around the edges.  

My next card uses more of the faux stitches and another sentiment and some flowers and leaves from the set.


I used the x stitches to make a little crazy quilt panel behind my doily, onto which I place the flowers and leaves. To enhance the quilt-look, I embossed the card front (Hero Arts Carnation layering paper) with a Sizzix Flowers folder.  And to finish I added tiny buttons to the centers of the flowers and tied my little bouquet with a bow.

And 1 more, this time with a stamped background - I just had to show you this adorable little cross-stitched heart.  I stamped it in soft cantaloupe and green hills inks, then added a couple more paper-pieced elements from the set.


50dollar_voucher_600px

Once again, Heidi has provided another $50.00 gift voucher to the Simon Says Stamp store for one lucky random winner of this week's challenge!

Simon Says Stamp

The challenge over at the Paper Smooches SPARKS challenge blog is Anything Goes, so I'll be entering these there this week!

Tuesday, January 21, 2014

2014 Hero Hostess Blog Hop!

Welcome to Day 2 of the 2014 edition of the Hero Hostess Catalog Blog Hop!  My 23 alumnae Hosti sisters and I are so excited to be able to get together again to show you some of the new stamps from this new 2014 Catalog!  You should have arrived here today from my friend Judy Jung's blog, Livin' the Dream.

All of my cards today use the new cling stamp set called Forever.  It is a fantastic set with such pretty elements!

For my first card, I used the flower and one of the sentiments, and paired them up with a piece of Earth Designer Paper and a strip of Tide Layering Paper.  I stamped the sentiment in Latte chalk ink, and added some pink pearls


For my next card I wanted to use this sweet bird on a branch motif from the set.  I inked it up in shabby shutters ink, then used a tumbled glass distress marker to color over the bird before stamping it onto white cardstock.  I used the same marker to ink my sentiment also.  I went back in after stamping and added some shadows with some colored pencils.  My papers this time are Pool and Shallows layering papers.


And for my final card I inked up this pretty panel with Cornflower Blue mid-tone ink and stamped it onto my card base, adding the sentiment stamped in Navy mid-tone ink.  I thought it needed just a little something, so I smooshed a bit of the cornflower ink on an acrylic block, spritzed it well with water, and then dipped a paint brush in and flicked it to make some splatters.


Hero Arts will be giving away 3 big prize packs containing an assortment of brand new products from the 2014 Catalog from randomly-drawn comments on our blogs.  For a chance to win, simply comment on any of the stops along the hop on any day, including each day's starting post at the Hero Club Blog.  The more comments you make, the better your chances of winning!

If you find a broken link, there's a master list of links at the Hero Club Blog.  I'm your last blog to visit for today, but please start again tomorrow at the Hero Club Blog for a new list of 4 more of my Hostess sisters' blogs.   I'll see you then!

Sunday, January 19, 2014

....in my heart.......

A quick post today to show you a Valentine's card I made inspired by Donna Mikasa and seen at the CASE Study challenge blog this week.  Love Donna's style - she always inspires me! Here's what I made:


supplies:  Hero Arts All Occasion Messages, embossed in white, mask using a Spellbinder's scalloped heart die, picked raspberry distress ink, tiny hearts from Simon's exclusive Tag Sayings.

Enjoy the rest of your weekend - thanks so much for stopping by!

Saturday, January 18, 2014

Just a Love Note

I made this card for the Splitcoast Stampers challenge called "Get the Tape", to use any kind of tape.  I love washi tape and so this was a fun one for me, and now I have another Valentine's card ready to send out.


I started with a white card base and splattered some Bubble Gum ink diluted with water across the surface, then added my washis.  (the dotty one is doodlebug designs  bubblegum swiss dot, and I think the others are probably by Darice)  Next I punched out some hearts and stamped the sentiment and the tiny three-some of hearts from Simon's Just a Love Note stamp set.  And to finish I added a few Lawn Fawn sequins and tied on some white crochet thread.

Thanks for stopping today - are you working on Valentine's?  It's my favorite holiday!  

Friday, January 17, 2014

The Card Concept

Here's another card using the colors for The Card Concept challenge.


supplies: kraft card base, vanilla cardstock and expresso cardstock, BoBunny passion fruit dot, Wplus9 Folk Art Florals and Seasonal Sentiments dies, Memory Box Grove Branch die, Cheery Lynn French Pastry doily die

Once again, I have no idea what category to put this into; maybe Clean and Layered?  

Thanks for visiting me today!

Thursday, January 16, 2014

A Blog Hop!

Just stopping by quickly to let you know that the 2014 edition of the Hero Hostess Blog Hop will begin next Monday and run all week!  We hostess alumnae are so excited to be together again to share some of the new stamps from the 2014 Catalog!  Each day there will be 4 or 5 blogs and of course, a chance at prizes!

Here's a card I made for my granddaughter's birthday later this month, using the new Lil Hoot stamp set.  I was heavily influenced by my friend Judy's card here.


supplies; white and carnation layering paper, OWH Lil Hoot, Birthday Messages, Alphabet Uppercase dies, Simon's Falling Hearts stencil, worn lipstick distress ink

The hop begins Monday, January 20, promptly at 9:00 AM Eastern time at the Hero Arts Club blog, and my day is Tuesday - see you then!!

Wednesday, January 15, 2014

Simon Says........Emboss It!


It's mid-week, and that means it's time for a new challenge at the Simon Says Stamp Wednesday Challenge!


We have a fun theme this week - emboss it!  You can use embossing folders, as the Design Team is doing, or heat emboss, or use embossing paste, your choice!  

I love the added dimension that an embossing folder can give to a card, so I had a fun play this week and made you 2 cards!


This first one uses one of the Sizzix Ornate Frames folders, along with the Simon exclusive Large Heart Doily die.  Just for fun, I emossed on some woodgrain cardstock, and love the extra little richness it gives!

For my next card I wanted to sand the embossing to bring out a 2nd color, and chose a Core'dinations Whitewash cardstock with a aqua reverse.


My embossing folder again is by Sizzix, called Vines, part of a duo set.  I separated the panels with a scalloped edge border to hold my sentiment, and then added some die-cuts: some Sizzix Sizzlits foliage and Simon's Leanna and Chrissy butterflies.


Sweet Heidi has provided another $50.00 gift voucher for the random winner of this week's challenge that can be used at her Simon Says Stamp Superstore.

Simon Says Stamp