Showing posts with label masking. Show all posts

Wednesday, July 30, 2025

Woodblock Wednesday

 Woodblock Wednesday time!  This month I used a big Hero Arts woodblock called Silhouette Grass, dated 2010.


supplies: white and black cardstock, (retired) Hero Arts Silhouette Grass woodblock, Newton's Nook Retro Sun & Palms stencil set (sun and birds), distress inks, (retired) Winnie & Walter Summer Cutaway 


You can see all the other entries at Amy's blog HERE.


Wednesday, March 26, 2025

Woodblock Wednesday

 I really enjoyed making my card for this month's Woodblock Wednesday!  The idea of mixing a collage postage die with small floral Hero Arts woodblocks came to mind as I was looking through my woodblocks to use this month.  Then I saw Linda's cards (rcwidow on IG) doing the same thing, and Colleen's cards from last month, and that made up my mind.  Here's my contribution for this month.


I had to do a wee bit of masking, but these smaller stamps fit into the openings perfectly! Here's a picture with the stamps I used, all of them Hero Arts from the early 2000s.  The "first class mail" and postage amounts are from  a Waffle Flower Postage Collage stamp set.  As you can see, I used the same colors that Hero Arts suggested on their stamps: yellow, pink, lavender, and green. 


supplies: white and purple cardstock, Waffle Flower Postage Collage die and stamp set, Hero Arts Angels in a Vase, Artist's Heart Leaves, Happy Spring (I believe part of a 2-piece set), Garden Blooms set of 3, punched butterflies

It was such a joy to use these again, as they were all favorites way back then!  Since the Simon Wednesday Blog is featuring Waffle Flower this week, I'll enter this into their challenge.

And because I had to know what these would look like cut apart, here's a bonus card.


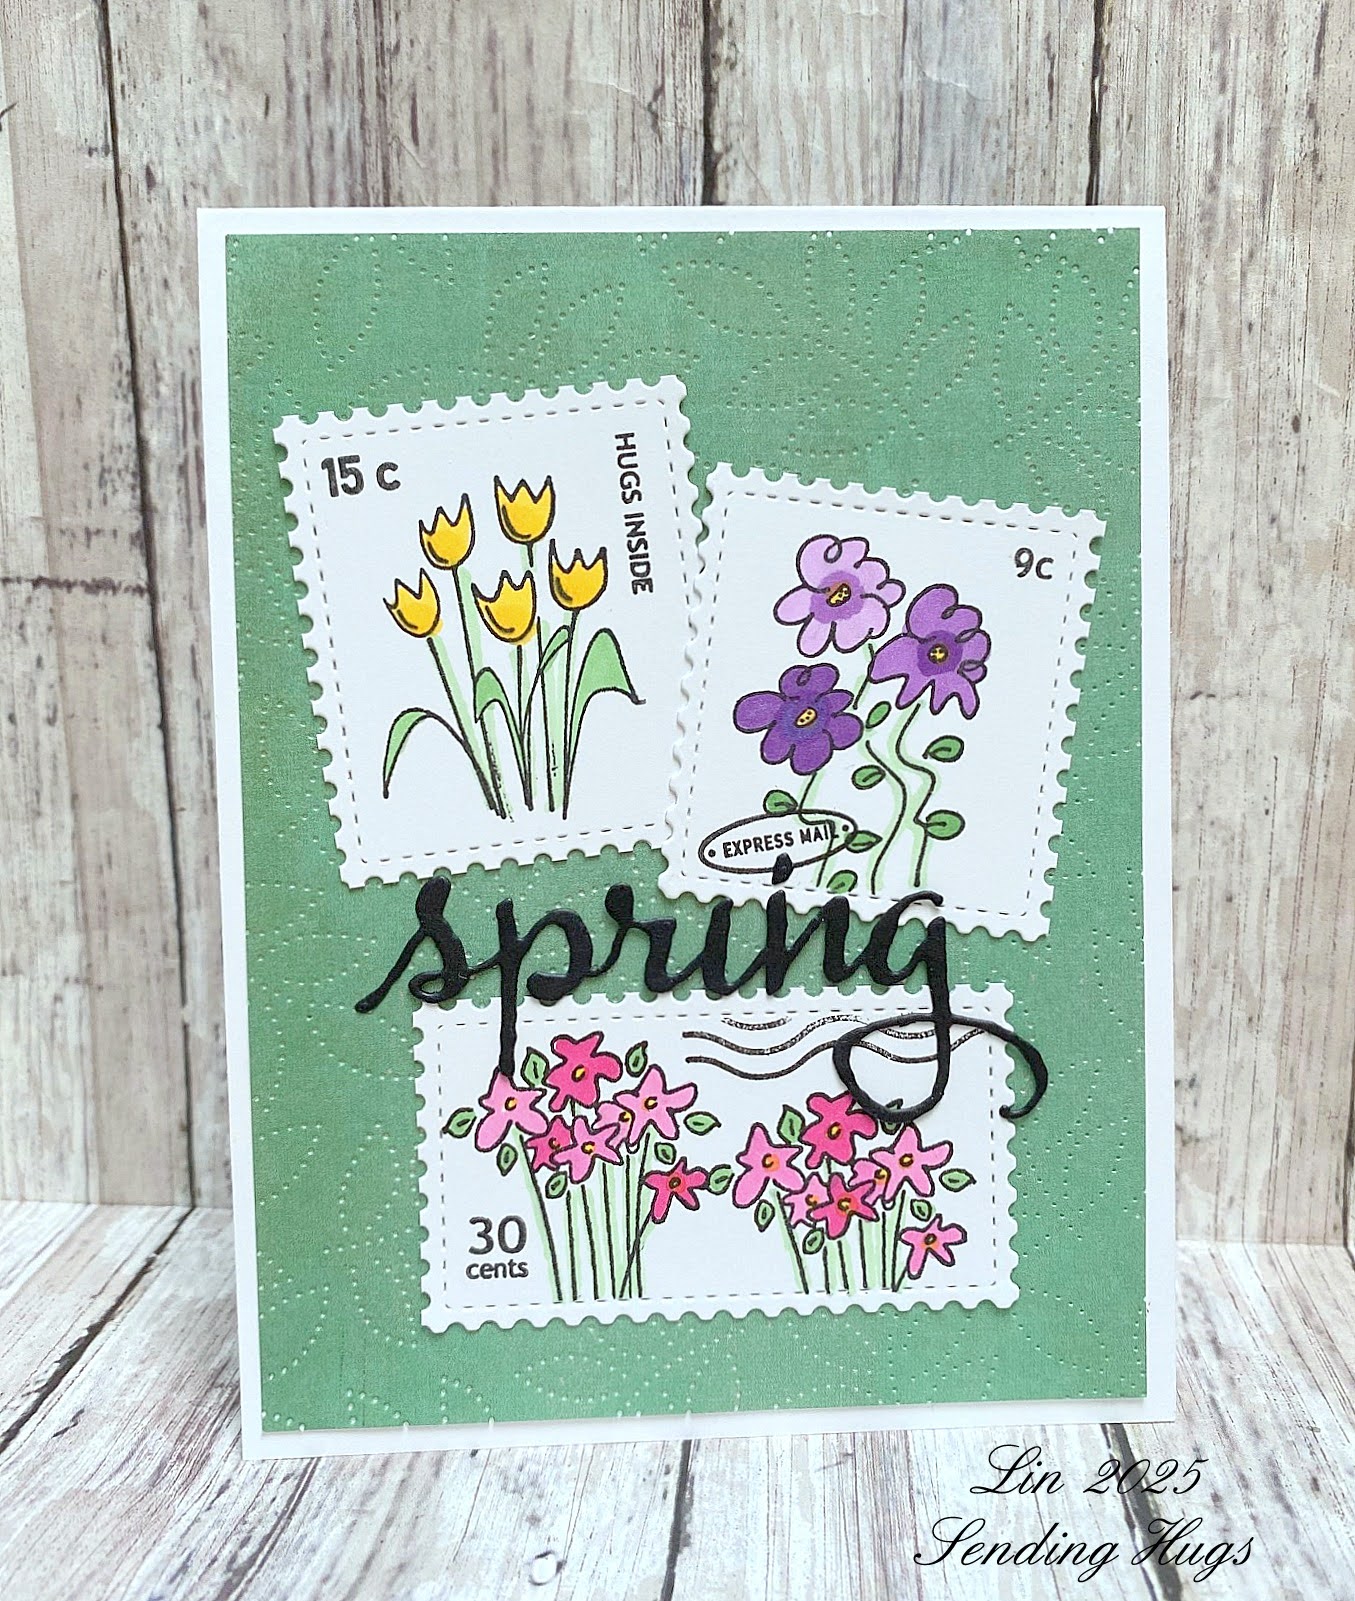
supplies: white and green cardstock, Memory Box Pinpoint Leaf cover plate, Waffle Flower Postage Collage die and stamp set , Hero Arts Garden Blooms stamps, Winnie & Walter Spring cutaway

This time I only used the 3 stamps from Garden Blooms set, coloring each one in only one of the same colors I used above.  Then I arranged them on a panel of green cardstock cut with the Pinpoint Leaf cover plate, and added a die-cut sentiment.

You can see all the other entries at Amy's blog HERE.


Thursday, January 23, 2025

Snowy

 Here's everyone's old favorite snowman from Penny Black!  He's a woodblock, dated 2008.  This time I made a (mostly) 1-layer card, using masking and paper-piecing.


supplies: white cardstock, red and white gingham dp, Penny Black Snowy woodblock, trees from (retired) Mark's Finest Papers All is Calm stamp set, sentiment from Simon Snow Love, unknown (retired) snowflake embossing folder

I stamped Snowy on a white panel, then masked him to overstamp the tree stamp two times.  Then I added minimal colors with markers and paper-pieced his scarf and hat.  Next I stamped my sentiment in red, and then ran the entire panel through a snowflake embossing folder.

How is your January going?  It's winter here, for sure!

Friday, January 17, 2025

Winter Scape

 We've had several days of snow with frigid temperatures so that it doesn't melt, and keeps accumulating.  Recently we also had a full moon and looking outside at night was breathtaking.  

I've been wanting to do a winter version of The Greetery's Rolling Hills Countryside suite, and today was the day!  Here's what I came up with.


supplies: white, dark green, medium grey, and pale yellow cardstock, The Greetery Rolling Hills stencils and a pale blue ink, Countryside and Rolling Hills Tree dies, circle die as a mask, dark blue ink, sentiment from Simon Snow Love

I used only the striped stencils this time, and then used the topmost one as a guide to make a mask so that I could color in the night sky, adding a circle mask for the moon.  Then I simply added my die-cut trees and houses and stamped my message.  

You can see a spring version using these supplies HERE, and a fall version HERE.  

What is your winter doing where you live?

Sunday, October 27, 2024

October

 One of my favorite months is almost gone, and I haven't done many cards for fall this month.  So I went looking back at my blog for past posts at this time of year.  I found one that featured this Quilted Stencil from Simon Says Stamp, and thought I'd use it once again, with fall colors.  When it came time to find a sentiment, I chose one from a Hello Bluebird Pumpkin Time set.


supplies: white and Audrey Blue cardstock, Simon Says Stamp Quilted stencil, Audrey Blue ink, distress inks in mustard seed, ripe persimmon, and barn door, Sunny Studios Frilly Frames Eyelet Lace die, Hello Bluebird Pumpkin Time sentiment, rectangle and square dies

The temperatures are dipping, so putting out some quilts to cuddle in is something I do about now.  They would pair nicely with a re-read of Anne of Green Gables, wouldn't they?

I'll be entering this into the October Stencil Fun Challenge and the Just Us Girls Challenge, thanks to Linda's suggestion.  I love stencils!

Hope you're enjoying the fall, too; thanks for stopping by today!

Thursday, October 24, 2024

Snowy Woodland

Here's a card I made with one of Simon's STAMPtember collaborations - with Gina K. Designs.  I love woodland scenes, and there were just too many cute possibilities in this silhouette set that I couldn't let it pass me by.  It's taken me awhile to get to play with it, but here's my first card using just a few of the elements.

At my parents' home, my Dad had planted several fruit trees in their large lawn and at dusk most of the year, deer would come to snack on whatever fruit they could find.  It's a special memory for me.  Those trees are still there, and continue to produce, so this little scene still plays out each year.


white cardstock, Gina K. Designs (retired) Stay Cozy stamps, VersaFine Onyx Black ink, clear embossing powder, lucky clover, wilted violet, salty ocean, and blueprint sketch distress oxide inks, splattered white paint, Spellbinders Perfect Touch die, snowflakes from my stash

After stamping the trees and deer, and embossing them, I brushed on a mix of distress oxide inks, masking off the ground first.  Then I cut out a smaller rectangle, stamped my sentiment, and splattered some diluted white paint across the panel.  That was then attached to my card base, along with a few small snowflakes.

Thanks for stopping by today - I appreciate your visits! 

Wednesday, June 5, 2024

Spellbinders June Club Kits

 The Club Kits for June are here!  They have a summer theme this month - so fun and nicely varied - something for everyone!

I'll start out this month with the stitching dies, because when you say summer, I say ICE CREAM!!


supplies: white, cotton candy, mint, red, green, and a kraft cardstock, Stitched Ice Cream stitching dies, 3 strands of pink, mint, and light brown floss, Peppermint Stripes embossing folder, distress inks in spun sugar and cracked pistachio, adhesive foam squares

Isn't that cherry a cute touch?  After stitching and constructing my double-scoop cone, I decided to add some old-fashioned candy stripes to the border of my card - they just seemed to "go".   I made them by masking off every other set of stripes and rubbing distress inks across only the edges of the embossed panel.  There's a 2nd sentiment in this set which says "Have a Cool Summer".

Here is a card using the Large dies of the Month: Summertime Vacay.  I recreated the scene I see in Florida with my husband when we go to the beach as snowbirds.  I also used one of the Glimmer of the Month sentiments and Satin Pewter glimmer foil to simulate writing in the sand.


supplies: white, bright yellow, 2 aqua, 2 kraft, 2 blue cardstock, Summertime Vacay dies, Summertime Sentiments glimmer plate, Satin Pewter glimmer foil

Next up are the Dies of the Month: Summertime Wade Pool - I have 2 cards for you with these, mixing in various other clubs with them: Summertime Waves embossing folder, and Summertime Graphics stencils.  


supplies: white, black, yellow, 2 greys, orange, and pink cardstock, Summertime Wade Pool dies, Summertime Graphics stencils (beach balls), Summertime Waves embossing folder, adhesive foam squares


supplies: kraft, white, aqua, 2 greens, pink, and black cardstock, turquoise glitter cardstock (sentiment), Summertime Wade Pool dies, Summertime Waves embossing folder, adhesive foam squares

These dies have a little hinge mechanism that allows the bodies to swing back and forth.  And the set includes the sentiments I used on these cards - fun font!  The stencils this month give you 3 different choices - these beach balls are just one of them!

Here is the 3D embossing folder: Summertime Citrus Twist.  When it's a hot summer day, my beverage of choice is limeade, so I used a lime cardstock to emboss with, then swiped the panel with lime ink to bring out the details.  I added some citrus flowers and leaves to frame the sentiment.


supplies: white, lime and kelly green cardstock, Summertime Citrus Twist 3D embossing folder, sentiment from Stitched Ice Cream, flowers from last month's Tropical Friends dies, leaves from Vintage Florals dies

I've already used orange and lemon cardstock to emboss more panels using this folder for some future cards!

Here is a card using the Stamp/Die of the Month: Paradise Resort, along with another of the stencils.


supplies: white and aqua cardstock, Summertime Graphics (clouds and sun) stencil, distress inks, Paradise Resort stamps and matching dies, Postage Edge Rectangle dies

And finally I have a card using the Caboodle bonus item for this month: Summertime Slice.  It's another one of those die sets that have a hinge so that the legs can swing.  I equate watermelons with picnics, so I brought in a red check tablecloth and a basket weave background to go along with this one and used a sentiment from the stitching dies again.


supplies: white, black, red and greens cardstock, Doodlebug Buffalo Check design paper, Summertime Slice dies, Stitched Ice Cream sentiment dies, Woven 3D embossing folder

Aren't her heart glasses too cute???

You can look HERE for information on Spellbinders Clubs.  Each is available for new subscribers only from the 6th until the 27th of each month.  If you click on my links under each card, you can see the specifics of each product.  You can subscribe to each of our 10 kits separately, (and you can "unjoin" a subscription at any time without any penalty), or you can get them all, plus a free bonus, and save 60% by choosing the Deluxe Caboodle!


Saturday, April 27, 2024

Stencil Masking

 My Favorite Things has some "Smart Masks", which can be used with stencils or stamps to give a border all around and a natural area to stamp a sentiment.  I ordered a High Low Strip masking stencil and a fun set of sentiment stamps that will fit with it, and made 3 cards today.


supplies: white cardstock, MFT Flower Fusion layering stencils, altenew mini ink cubes from Lapis Lazuli, Enchanted Garden, and Sweet Dreams collections, and Lime, MFT Smart Mask High Low StripEssential Messages 

Then I shifted the mask upward, chose a Greetery stencil set, and inked this card in warm colors.

supplies: white and bright pink cardstock, The Greetery Petal Pushers stencils, teeny bikini, melon, sunshine, firefly, and volcano lake inks, MFT High Low Strip masking stencilEssential Messages, enamel dots

And 1 more, just cause it's fun to play with colors!


supplies: white and purple cardstock, The Greetery Petal Pushers layering stencils, wilted violet,ripe persimmon, mustard seed, and mowed lawn distress inks, MFT Smart Mask High Low Strip, Essential Messages, enamel dots

These masking stencils come in 4 varieties, each in either a vertical or a horizontal perspective, and I think they're a great addition to our layering stencils and even stamps to make a card a little more interesting, yet still 1 layer!

It's an Anything Goes week at the Simon Wednesday challenge, so I'll be entering these this week.

Thanks for stopping by!

Thursday, November 16, 2023

Peace On Earth

 Playing once again with the other big word in Tim Holtz's Big Tidings die set, I remembered THIS card that I made in 2015, and decided to try and redo it using this die.  Here's the result.


supplies: white and blue cardstock, Tim Holtz Big Tidings Noel die, Penny Black (retired) Peace and Joy doves from 2013, sentiment from Simon's Tiny Words Christmas set, broken china distress ink and a blending brush

I stamped the doves on a trimmed white card panel, then masked them and brushed some broken china distress ink around them to make them stand out.  Then I cut out the inner Noel word of the set.  I cut it out also from some blue cardstock to offset it, and twice more in white, then glued them all together and attached them back onto the card base. 

This is pretty understated, I kept wanting to add something glitzy, but in the end decided to leave it as is.

How are you coming on your cards for Christmas?  

Tuesday, November 22, 2022

Let It Snow

 I recently brought home a Gina K. Master Layout set of dies, my first, and mixed it with a bunch of retired snow-themed products for my card today.


supplies: white, a blue from the Ocean Blue collection paper pad, and Chrome Silver mirror card, Master Layouts 11 dies, oxide inks in mermaid lagoon, prize ribbon, and wilted violet, blending brushes, (retired) Hero Arts Snowflake Circle cling stamp, clear ink and white embossing powder, an unknown snowflake die, (retired) Birch Press Design Let it Snow dies, a silver snowflake sequin

I used the largest master layout die to make a mask to sponge on my inks, then left it in place and overstamped a small snowflake stamp, white heat-embossing it.  The snowflakes were the perfect size for these windows, don't you think?  The panel was then matted in silver foil card.  I used that for my sentiment dies, too.  I seem to remember that the large snowflake may have come with Cuttlebug machines when they first came out?  I don't actually have it, but I used to borrow it from a friend and cut bunches of them at a time, which I still have after all these years!

This shade of blue cardstock is the perfect blue, just right for a crisp clear winter sky, but more importantly it matched my ink blending nicely.


Thanks for stopping by today.

Sunday, June 26, 2022

Blue Bells

 Here's a card using another of my new The Greetery dies recently released.

supplies: white, cornflower blue, paler blue, and green cardstock, The Greetery Blue Bells Botanicuts dies, Altenew Fine Frames die, Hero Arts (retired) Old Letter Writing woodblock stamp and sentiment from (retired) Forever cling stamps, partial Sunny Studio Frilly Frames Eyelet Lace die,micro-dot adhesive, Doodlebug tiny heart sprinkle

I love any flower that's blue, so this one was a must-have die for me.  I thought I'd make a vintage-feeling card using some old Hero arts stamps along with more modern supplies.  Once again, the micro-dot adhesive came to the rescue to help secure the teensy frame and the skinny flower dies - makes everything SO much easier!

After cutting out my scalloped panel, I masked off an area to stamp the script background.  Then I added the skinny blue frame, and stamped the main sentiment.  Lastly I added my blue bells, and then popped up the panel above a white card base.

My husband and I celebrated our 51st anniversary earlier this month, and here's the card I made him; it incorporates these bluebells along with some older The Greetery dies.


supplies: white, cream, kraft, green, and 2 blue cardstocks, The Greetery Wood Slice Hearts, Blue Bells Botanicuts, Love die, and sentiment from Love Is, faded jeans distress ink

This is a take on some cards I made for Valentine's Day last year.

There's also a similar Botanicut set released at the same time that is Lavender - it's on my wishlist!

Thanks for stopping by - have a great day!

Saturday, December 18, 2021

Simon's January Card Kit

 I love the elements in the new January Card Kit from Simon Says Stamp!  This stamp set is really darling, with 4 different snowmen and 3 sizes of pine trees to stamp!  I chose my favorite snowman and pine tree and one of the patterned papers to put my first card together.


supplies: white cardstock, Warmest Wishes clear stamp set, paper from La-La-Land Crafts Starry Night paper pad, adhesive foam squares

Instead of cutting out everything like I usually do, I took the time to compose my little snow scene first, using masking.  Then I just had to cut around the tops of the trees and the snowman.  That panel was then lifted above the patterned paper birch trees and snowflake background.  I love woodland scenes! 

Next I couldn't wait to try out the snowflake stencil and the new Glitz Glitter Gel in Seafoam.


supplies: white, Audrey Blue, and silver glitter card, Scattered Snowflake stencil, Seafoam Glitz Glitter Gel, Hero Arts (retired) snowflake die, small circle die, JOY from Simon's Ornamental Christmas, embossed in white

The glitter gel spreads like "butta" and really didn't take too long to dry, so that I could trim it to fit inside my A2 card.  Then I just popped on a silvery snowflake and a tiny sentiment in its center; so easy to do, but so striking!

Here's the kit in its entirety - you also get a snowflake embossing folder in this kit!


If you're a snowflake/snowman fan, then this kit is for you!

Friday, October 29, 2021

Winterberry Bouquet

 Here are 2  more cards using some new goodies from The Greetery.


supplies: white and Audrey Blue card, Winterberry Bouquet layered stencils and stamp, Opposites Attract Holiday sentiment stamps, Altenew Mini Ink Cubes, Hero Arts 2004 woodblock Three Holiday Messages, Penny Black Stitched Stackers die

After stencilling the bouquet, there are 2 stamps to add details to it.  The panel was then trimmed with the stitched border.  I wanted something in the background, so I used the Winterberry Bouquet mask and randomly stamped the Joy to You before attaching the panel to my card base.  I didn't invest in the matching dies, so my sentiments were fussy-cut.  

Next I used some of the little individual leaf and berry cluster multi-step stamps on my 2nd card.  


supplies: white and Lipstick Red card, Winterberry Bouquet layering stamps, Opposites Attract Holiday sentiments, Altenew mini ink cubes, (retired) snowflake embossing folder, adhesive foam squares

There are 4 extra layering stamps in the Winterberry Bouquet set, which I stamped and then arranged.  I loved the Christmas carol sentiment from "I'm Dreaming of a White Christmas" that you can piece, so after stamping them onto my panel, I debossed a snowflake background.  Then I just lifted the little berry arrangement above the card.

Thanks for stopping by today.

Friday, October 15, 2021

Christmas Traditions Collection

 Once again, Spellbinders was kind enough to send me some new goodies from their new Christmas Traditions Collection!  Here are the projects I made with them.

I was excited to play with these new Holiday Florals Background glimmer plates, so much so that I made 3 cards with them!  

supplies: white and pink card, gold metallic card, Holiday Florals Background glimmer plate set (includes sentiment), bright gold glimmer foil, Hemstitch rectangle die, markers to color flowers and leaves

These florals come as half of the design you see here - just line it up in 1 corner, foil, then line it up at the opposite diagonal corner, and foil again.  There is also a 3-piece sentiment included in the set, and I  foiled the largest in the center.  After trimming my panel so that I could put it on a card base, I used my old favorite Hemstitch rectangle to cut out the design around the foiled sentiment, then matted the whole panel on gold metallic card, then onto a pink card base.

Here's another pink card, using silver foiling, with a die-cut sentiment.


supplies: Cotton Candy and Chrome Silver Mirror card, Holiday Florals Background glimmer plate and silver foil, sentiment from Santa Parade die set, silver sequins, markers to color flowers and leaves

And the 3rd card is much simpler, using a rich burgundy card with gold foiling.


supplies: burgundy and Polished Gold mirror card, Holiday Florals Background glimmer plate and gold foil, sentiment from Joy die set, gold sequins

Next I played with the Rejoice Nativity dies.

This die set has a little die which I couldn't figure out at first, until I saw that it was a piece to make this set into an ornament!  So that's what I did first, using silver mirror cardstock, along with an old piece of polished stone made years ago for the starry background (there's an oval die that makes teensy holes for light to shine through!).  I just cut out all the pieces and assembled them, adding a silver sequin to the center of the star, and some silver thread to hang it with.  If placed in front of a Christmas bulb, I think the effect will be magical!


supplies: silver mirror card, my own blue polished stone background, Rejoice Nativity dies, a silver sequin


So then I decided to make a really simple card that this ornament can be placed inside for presentation.  I used silver glitter and soft navy cardstock and silver-embossed the sentiment (which is from another new stamp set in this collection: Three Kings). I didn't use the starry background for this version.  


supplies: Soft Navy and silver glitter card, Rejoice Nativity dies and sentiment from Three Kings stamps set, silver embossing powder

As always, I thank Spellbinders for the chance to play with these lovely products!

Wednesday, August 25, 2021

Simon Says.......Anything Goes


Happy Wednesday - welcome to our challenge at the Simon Says Stamp Wednesday Challenge blog!


It's an Anything Goes week, and the team is featuring My Favorite Things products.


supplies: white, Slate, and Green Leaf cardstock, Memory Box Vibrant Violet and Sunny Orange paper packs, My Favorite Things Stitched Flowers dies, sentiment from Simon Look for the Rainbows, Carta Bella Dot Stencil, grey ink, gold pearls

I masked off an area on my card base and stencilled the dot pattern.  Then I cut out flowers and leaves, layered them, and added my arrangement, leaving room for a sentiment strip.

Now it's your turn!  We have a $25.00 gift certificate 


to the amazing Simon Says Stamp store for 1 lucky random winner of this week's challenge!  I can't wait to see what you all make this week!