Showing posts with label distress oxide inks. Show all posts

Sunday, June 22, 2025

Elegant Rose

I couldn't resist this set of stencils from Simon's April release, You Are My Favorite, especially after seeing Heather's idea using them mixed with embossing folders. I needed 2 cards for anniversaries this month - here's the one I made for my husband - it was 54 years this year!


supplies: white, yellow, and cream cardstock, Simon Elegant Rose stencil set, squeezed lemonade, mustard seed, fossilized amber, and mowed lawn oxide inks, sentiment from Waffle Flower Sweet Lattice Sentiments, an unknown heart embossing folder

Heather embossed her blank panel first, then stencilled it, and I did the same, using oxide inks.  Doing it this way vs. the reverse makes you work a little harder to get the color down, but I love the results!  This design is so large that all you need is a sentiment.  

Next I made another card in coral inks for our son and daughter-in-law.  This time I used a pierced cover plate that leaves a much smoother surface on which to stencil, smooth enough to stamp the sentiment at the end.


supplies: white and coral cardstock, Elegant Rose stencil set, spun sugar, saltwater taffy, abandoned coral, and mowed lawn oxide inks, sentiment from (retired) Tammy Tutterow/Spellbinders Tiny Sentiments, Simon Detailed Ringlet cover plate, tiny heart sprinkle

This is a lovely design, easy to line up, and will work for so many occasions!

Thank you for coming by today.

Wednesday, May 28, 2025

Woodblock Wednesday!

 Here's my card for Amy's Woodblock Wednesday.  This month I was inspired by a place that we've been going to for walks.  It was formerly a 36-hole golf course, but when the parents retired and the kids weren't interested in continuing the business, the family donated most of it to the local park systems here!  All last year we enjoyed watching the trees and wildflowers develop and grow.  Now this spring we'll start all over again!  

I chose this Hero Arts Design Block called Silhouette.  It's dated 2008.  I've always stamped it in black or white to make a true silhouette, but today I used some oxide inks in the colors of new spring growth.


supplies: white and jade cardstock, Hero Arts DesignBlock Silhouette, salvaged patina, cracked pistachio, mermaid lagoon, and lucky clover oxide inks, sentiment from Simon Brushed Flowers, some punched butterflies

I randomly applied the 4 colors of oxide ink to the stamp.  Then I cut the panel down into smaller
sections and matted them with jade cardstock.  Here's a picture of just the card.


You can see more entries at Amy's blog HERE.  


Saturday, November 2, 2024

Some Wreaths for November Thanks

 It's November!  This month is for being grateful, and so I thought I'd start it out with a couple wreath cards for that occasion.  

Both of them start with cream card bases, and use Concord & 9th Turnabout products and the same 4 colors of distress oxide inks.

My first card uses a turnabout stamp set called Harvest Wreath.


supplies: cream and Audrey Blue cardstock, vellum, Concord & 9th Harvest Wreath Turnabout stamp set, Turnabout Jig, mustard seed, ripe persimmon, peacock feathers, and vintage photo oxide inks, Sunny Studio Autumn Greetings sentiment, Pink Fresh Studio Folk Edge Rectangle die

These stamps make such a pretty design, that I never want to cover them up, so I stamped and clear embossed my sentiment on a strip of vellum this time.  It reads "Wishing You a Season of Blessings".

The second card started with a turnabout stencil called Autumn Hues.


supplies: cream cardstock, Concord & 9th Autumn Hues Turnabout stencil, Turnabout Jig, same inks as above, sentiment and circle from Gina K. Designs Autumn Wreath Builder, MFT Wonky Stitched Rectangle die

These Turnabout goodies are pure fun, in my opinion; I always enjoy the process of working with them!  For those of you who haven't tried them yet, you position the stamp or stencil in your Misti with the help of the included acetate alignment aid, choose a color of ink, stamp or stencil, then turn your cardstock 1/4 turn to the right and choose another ink color, repeating this twice more to complete the design using 4 colors. I always use the Turnabout Jig to make sure my paper is positioned correctly to get the design centered perfectly on it. 


Thanks so much for stopping by today - have a great one!

Thursday, October 24, 2024

Snowy Woodland

Here's a card I made with one of Simon's STAMPtember collaborations - with Gina K. Designs.  I love woodland scenes, and there were just too many cute possibilities in this silhouette set that I couldn't let it pass me by.  It's taken me awhile to get to play with it, but here's my first card using just a few of the elements.

At my parents' home, my Dad had planted several fruit trees in their large lawn and at dusk most of the year, deer would come to snack on whatever fruit they could find.  It's a special memory for me.  Those trees are still there, and continue to produce, so this little scene still plays out each year.


white cardstock, Gina K. Designs (retired) Stay Cozy stamps, VersaFine Onyx Black ink, clear embossing powder, lucky clover, wilted violet, salty ocean, and blueprint sketch distress oxide inks, splattered white paint, Spellbinders Perfect Touch die, snowflakes from my stash

After stamping the trees and deer, and embossing them, I brushed on a mix of distress oxide inks, masking off the ground first.  Then I cut out a smaller rectangle, stamped my sentiment, and splattered some diluted white paint across the panel.  That was then attached to my card base, along with a few small snowflakes.

Thanks for stopping by today - I appreciate your visits! 

Friday, July 28, 2023

One Big Hug

 I was in the mood for some turnabout stamping, and pulled out this Blooms Turnabout.  I did it in pinks and yellows this time.


supplies: white, Green Leaf, Green Apple, Doll Pink pale pink and pale yellow card, Concord & 9th Blooms Turnabout stamps, sentiment from (retired) Simon's Happy Every Day set, kitsch flamingo, picked raspberry, squeezed lemonade, and mustard seed oxide inks, Altenew Lime and Fresh Leaf inks, Spellbinders Be Bold Blooms dies, Winnie & Walter (retired) Noel scalloped rectangle die, adhesive foam squares

This turnabout set actually has 2 turnabout stamps, one for the leaves, another for the flowers!  The turnabouts are fun to play with and always give pretty results, no matter what colors you choose!  And I think this Be Bold Bloom flowers are a nice match with the floral stamps..

Thanks for stopping by today - have a good one!

Friday, October 21, 2022

Dove of Peace

 When I saw the lovely dove dies recently released by My Favorite Things, I pounced!  


supplies: white cardstock, My Favorite Things Peaceful Dove dies, tumbled glass oxide ink, (retired) The Craft's Meow sentiment from Christmas Lanterns, Pink Fresh Studio Folk Edge dies, adhesive foam 

The dies include the dove body, a wing, which I cut twice, the beak, and the leafy branch.  I suppose you could ink blend some grey to bring out the details on the dove, but really, I think it's beautiful as is. I popped it above my card base, and pulled the top wing forward a bit for some dimension.

The price point is wonderful too!  I am so glad I got this; it may be the easiest card EVER, and if I need any last-minute Christmas cards this year, it's in contention!

Thanks for stopping by today.  Happy Friday - enjoy your weekend!  

Wednesday, July 13, 2022

Simon Says......Make Your Own Background


Welcome to the new challenge at the Simon Says Stamp Wednesday Challenge blog!


This week we want you to "Make Your Own Background".  The team is featuring Picket Fence Studios products.  You don't have to use this brand to enter, but if you do have any of their products, we'd love to see what you do with them!

I chose a gorgeous Lavender Frame Cover die and made 2 cards with it, since having this die practically makes the card by itself.  I have a dawn version and a dusk one.


This cover die cuts out a frame that goes outside the left edge, which really appealed to me!  Here's the dusk version, just switching to black cardstock and darker colors.


The other thing I really liked about this die set was that it also has 3 separate smaller sprigs of lavender, so for all you get, I think the price point is excellent.

Now it's your turn!  We have a $25.00 gift certificate 


to the amazing Simon Says Stamp store for 1 lucky random winner of this week's challenge!  I can't wait to see what you all make this week!


And don't forget our Kids' Summer Vacation Challenge, ongoing all this month, for kids 16 and under.


Wednesday, April 20, 2022

Simon Says.......Rain or Shine


Welcome to the new challenge at the Simon Says Stamp Wednesday Challenge blog!


"Rain or Shine" is our theme this week.  The team is featuring Sunny Studio products.  You don't have to use this brand to play along with our challenge, but if you do have any of their products, we'd love to see them used.


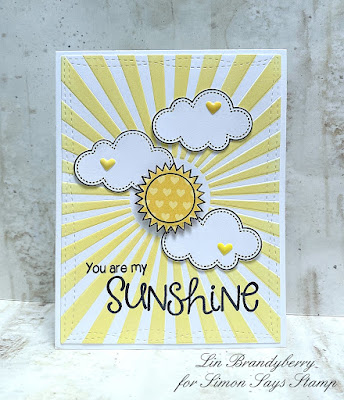
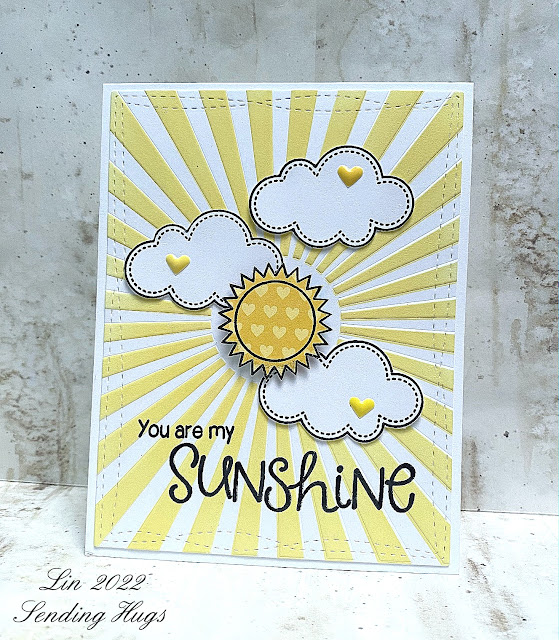
supplies: white card, Sunny Studio heart patterned paper, Sunny Studio Sunny Sentiments clear stamp set, My Favorite Things Radiating Rays stencil and squeezed lemonade oxide ink, My Favorite Things Wonky Stitched Rectangle die, Altenew Pocketful of Sunshine enamel hearts

I started by trimming a white panel using the wonky stitched rectangle die.  Next I attached my stencil and inked through it.  I removed the stencil and stamped my sentiment,  then reattached the stencil and embossed it with an embossing pad.  The clouds and sun were stamped and fussy-cut, then attached to my card base, adding some little enamel hearts.

Now it's your turn!  We have a $25.00 gift certificate 


to the amazing Simon Says Stamp store for 1 lucky random winner of this week's challenge!  I can't wait to see what you all make this week!

Friday, April 8, 2022

April Hot Foil Glimmer of the Month Kit

 The Glimmer Hot Foil kit for April is a fun one this month!  I have 2 cards for you!


supplies: white card and gold metallic card, Spellbinders April Glimmer Hot Foil Kit of the Monthgold glimmer foil, distress inks in yellows and oranges, gold sequins


supplies: white cardstock and rainbow metallic card, Spellbinders April Glimmer Hot Foil Kit of the Month, Mini Rainbow Stripe glimmer foil, sequins to match

This kit consists of a large ray glimmer plate, and 3 sentiment glimmer plates, plus 2 dies, 1 a circle and the other an indented scalloped circle..  So on both of these cards I first foiled the large ray design, then one of the sentiments which I then cut into a circle and framed with the other die.  I randomly added gold sequins to the first design, and lined up some colored metallic sequins on the 2nd.

You can find all the information you'll need HERE to get this fun kit for yourself.  You'll have until April 24 to join the club, and you can "unjoin" at any time!  Each month you'll also get a roll of glimmer foil!  

Tuesday, October 12, 2021

October Birthday Cards

  Here are some birthday cards that look like October to me!


supplies: kraft, white, and copper metallic cardstock, Spellbinder's Autumn Leaf Border glimmer plate and copper glimmer foil, oxide inks in tumbled glass and autumn colors, copper and teal sequins

I foiled the border then colored in the details and the background with oxide inks and blender brushes.  Then I fussy-cut one edge of the image and trimmed my panel to fit an A2 kraft panel, on which I had foiled this sentiment (I think it came with the glimmer machine).

Here's another one, with gold foiling instead of copper.


Same process here, except I painted the foiled image with metallic watercolors and dropped the trimmed panel down a bit more this time to allow room for the sentiment.  As above, I added a skinny metallic strip to bring in more shine.

Thanks for coming by today - have a fantastic week!

Tuesday, September 28, 2021

Autumn Blessings

Today's card is full of fall goodness - all the things I think of when you say "autumn"!


supplies: cream card, Spellbinders Falling Leaves embossing folder and Autumn Leaves dies, Simon Autumn Blessings die, distress oxide inks in fall colors

I started by brushing on several fall shades of oxide inks, then trimming the panel and cutting out my sentiment die.  Then I ran the panel through the embossing folder, inlaid the sentiment cut from cream card back into place, and mounted the panel onto a cream card base.  Then I cut and colored 4 leaves and arranged them, popping up 2 of them.

Enjoy your day, thanks for coming by.

Monday, September 20, 2021

Merry Stitchmas

 The Merry Stitchmas collection launches today at Spellbinders!  It's a collection of dies that can be stitched.  I chose the Sparkling Mandala set to play with.


supplies: white cardstock, watercolor distress cardstock, Sparkling Mandala and sentiment from All is Calm dies, distress oxide inks, white embroidery thread, pearls

I first made a galaxy background using oxide inks, then cut out the detailed mandala only in 2 places.  After stitching with 3 strands of white floss, I mounted it onto a white slimline cardbase, which allowed more of the details to show through, then added my sentiment and some pearls., 2 large ones in the centers of the flakes, and some smaller ones scattered.

I love how this turned out! The stitching adds some texture without being too bulky.


This die set also includes an outline die so that you can cut and stitch snowflakes which could then be made into ornaments.  They make a nice size at 3" wide.  Here are 3 which I stitched and plan to use this Christmas - just have to add some thread as a hanger, and finish the back with an unstitched die.  On these, I did some outline stitching around each area.  The bottom right one uses silver metallic thread; the other 2 are embroidery floss.

These would also be fun to string together to make a snowflake banner.


So pleased that Spellbinders allowed me to play with this gorgeous die!  Thank you for stopping by!

Wednesday, September 1, 2021

Simon Says..........Stamp It!


Happy Wednesday - welcome to our challenge at the Simon Says Stamp Wednesday Challenge, and welcome to STAMPtember!!!


STAMPtember is a very special month on the Simon Says Stamp calendar, so of course, to kick it all off, we are showcasing some of the new goodies from this year's release.  I was sent a sentiment stamp set, and I have 2 cards today using it.  It's called Ornamental Christmas and contains sentiments in lots of different sizes and orientations.


supplies: white cardstock, oxide inks in prize ribbon, mermaid lagoon, and wilted violet, a snowflake embossing folder, NEW Ornamental Christmas sentiment, Eliza snowflake die, white pearls

I blended my background using oxide inks, splattered it with white paint, then trimmed it and ran it through a favorite snowflake embossing folder.  That panel was affixed to my white card base on which I had stamped my sentiment in prize ribbon oxide ink, and then I added the big snowflake.

My second card uses another of the sentiment stamps in this new set.


supplies: Schoolhouse Red, green, and white cardstock, a red striped patterned paper, NEW Ornamental Christmas sentiment, lipstick red ink, Christmas Foliage and Stitched Rectangle dies

This vertical sentiment is probably meant for inside a card, but I chose to put it front and center on this one.

Now it's your turn!  We have a $25.00 gift certificate 


to the amazing Simon Says Stamp store for 1 lucky random winner of this week's challenge!  I can't wait to see what you all make this week!


Thursday, July 29, 2021

Silhouette Sentiments

 I have 2 cards today made with the newly released Simon Says Stamp clear set called Silhouette Sentiment.


supplies: white cardstock, some retired (dated 2000) Hero Arts Shadow woodblock stamps, oxide inks in Blueprint Sketch, Salty Ocean, Peacock Feathers, and Lucky Clover, Simon Silhouette Sentiments clear stamps, MFT Wonky Stitched Rectangle die

I started by stamping the rectangle shadows, then overstamped the silhouette before trimming out my panel.  I stamped one of the small sentiments and  2 of the butterflies in the set, then added the panel to a white card base.


supplies: yellow, black, and white cardstock, vellum, Silhouette Sentiments clear stamps and (retired) Butterfly Shimmer dies, oxide inks in Shaded Lilac, Kitsch Flamingo, and Squeezed Lemonade

I first blended a panel of oxide inks, then overstamped and clear embossed the silhouette image.  That was then matted in black and attached to a yellow card base.  I added my sentiment with a strip of vellum, and popped some tiny butterflies up here and there.

Thanks for stopping by.  Hope you have a great day!

Wednesday, July 21, 2021

Simon Says.......Out with the Old and In with the New!


 Happy Wednesday - welcome to our challenge at the Simon Says Stamp Wednesday Challenge Blog!


This week we want you to use something old AND something new on your creations!  The team is playing with our own Simon Says Stamp exclusives!  


supplies: white, black, and Audrey Blue cardstock, Simon Bouquet of Roses stencil, Sending Smiles die, and a Stitching Butterfly die, Oxide inks: salvaged patina, peacock feathers, cracked pistachio, and lucky clover, Rainbow Blender Brushes, MFT Wonky Stitched Rectangle die, aqua pearls

The butterly die is my "old" - it's from 2018.  I stencilled a die-cut panel of white cardstock with oxide inks, then kept the stencil attached while I passed it through my cutting machine with an embossing pad and plate to raise the inked areas for more dimension.  Then I simply glued on my sentiment and butterfly, with some pearls in the flower centers.

Now it's your turn!  We have a $25.00 gift certificate 


to the amazing Simon Says Stamp store for 1 lucky random winner of this week's challenge!  I can't wait to see what you all make this week!