Showing posts with label anything but a card. Show all posts

Monday, November 18, 2024

More Ornaments

 Here are some more ornaments that will be going onto our tree and to our Grands this year, all made with Spellbinders Klondike the Moose.


These dies were originally meant to be hinged so that the moose can dance (swing his legs), but I decided to make them stationary, so they could be double sided.  This way, you can vary the length of their legs, too.  As I did on the angels earlier, I made these two-sided so that if they swing, it doesn't matter.  Before I attached the mirror image to each, I taped in a strong thread hanger.

Which is your favorite?  Mine is the bright green one, made for our Grandson Owen, who loves the Austin Football club.

Thanks so much for stopping by!

Saturday, November 16, 2024

Felt Forest Fox

 Nichol Spohr has designed a delightful suite of felt stitching products with Spellbinders, which she calls her Felt Stitch and Create Collection!  I was thrilled to get the adorable Felt Forest Fox!  I made 1 sample, and then styled her 2 different ways with paper accessories.


supplies: Felt Forest Fox dies, brown, cream, black, and peach felt, 3 strands of embroidery floss to match, 2 layers of Warm & Natural quilt batting

I used wool felt that I have here at home.  Nichol gives wonderful directions on how to assemble this sweet fox HERE, and they were very helpful.   I especially liked how she showed us how to bring the eyes to life with a bit of sparkle and those adorable little lashes.  With eyes like these, of course this is a little girl!  I had a paper bow in my stash, so I just popped it on as I was taking my pictures.

Here's another with flowers instead of the bow.  Just some ideas on how to personalize these.......


supplies: Felt Forest Fox dies, brown, cream, black, and peach wool felt, 3 strands of embroidery floss to match, 2 layers of Warm & Natural quilt batting

I really enjoyed this process.  So much so that I started another with some cheaper felt that I have, but abandoned that quickly, as it shredded pretty easily.  Spellbinders has a nice grouping of ten 8 X 12" Merino wool felt sheets in various colorways to work with Nichole's other stitching kits.

If you're wondering, the fox measures a bit over 4" wide by 5+" tall.  So it could be done 1-layered and added to a card, if you so wish.  I may try that next, since I'm out of felt!

Be sure to look at the rest of Nichol's collection; there's a star-shaped snowman, an owl, a reindeer, some gingerbread people, plus more!

I also wanted to let you know about the current Spellbinders Early Black Friday sale, which will last until November 28 - it's huge and there are lots of savings to be had!

Thursday, November 14, 2024

Angel Ornaments

I fell in love with the beautiful Build an Angel die set from Paper Trey Ink the moment I saw them.  I know they will make lovely cards, but I wanted them especially to make some paper ornaments for Christmas.  It's something I try to do every year.  

Because these are ornaments, I made them double-sided, so that if I add a thread to hang them with and they swing, it won't matter.  For today's pictures, however, I just perched them among my branches.  Here's what I've made so far.


supplies: ivory cardstock and matte gold metallic cardstock, also to line the filigree hem on her dress


supplies: pink damask design paper and rose gold metallic cardstock


supplies: woodgrain and matte silver metallic cardstock, swiped lightly with silver ink  I made this one for my son.


supplies: music design paper and gold metallic cardstock


supplies: soft pink tone-on-tone design paper and silver metallic cardstock


supplies: pink floral design paper and gold glitter cardstock

And finally, I tried a small-scale floral print and non-metallic wings.


supplies: cream cardstock and a floral design paper

Some observations: you can line the angel's skirt bottom, but on a tree, I think I like it better unlined - the lovely details show better.  

I found it very hard to cut the detailed wings using glitter paper - no matter how many times I swiped through my machine, I couldn't dislodge the tiny pieces.  I finally did find an ancient pad of paper that was adhesive glitter and you pulled off the backing to stick it to white cardstock.  That cut just fine, but today's glitter papers are just too thick.  The wing cuts out, but the details in it are difficult to dislodge.

This set has 2 sizes of angels - I used the largest ones here; they measure about 3 1/2" wide by 4 1/2" long.  I think I'll use the smaller ones on A2 cards.  Each angel has a choice of 3 different wing styles and a halo to cut out separately from the angel.  I haven't used the plainest wing yet.  I also experimented with the wings pointing up or down; I like both ways, and it's nice to have that option!

These would make lovely place-setting cards, too, on your Christmas table, or how about 3 or 4 of them on an indoor wreath?  Or string several of them together for a garland.  And of course, what sweet tags they'd make!

Thursday, September 19, 2024

Season of Wonder: Peace Dove

 Here's another card that I made using products from the Spellbinders/Stampendous Season of Wonder release.


supplies: white, silver metallic, and 3 shades of teal cardstock, Peace Dove dies, In the Pines embossing folder

Today I paired these dies with an embossing folder from last year.  This pretty die set contains what you see here, along with 3 other sizes of doves, 1 of which is large enough to make into an ornament!  How clever! 


supplies: white and green cardstock, Peace Dove dies, twine

This set contains a large wing die that is meant to be cut from a folded piece of paper and used with the largest dove, and a little tab to make a hanger.  I cut 2 of everything to make it good and strong and to make it look good from front and back.  It measures roughly 4" long and 2" tall, with the leaf sprig.

Friday, October 13, 2023

Winter Critters, Festive Circle Crew, and Festive Ornaments

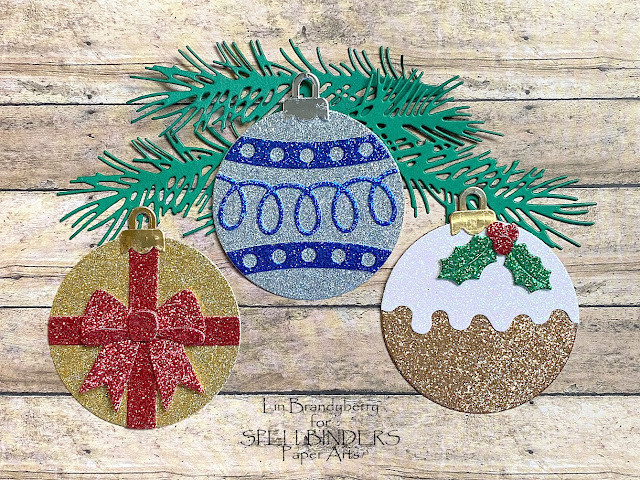
 Here are some more of Nichol Spohr's Christmas die sets from her Merry Mugs and Circle Delights Collection that was just released at Spellbinders this week!  I used them to make paper ornaments for my tree, but these would also work as tags, don't you think?  

Everything starts with a circle die that is included in the Festive Ornaments set - it measures 2 1/2" in diameter.  First, some cute woodland critters!


supplies: lots of creams, beiges, krafts, and browns, plus reds and greens cardstock, metallic cardstock (for ornament hangers), Whimsical Winter Critters (bear and fox), Festive Circle Crew (reindeer), and Festive Ornaments (base circle and ornament hangers) sets

Nichol has thought of everything!  There are different ears and muzzles for each creature, and even a little bell for the reindeer, plus hats and scarves.  And I haven't shown you the half of it - there are 2 different snowman, a man and lady gingerbread people, Santa, plus a raccoon, a bunny, and a penguin!  How fun it would be to use these to decorate a little table-top tree!  And of course, just one of these could be the star of a Christmas card - just leave off the ornament hanger, and build a little scene around him!

Next are the Festive Ornaments, and for these I used glitzy glitter cardstock to construct them.


supplies: silver, gold, white, bronze, red, blue, and green glitter cardstock, and metallic cardstock for the ornament hangers, Festive Ornaments dies

These would be equally gorgeous using metallic cardstock, too.  Again, I only did 3 ornaments from this set - there's also a Santa body (to go with his head from the Circle Crew set above) and one with little colored lights!

These all have PDF instructions to show you how to put everything together - I think it would be a great activity to share with your kids!

Thanks for stopping by today - hope I inspired you!

Wednesday, November 23, 2022

Simon Says.......Not a Card


Welcome to the new challenge at the Simon Says Stamp Wednesday Challenge blog!


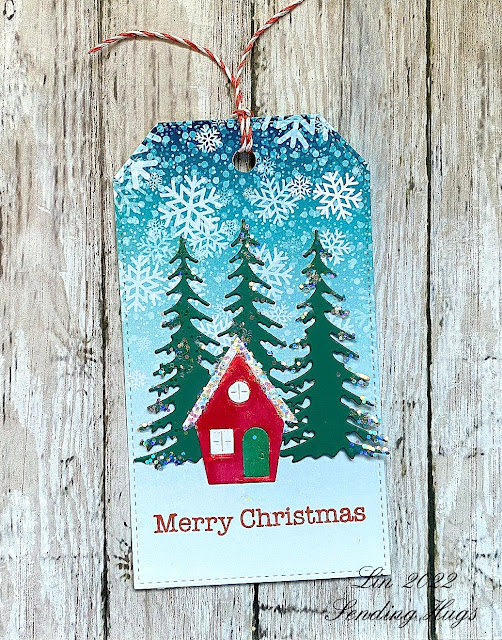
Our theme this week is "Not a Card", and the team is featuring Memory Box products.  I made a Christmas tag.


supplies: white and green cardstock, printed paper from Blurry Flurries pad, Poppy Stamps Evergreen Trio dies, Hero Arts Neighborhood Houses die, sentiment from Simon (retired) Winter Scene clear set, Unicorn Confetti, MFT Stitched Tag die

Now it's your turn!  We have a $25.00 gift certificate 


to the amazing Simon Says Stamp store for 1 lucky random winner of this week's challenge!  I can't wait to see what you all make this week!

Wednesday, October 12, 2022

Simon Says......Fall Colors


Welcome to the new challenge at the Simon Says Stamp Wednesday Challenge blog!


This week our theme is Fall Colors, and the team is featuring Colorado Craft Company products. Our teammate Kim made us a mood board to inspire us!
 

I used a stamp that's a bit over an A2 size and put it into a frame for something different this week.


supplies: white cardstock, Colorado Craft Company Whatsoever Things clear stamp, markers to color

I have always loved this quote from Philippians 4:8, especially in these times when we are surrounded by negativity.  This is a gentle reminder to put our minds to something beautiful and worthwhile rather than thinking about all the bad in the world.  Here's a closer shot so that you can read better.


Now it's your turn!  We have a $25.00 gift certificate 


to the amazing Simon Says Stamp store for 1 lucky random winner of this week's challenge!  I can't wait to see what you all make this week!

Wednesday, May 11, 2022

Simon Says.......Not a Card


Welcome to our weekly challenge at the Simon Says Stamp Wednesday Challenge!


This week we want you to make anything that is "Not a Card"!  The team is featuring Tim Holtz products.  You don't have to use this brand to play along with our challenge, but if you do have any of their products, we'd love to see them used.

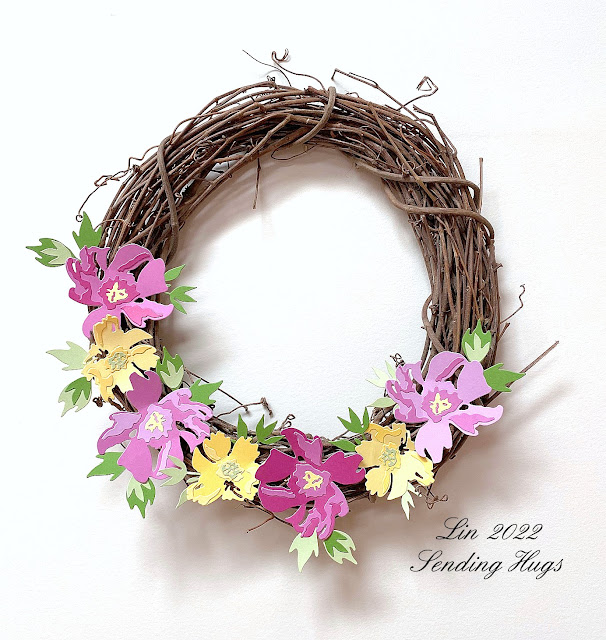
You know how much I love wreaths, so this week I decorated a 12" twig wreath with some Brushstroke Flowers dies.


supplies: twig wreath, yellows, greens, and pinky-violet cardstock, Tim Holtz Brushstroke Flowers #1 dies, glue dots to attach flowers

Now it's your turn!  We have a $25.00 gift certificate 


to the amazing Simon Says Stamp store for 1 lucky random winner of this week's challenge!  I can't wait to see what you all make this week!

Friday, October 15, 2021

Christmas Traditions Collection

 Once again, Spellbinders was kind enough to send me some new goodies from their new Christmas Traditions Collection!  Here are the projects I made with them.

I was excited to play with these new Holiday Florals Background glimmer plates, so much so that I made 3 cards with them!  

supplies: white and pink card, gold metallic card, Holiday Florals Background glimmer plate set (includes sentiment), bright gold glimmer foil, Hemstitch rectangle die, markers to color flowers and leaves

These florals come as half of the design you see here - just line it up in 1 corner, foil, then line it up at the opposite diagonal corner, and foil again.  There is also a 3-piece sentiment included in the set, and I  foiled the largest in the center.  After trimming my panel so that I could put it on a card base, I used my old favorite Hemstitch rectangle to cut out the design around the foiled sentiment, then matted the whole panel on gold metallic card, then onto a pink card base.

Here's another pink card, using silver foiling, with a die-cut sentiment.


supplies: Cotton Candy and Chrome Silver Mirror card, Holiday Florals Background glimmer plate and silver foil, sentiment from Santa Parade die set, silver sequins, markers to color flowers and leaves

And the 3rd card is much simpler, using a rich burgundy card with gold foiling.


supplies: burgundy and Polished Gold mirror card, Holiday Florals Background glimmer plate and gold foil, sentiment from Joy die set, gold sequins

Next I played with the Rejoice Nativity dies.

This die set has a little die which I couldn't figure out at first, until I saw that it was a piece to make this set into an ornament!  So that's what I did first, using silver mirror cardstock, along with an old piece of polished stone made years ago for the starry background (there's an oval die that makes teensy holes for light to shine through!).  I just cut out all the pieces and assembled them, adding a silver sequin to the center of the star, and some silver thread to hang it with.  If placed in front of a Christmas bulb, I think the effect will be magical!


supplies: silver mirror card, my own blue polished stone background, Rejoice Nativity dies, a silver sequin


So then I decided to make a really simple card that this ornament can be placed inside for presentation.  I used silver glitter and soft navy cardstock and silver-embossed the sentiment (which is from another new stamp set in this collection: Three Kings). I didn't use the starry background for this version.  


supplies: Soft Navy and silver glitter card, Rejoice Nativity dies and sentiment from Three Kings stamps set, silver embossing powder

As always, I thank Spellbinders for the chance to play with these lovely products!

Wednesday, October 13, 2021

Simon Says.......Not a Card


It's Wednesday - welcome to our challenge at the Simon Says Stamp Wednesday Challenge Blog!


This week our theme is "Not a Card" - use your creativity to make a tag, something for the home, anything you'd like, but NOT a card!  The team is playing with Tim Holtz products this week. I made a little plaque that could sit on a shelf., measuring 4  1/2" X 6  3/4".


supplies: Simon Says Stamp Cotton Candy, Lemon Chiffon, Green Apple, Green Leaf, plus darker pinks and yellows and cream and kraft cardstock, a sheet of Ideaology Menagerie patterned paper, sponged in tumbled glass distress ink, the largest Lace BaseBoard frame, Colorize Bloom dies, a Butterfly adornment, gold leaf sequins, metallic gold "L" alphabet sticker, 3 sticker sentiments from Clippings book

I had such fun making this project!   First I diecut all the parts for the Bloom flowers and leaves, glued them together, then placed them into an arrangment, adding some metallic gold leaves, which are really sequins.  The floral arrangement was then glued atop the lacey frame, and I added some adhesive foam behind the parts inside the frame opening, since the frame is thick like chipboard.  Next I went looking for something to put inside as a background, and found this piece of Menagerie patterned paper which I sponged with some tumbled glass.  After that was attached to the back of the frame, I added a butterly, an "L" for me, since this will live in my craft room, and finally some sentiment stickers.

Here's a closer look so that you can read the sentiments:


Many of the "extras" on this creation were bits and pieces from past Simon Card Kits, which I keep all together for instances like this when I need embellishments.  

Now it's your turn!  We have a $25.00 gift certificate 


to the amazing Simon Says Stamp store for 1 lucky random winner of this week's challenge!  I can't wait to see what you all make this week!