Showing posts with label stripes. Show all posts

Wednesday, February 18, 2026

Some Masculine Cards

 I have 3 birthday cards to make for February, all of them for men.  So here's a share of 2 of them.  This first one's a CASE of a card that Hannelie made a few years ago - what a gorgeous design!


supplies: white and aqua cardstock, Altenew Watercolor Stripes stencil, Sea Shore inks, Prim Heart die used as a mask, leaves from Verve Bloom & Grow, sentment from Simon Says Stamp Joys of Spring, aqua enamel dots

And the 2nd one uses my go-to elements for masculine cards, leaves and woodgrain.
  

supplies: brown and several green cardstocks, a wood design paper, leaf dies from Tim Holtz, Neat and Tangled, and a cute little freebie from Taylored Expressions, I think, sentiment from Hero Arts Sending Love Mail and matching die, bright green embossing powder, circle die

I'm pleasantly surprised with the new update from Apple that I got back in January.  I took this picture just after our monster snowstorm and the skylight in the room I always take pictures in was completely snow covered, and thus much darker in there than usual, but the photos were amazingly bright without any tweaking!

Do you have a "recipe" for making certain kinds of cards?  

Thursday, November 6, 2025

Spellbinders November Club Kits: Charmed Life

 The Spellbinders Club Kits for November are now available, through November 27.  The overall theme is Charmed Life - all things girly!

My first card shows you the Large Dies of the Month, Charmed Life.  It makes a partial purse with some fun charms attached: a teddy bear, cherries, and a flying pig!  I mixed it with the Glimmer Plate, Luxe Links, foiled with Blush glimmer foil.


supplies: cream, tans, browns, and pinks cardstock, rose gold metallic cardstock,  a dotted pink dp, Charmed Life dies, flying pig from the Caboodle Bonus, Luxe Links glimmer plate, Blush glimmer foil. foiled sentiment from Paws in the City BetterPress kit

I started by foiling a piece of chocolate cardstock with Blush glimmer foil (included in this month's kit), then used a die in the Charmed Life set to trim it into a partial purse shape.  That was affixed to a cream A2 panel, then I made my charms, tied a scarf around the handle, and added a sentiment from the BetterPress kit, Paws in the City.  There are more charms to choose from, as well as ways to hang them.  The little flying pig is the Caboodle Bonus for this month!

Next up is another purse, much smaller this time, that doubles as a puppy carrier!  It's made from the Stitching dies, Fur-ever Fabulous, and I popped it above the 3D folder, Petite Tuft, and added another sentiment from the BetterPress kit.


supplies: white, black, tans, brown, pinks cardstock, Fur-Ever Fabulous stitching dies, camel embroidery floss, 3 strands, Petite Tuft 3D embossing folder, sentiment from Paws in the City BetterPress kit

The stitching kit this month has very little stitching, only on the purse, to give it some dimension.  I popped the whole thing above my background, and used yet another BetterPress sentiment.

The Clear Stamps and Dies are called Go-To Girl.


supplies: white cardstock, aqua printed paper, Go-To Girl clear stamps and matching dies, Nested Tree Frames rectangle

This kit contains what you see here, plus another girl, some accessories, and 3 more sentiments.  And there are matching dies for the main images and all of the sentiments.  

I always enjoy the stencils each month; here's my card to show you them.  They're called Cherry Chic, and I had to use the cherries from the Charmed Life set, of course!


supplies: white, red, green, aqua, and a red gingham patterned cardstock, Cherry Chic stencils, inks in 2 aquas, red, and green, cherries from Charmed Life, sentiment and die from All Seasons Summer press plate/die set, (retired) Postage Edge Rectangle die

As always, there are 5 stencils in the set, 2 for the stripes, and the remaining 3 for the cherry details.  I used a sentiment from last year.

Almost done!  Here are the Dies of the Month for November, Let's Do Brunch, and the embossing folder, Luxe Lattice.


supplies: colored cardstock, Let's Do Brunch dies, Luxe Lattice embossing folder, swiped with white ink

This fun die set contains brunch foods! (I didn't include toast or champagne). And the little arms and legs are a fun addition.  There are 2 other sentiments included, too.  I used the Luxe Lattice swiped with white ink as a kind of tablecloth for them.

And finally, here is my card using the BetterPress kit, Paws in the City.


supplies: white and red cardstock, black and white diagonal stripe dp, Paws in the City BetterPress Plate (includes sentiment), Perfect Touch Rectangle die

The set includes an acetate registration sheet to help you place the images.  And there is a die that will cut out all the sentiments at once.

You can look HERE for information on Spellbinders Clubs.  Each is available for new subscribers only from the 6th until the 27th of each month.  If you click on my links under each card, you can see the specifics of each product.  You can subscribe to each of our10 kits separately, (and you can "unjoin" a subscription at any time without any penalty), or you can get them all, plus a free bonus item each month, and save 60% by choosing the Deluxe Caboodle!


Saturday, May 10, 2025

Spellbinders Club Kits: Clear Stamp and Die, Embossing Folder, Caboodle dies, and BetterPress Plates

 The Spellbinders Club Kits for May are now available to new subscribers, through May 27.  The theme this month is Pages & Phrases.  Here are my final 3 cards.

Today I have the Clear Stamps and Dies to show you.  They're named Crayon Creations!  There are 15 stamps, including 5 sentiments and elements to put together these crayon cuties, and the 10 matching dies enable you to cut everything out.  Here's my card.


supplies: white and black cardstock, confetti/dotty patterned paper, Crayon Creations stamps and die, star sequins, adhesive foam squares

When I saw the "brightest" sentiment, I decided to use bright colors of inks.  I first did the pink one, using the appropriate die first, then stamping onto it.  The other 2 crayons were stamped onto my trimmed rectangle panel, leaving a space in the middle for the die-cut one.  Then I just stamped my sentiments, matted the panel, mounted it onto some paper that looked like confetti, and added some star sequins for glitz.

If you want to make the same kind of card, but use only dies, then the Caboodle item for this month, Yay! Crayons, is for you!  This is a set of 10 dies.  (I didn't use them all on my card today).  I mixed them with the embossing folder, Abstract Study, and used a sentiment/matching die from the stamps/dies of the month.


supplies: white, black, and colored cardstock,  black and white stripe pattern paper, Caboodle Yay! Crayons dies, Abstract Study embossing folder, Crayon Creations sentiment and matching die

Lastly is my BetterPress card.  The kit is called From A to Z.


supplies: green and white cardstock, a subtle-print from my stash, Spellbinders From A to Z Betterpress plates/die, leaves from Club Blooms, butterfly from my scrap basket, adhesive foam strips to lift sentiment

The plan was to surround the sentiment with leaves, but I felt it needed something else, so I got out my scrap basket and added this stamped butterfly.

Here are the Club Kits I used today; just click on the picture and you'll be whisked away to the Spellbinders store!


You can look HERE for information on Spellbinders Clubs.  Each is available for new subscribers only from the 6th until the 27th of each month.  If you click on my links under each card, you can see the specifics of each product.  You can subscribe to each of our 10 kits separately, (and you can "unjoin" a subscription at any time without any penalty), or you can get them all, plus a free bonus item each month, and save 60% by choosing the Deluxe Caboodle!  

Saturday, February 22, 2025

Nature's Blooms

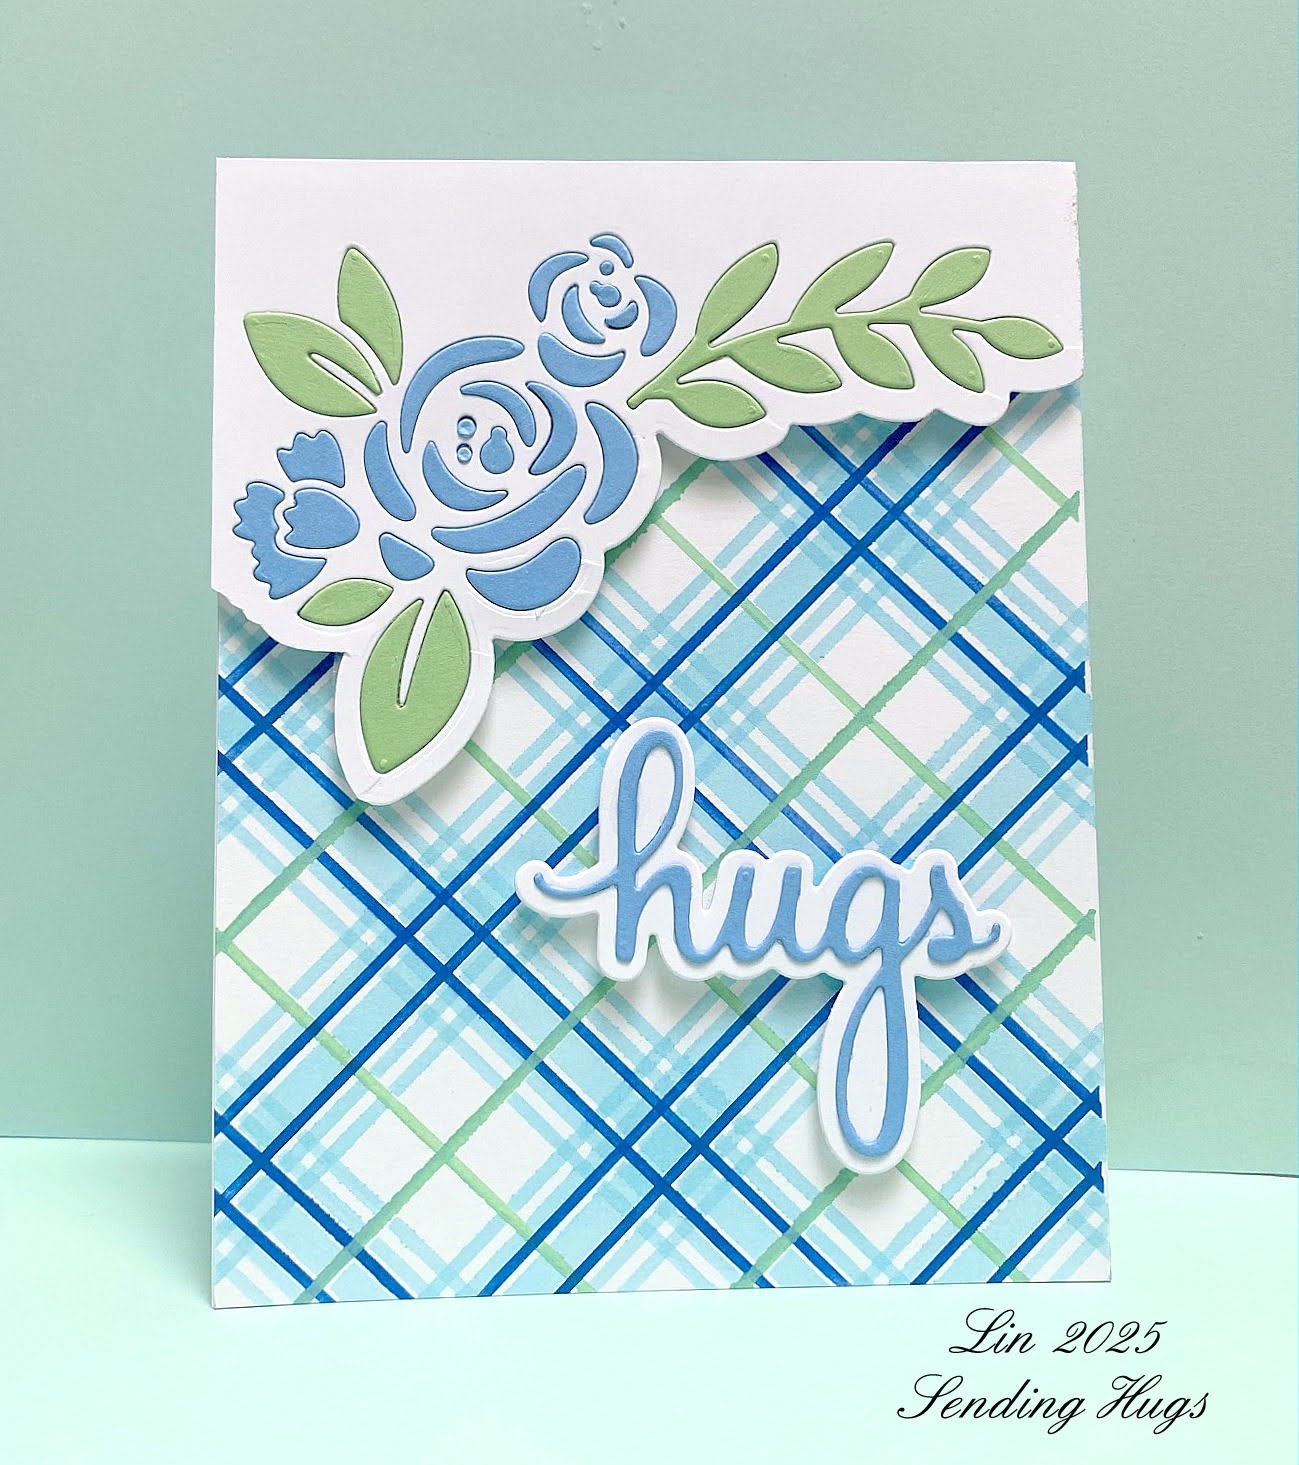
 I recently got a new die from Papertrey Ink called Nature's Blooms Elegant Edges.  Here are  some cards I made with it.


supplies: white, blue, and green cardstock, PTI Elegant Edges: Nature's Blooms dies, The Greetery Tartan Builder Diagonal stencils, tumbled glass, cracked pistachio and prize ribbon distress inks, Pink Fresh Studio Phrase Builder Sending sentiment dies

The plaid panel was already stencilled and in my scrap basket, so I just had to find some cardstock to match the colors and a sentiment.  I really liked using a plaid with these dies as I saw Brenda Noelke do when they were introduced at the end of December.

I wonder when they'll figure out how to make a blue rose?  I'll be the first in line to have one!

Next I matched it up with an embossing folder.


supplies: pink and white cardstock, PTI Elegant Edges: Nature's Blooms dies, Tim Holtz (retired) Roses embossing folder, Simon Sending Smiles die

I used the edging die to cut an extra piece of pink cardstock to line the white detailed panel, which was then put atop the embossed roses panel with a large sentiment die. and the negative die-cut of the long leafy sprig.

And one more, because I like mixing stripes with florals, and I had to have some yellow roses.

supplies: white, yellow, green cardstock, unknown green stripe patterned paper, PTI Elegant Edges Nature's Blooms dies, Spellbinders A Little Hello Sentiments stamp/die set 

Thanks for hanging with me for this long post today - have a good one!

Monday, December 9, 2024

All Wrapped Up

 The idea for today's card came from a Christmas catalog I recently received, showing a striped sweater, with the top stripe all sequins with a bow.  It made an easy design!


supplies: white, green, and red glitter cardstock, Spellbinders Christmas Wreath Add-Ons bow, and sentiment from Christmas Sentiments press plate/dies, red glimmer foil, adhesive foam squares

The green stripes are 1/4" wide, and the red glitter one is 1/2".  

As always, I thank you for visiting my blog today!

Sunday, June 30, 2024

A Birthday Card

Our oldest Grand turned 15 this year - here's the card I made for him.  It's getting more and more difficult the older they get!


I started by embossing the birthday candles folder onto brightly striped design paper, then just added my sentiment and the glitzy numbers, which are actually stitching dies, but work well on their own, too.

Do you have any hints for birthday designs for teens?  

Thanks for your visit - enjoy your day! 

Wednesday, June 5, 2024

Spellbinders June Club Kits

 The Club Kits for June are here!  They have a summer theme this month - so fun and nicely varied - something for everyone!

I'll start out this month with the stitching dies, because when you say summer, I say ICE CREAM!!


supplies: white, cotton candy, mint, red, green, and a kraft cardstock, Stitched Ice Cream stitching dies, 3 strands of pink, mint, and light brown floss, Peppermint Stripes embossing folder, distress inks in spun sugar and cracked pistachio, adhesive foam squares

Isn't that cherry a cute touch?  After stitching and constructing my double-scoop cone, I decided to add some old-fashioned candy stripes to the border of my card - they just seemed to "go".   I made them by masking off every other set of stripes and rubbing distress inks across only the edges of the embossed panel.  There's a 2nd sentiment in this set which says "Have a Cool Summer".

Here is a card using the Large dies of the Month: Summertime Vacay.  I recreated the scene I see in Florida with my husband when we go to the beach as snowbirds.  I also used one of the Glimmer of the Month sentiments and Satin Pewter glimmer foil to simulate writing in the sand.


supplies: white, bright yellow, 2 aqua, 2 kraft, 2 blue cardstock, Summertime Vacay dies, Summertime Sentiments glimmer plate, Satin Pewter glimmer foil

Next up are the Dies of the Month: Summertime Wade Pool - I have 2 cards for you with these, mixing in various other clubs with them: Summertime Waves embossing folder, and Summertime Graphics stencils.  


supplies: white, black, yellow, 2 greys, orange, and pink cardstock, Summertime Wade Pool dies, Summertime Graphics stencils (beach balls), Summertime Waves embossing folder, adhesive foam squares


supplies: kraft, white, aqua, 2 greens, pink, and black cardstock, turquoise glitter cardstock (sentiment), Summertime Wade Pool dies, Summertime Waves embossing folder, adhesive foam squares

These dies have a little hinge mechanism that allows the bodies to swing back and forth.  And the set includes the sentiments I used on these cards - fun font!  The stencils this month give you 3 different choices - these beach balls are just one of them!

Here is the 3D embossing folder: Summertime Citrus Twist.  When it's a hot summer day, my beverage of choice is limeade, so I used a lime cardstock to emboss with, then swiped the panel with lime ink to bring out the details.  I added some citrus flowers and leaves to frame the sentiment.


supplies: white, lime and kelly green cardstock, Summertime Citrus Twist 3D embossing folder, sentiment from Stitched Ice Cream, flowers from last month's Tropical Friends dies, leaves from Vintage Florals dies

I've already used orange and lemon cardstock to emboss more panels using this folder for some future cards!

Here is a card using the Stamp/Die of the Month: Paradise Resort, along with another of the stencils.


supplies: white and aqua cardstock, Summertime Graphics (clouds and sun) stencil, distress inks, Paradise Resort stamps and matching dies, Postage Edge Rectangle dies

And finally I have a card using the Caboodle bonus item for this month: Summertime Slice.  It's another one of those die sets that have a hinge so that the legs can swing.  I equate watermelons with picnics, so I brought in a red check tablecloth and a basket weave background to go along with this one and used a sentiment from the stitching dies again.


supplies: white, black, red and greens cardstock, Doodlebug Buffalo Check design paper, Summertime Slice dies, Stitched Ice Cream sentiment dies, Woven 3D embossing folder

Aren't her heart glasses too cute???

You can look HERE for information on Spellbinders Clubs.  Each is available for new subscribers only from the 6th until the 27th of each month.  If you click on my links under each card, you can see the specifics of each product.  You can subscribe to each of our 10 kits separately, (and you can "unjoin" a subscription at any time without any penalty), or you can get them all, plus a free bonus, and save 60% by choosing the Deluxe Caboodle!


Saturday, May 18, 2024

Delicate Garden

 I've been lusting after this Delicate Garden Craft Your Life set for a year now, and I finally caught it on sale earlier this month!  Here are some cards I made using this wonderful set.


supplies: white cardstock, dps from Whimsy Stamps Mix-n-Match 2 pack, Delicate Garden embossing folder, stencils, and matching die, Altenew Cherry Blossom, Pocketful of Sunshine, and Green Valley inks, Pink Fresh Studio Perfect Sentiments stamps and die

First I used the embossing folder to emboss this image, then the stencils to color it, and finally the matching die to cut it out.  Then I ran it through the folder again to refresh and deepen all the details.  I love dots and stripes, and this paper pack is a great one that has both!  There is a stamp set also in this set, but when using the embossing folder, I don't think you need it.  

The stamp set, stencils, and dies have 2 more floral arrangements in this set.  They are often used together with the above image, but today I wanted to let them shine on their own.


supplies: white and purple cardstock, Delicate Garden stamp, stencils, and die, Altenew Enchanted Garden purples and Green Meadows greens inks, Spellbinders Hemstitch Rectangle die, Simon Blossom Field embossing folder, Spellbinders All You Need Sentiments glimmer plate and die, Lavender Petal glimmer foil


supplies: white, lemon yellow, and black cardstock, Delicate Garden stamp, stencils, and die, Altenew Pocketful of Sunshine yellows, Golden Sunset oranges, and Spring Bouquet greens inks, Pink Fresh Studio Floral and Diamond Tiles coverplate, Spellbinders Curved Everyday Sentiments glimmer plate and die, gold glimmer foil

This is certainly a set that gives you your money's worth!  I love sets like these that give you lots of products that all coordinate.

Thanks for stopping by!

Thursday, March 7, 2024

Spellbinders March Club Kits: Dies of the Month, Embossing Folder, Stencils, Glimmer Kit and Deluxe Caboodle Bonus

 The March Club Kits from Spellbinders are now available!  The clubs will remain open until March 27.  

My first card features the Small dies of the month: Wise Owl, the Embossing Folder: Checkered Scallops, one of the Stencils: Dynamic Backgrounds, and a glimmered sentiment from Sketched Lines, the Glimmer Kit for this month.


supplies: colored cardstock, Wise Owl dies, sentiment from Sketched Lines, gold glimmer foil, Checkered Scallops embossing folder, and one of the Dynamic Backgrounds stencils for this month, light aqua ink and a blending brush

For the background, I embossed with the new folder of the month, Checkered Scallops.  I discovered that 2 of the 5 stencils in the Dynamic Backgrounds stencil kit matches it perfectly, so I used just 1 of them with an ink slightly darker than my pale aqua cardstock.

Here's another of the stencils; it looks to me like brushstrokes going horizontally down the length of the panel, but here I only brushed in 4 of them, roughly in the center of my panel, in shades of purples, then added an arrangement of flowers from this month's Stitching kit: Read & Sip.  


supplies: white, dark and medium purples, yellow, and green cardstocks, Dynamic Backgrounds Brushstroke stencil, floral arrangement from Stitched Read & Sip, (retired) Tammy Tutterow cling sentiment from Tiny Sentiments

I've always loved brushstrokes, so I know this particular stencil will get lots of use from me!

Last for today, I have 2 cards that using the Glimmer Plates of the Month.  This first one combines them with the bonus dies that you receive when you order the Deluxe Caboodle.


Starting with an A2 panel of navy cardstock, I positioned the Sketched Lines glimmer plate first vertically, then horizontally and foiled with Cobalt Blue foil.  That panel was trimmed down with a postage edge die, then placed onto a red card front.  Then I constructed the Fairy Tale castle, foiled my sentiment, and centered them onto my card, adding some stars (also from the bonus dies). 

And finally, I used the Glimmer Sketch Lines with the flowers from the Stitching Kit.


supplies: white, yellow, green, and several blue cardstocks, Sketched Lines glimmer kit, Cobalt Blue glimmer foil, flowers and leaves from Stitched Read & Sip kit, sentiment from Snowflake Wishes Stamp/die set

I foiled the sketched lines with Cobalt Blue glimmer foil onto a panel of bright blue cardstock, then added it at an angle to a pale blue card base.  Then I arranged my sentiment and flowers.  Cut from white, they make me think of strawberry blossoms!

You can look HERE for information on Spellbinders Clubs.  Each is available only from the 6th until the 27th of each month.  If you click on my links under each card, you can see the specifics of each product.  You can subscribe to each of our 10 kits separately, (and you can "unjoin" a subscription at any time without any penalty), or you can get them all and save 60% AND get the free bonus dies by choosing the Deluxe Caboodle!  


Sunday, October 29, 2023

Happy Halloween!

 Here are 3 cards for Halloween that are made of almost all long-retired goodies.  I started with this black cat silhouette from die a 2018 Spellbinders club kit.


supplies: black, Green Apple, Orange Peel, Doll Pink, and Royal Purple cardstock, Pink Fresh Studio Color Block Diagonal Stripes cover plate die, Spellbinders Trick or Treats die set (Large Die of the Month from September 2018), a scalloped square die, Hero Arts Happy Halloween sentiment, Cuttlebug embossing folder

I haven't done this strip-piecing technique for a long time, and rarely using solid papers.  Having the stripe cover plate saved me lots of time this time around - I used to just slice my papers in random sizes and widths.  I had seen a Halloween card using oranges and bright pinks, so I started with those colors and then added the traditional orange and lime green to the mix. I thought adding the swirly embossing made it a little creepier, but not scary.

This was fun, and I ALWAYS like it when I can use old supplies!  I'm not a big Halloween fan, but once I make one Halloween card, I always have to make 2 more so that none of our Grands feel slighted.  They are getting a bit old for my kind of Halloween cards, so this may be the last ones they'll receive going forward.

So, here are 2 more for this set, using the same strips, just changing up the main motif, and doing a little paper-piecing within each one.  There are sentiments built in for these, so I didn't need to add any more.


supplies: black,  Green AppleOrange Peel, Sunshine, and Royal Purple cardstock, Pink Fresh Studio Color Block Diagonal Stripes cover plate die, Spellbinders Trick or Treats die set (Large Die of the Month from September 2018), a scalloped square die

I kept these strips all going the same way for my final one.


supplies: white, Green AppleDoll Pink, and Royal Purple cardstock, Pink Fresh Studio Color Block Diagonal Stripes cover plate die, Spellbinders Trick or Treats die set (Large Die of the Month from September 2018), a scalloped square die

Thank you for stopping by!