Wednesday, November 29, 2017

Simon Says..........Anything Goes

wed-newchallenge-header

Happy Wednesday!  Welcome to another challenge at the Simon Says Stamp Wednesday Challenge Blog!


It's Anything Goes week, and the team are playing with Tim Holtz products.

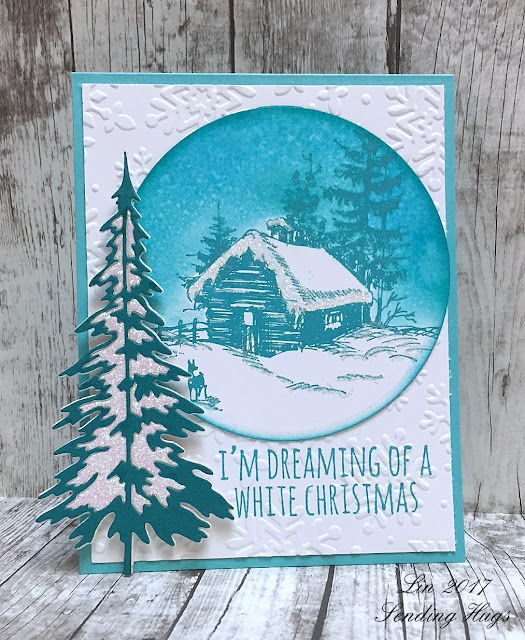
I've been wanting this Scribble Woodland cling stamp set, and when they arrived recently, I made a monochromatic card with the lovely little cabin stamp and one of the sentiments.  I love little cottages in the woods!


supplies: white, glitter white, dark teal, and Audrey Blue cardstock, Tim Holtz Scribble Woodland cottage and sentiment, peacock feathers distress oxide ink, shaded with peacock feathers and mermaid lagoon distress inks, spritzed with water, Tim Holtz Woodlands die, Taylored Expressions Winter flurry embossing folder, Spellbinders Circle die, glue pen and Prisma glitter, adhesive foam squares

Next up, a card using a plaid stencil for the background.


supplies: kraft, green, and Simon's Lipstick Red card stock, Tim Holtz Plaid stencil, Candied Apple distress ink, Tim Holtz Mini Holiday Greens dies, Simon's Merry & Bright sentiment and Stitched Circle die, adhesive foam squares

Now it's your turn!  Once again we have another $50.00 gift voucher

50dollar_voucher_600px

to the amazing Simon Says Stamp store for 1 lucky random winner of this week's challenge!

Monday, November 27, 2017

Mint Wishes

The sold-out Simon Ltd Edition Holiday Card Kit arrived today, and in between bagging leaves, I dove right into it!  I got it mostly for the pretty patterned papers, and they did not disappoint; I almost don't want to cut into them, so I used them minimally for my first card.


supplies: mint, green, and silver glitter card stock, vellum, pattern plank and mint stripe from Kaisercraft Mint Wishes paper pad, Simon's More Spring Flowers and Yuletide Holiday clear stamps,  Hero Arts Charcoal ink for sentiment, Tim Holtz Mini Holiday Greens, clear sequins

I tried a white on white embossed rose, but in the end, I watercolored that one lightly in Cracked Pistachio distress ink, and added a white-embossed vellum one on top to make it paler.

Here's one more, again using the gorgeous papers, and adding the Joy die from the kit, and my own silver snowflakes and sequins.


The "Merry Christmas" strips are from one of the papers that has 5 or 6 different stripes on it - I just cut it apart and used it to separate the other papers a bit.

Love this kit!!

Sunday, November 26, 2017

Cyber Week at Simon Says Stamp

Simon has planned a fun week beginning today through Friday, as a prequel to DIEcember!  I was sent the newest Suzy's Watercolor Prints, and here is a sample:


supplies:pink and dark green card stock, Suzy's Classical Christmas Watercolor Print, Zig markers and water to color

This is just one of 12 holiday designs in the pack of Watercolor Prints, and I really enjoyed taking my time to color this up.  I chose to trim it a bit, but they are A2 size and can be popped right onto a card base for an easy card!

Thursday, November 23, 2017

Giving Thanks

I made this card for a special friend, but it works also to wish you all in the US a Happy Thanksgiving - may you be surrounded by family and friends, and enjoy this very special holiday!


supplies: white, kraft, Lipstick Red, Orange Peel, and  Sunshine card stock, Tammy Tutterow's Mad for Plaid stencils, fossilized amber, carved pumpkin, and candied apple mini distress inks, stitch stamp from Winnie & Walter Stripes stamps, leaf die and sentiment from Hero Arts Sept 2016 My Monthly Hero Card Kit, Stitched Circle die, Doodlebug Rainbow Hearts sprinkles

Happy Thanksgiving!

Wednesday, November 22, 2017

Simon Says..........Food/Drink

wed-newchallenge-header


Happy Wednesday!  Welcome to another challenge at the Simon Says Stamp Wednesday Challenge Blog!


This week our theme is Food/Drink and my teamies and I are playing with Mama Elephant products.


supplies: white cardstock, Doodlebug Designs Fairy Tale design papers, Mama Elephant Carnival Toppers sentiment and flowers, Hero Arts Cupcakes, Zig markers and water, Simon's Stitched Rectangle die

I used my Simon's Stitched Rectangle die, cut 3 times to get the exact rectangle dimension I needed for this card.  After cutting it the first time I repositioned it twice more to narrow and shorten the rectangle.

Now it's your turn!  As always, we have another $50.00 gift voucher

50dollar_voucher_600px


to the amazing Simon Says Stamp store for 1 lucky random winner of this week's challenge!

Tuesday, November 21, 2017

Five for Friday!

Hello!  Here's my contribution to Tammy Tutterow's Five for Friday post on Friday of this week.


supplies: Cotton Candy and Slate cardstock, a floral plank design paper from My Mind's Eye, Tammy's Hello There cling and Bitty Posies dies, pink and grey Zig markers to color, pastel felt, pastel pearls

I stamped the Hello There directly onto my patterned paper, then colored in the thicker letters with markers.  That panel was framed in slate, then affixed to a pink card.  In Tammy's stamp, there are tiny clusters of flowers where you see my felt ones, and I didn't think I could color them to show up against the patterned paper, so I opted to cover them with some of her darling Bitty Flowers cut from felt and centered with pearls.

I hope you'll visit Tammy's Blog to see what my talented sisters have done this time!

Sunday, November 19, 2017

Peace

I've been wanting to revisit a card I made 4 years ago.  It has always been one of my favorites; I like the mood it invokes.  Goodness knows we'll all need a little peace in the coming weeks!  Here is my newer version, just updating the trees in the foreground and the sentiment.


supplies: white, green, and Schoolhouse Red card stock, Tim
Holtz Woodlands and Holiday Words dies, Penny Black Christmas Cottage wood stamp, Zig markers to color, My Favorite Things Snow Drifts die, cardinals from Impression Obsession Birch Tree die set, salty ocean and peacock feathers distress inks, ink blending tool, Simon's Falling Snow stencil, Nuvo Moonstone glimmer paste, adhesive foam squares

I stamped and colored the cottage, then sponged in the sky with distress inks.  Next I overlaid a snowy slope, and stenciled on my falling snow, using glimmer paste for some sparkle.  When that was dry, I added the panel to a longer than usual card (about 6" X 4 1/4"), then affixed my sentiment, trees, and birds.

As always, thank you for stopping by to visit!

Saturday, November 18, 2017

You Take the Cake!

Got my Simon December Card Kit yesterday, and had some fun today playing only with the papers.  This kit is a collaboration with Doodlebug, who makes the CUTEST papers!


supplies: red and kraft card stock, Tonic Tropical Tide glitter card stock,  Doodlebug Milk & Cookies design papers,  Milk & Cookies sprinkle (gingerbread boy), MFT Mini Stitched Scallop Square dies

The reverse of one of the papers includes 5 stand-alone motifs - I chose this plum pudding one, and continually framed it with the other papers in the pad.  On that same sheet is an area with little sentiment strips - I framed this one with some of the candy-stripe paper in the kit.

The kit is sold out, of course, but you can still get the papers and sprinkles, if you like.

Hope you're enjoying your weekend - it's raining and dreary here, so I'll be in the craft room!

Thursday, November 16, 2017

Winter Cheer

Here's another Snowy card, paired with a Tim Holtz stencil.


supplies: white and Mint card stock, Tim Holtz Holiday Knit stencil, picked raspberry and cracked pistachio distress oxide inks, Penny Black Snowy, sentiment from a retired The Craft's Meow set, glue pen and prisma glitter, pink pearls, adhesive foam squares

I first embossed the stencil into the card stock, and then added my inks - I like the subtle difference embossing makes.  I smooshed some picked raspberry onto my kraft mat, spritzed it with water, and then colored in Snowy's hat and scarf this time, adding some glitter to his hat and some pink pearl buttons to his body.  I had first stamped the sentiment in pink, but it faded into the background, so it ended up black, tucked in behind the popped-up snowman.

The oxide inks blended like butta through the stencil, and cleaned up easily, too!  Love these colors together - like sherbet!  Thanks for stopping by......

Wednesday, November 15, 2017

Simon Says........Furry Friends

If you'd like to see my card for the Your Next Stamp DT Dare, please scroll down a post, or click HERE.  Thanks!

wed-newchallenge-header

Happy Wednesday!  Welcome to another challenge at the Simon Says Stamp Wednesday Challenge Blog!


This week our theme is Furry Friends, and the team is showcasing Newton's Nook products.


supplies: white and kraft cardstock, Bristol paper, fall patterned papers (Echo Park I Love Family, Doodlebug Flea Market), Newton's Nook Autumn Newton stamps, colored with Spectrum Aqua markers and water, mermaid lagoon and peacock feathers distress inks and water, adhesive foam squares

I colored and cut out the image, then popped it above a smooshed distress ink background, and surrounded that with some patterned papers.

Here's another card using the same set.


supplies: white and kraft cardstock, Bristol paper, patterned papers from Echo Park's I Love Family and A Perfect Autumn, Newton's Nook Autumn Newton, Simon's Stitched Rectangle and Stitched Circle dies

Now it's your turn!  As always, we have another $50.00 gift voucher

50dollar_voucher_600px

to the amazing Simon Says Stamp store for 1 lucky random winner of this week's challenge!

Your Next Stamp November DT Dare!

I'm back again one more time as the November Guest Designer for Your Next Stamp!  Today starts the monthly DT Dare - this month we are to choose our favorite Christmas color combination!

I love lime and pink together for the holidays, and here's the card I made, using the new Holiday Scribble Tree die set:


supplies: Green Apple card stock, pink and lime glitter paper, My Favorite Things Merry & Bright plaid, YNS Holiday Scribble Tree die set, Wonky Stitched Rectangle die, bright pink gems

This pink and lime plaid shows off my colors perfectly, so I started with a panel of that, then cut the Scribble Tree 4 times.  One of them is a lime glitter paper, which I dropped slightly below the solid lime cardstock tree.  I added a pink glitter star and gem "ornaments".

Would you like to win a stamp set of your choice from this newest November YNS release?  Just leave a comment at the YNS blog by November 18th at midnight EST.  The random winner will be announced on November 20th.

Many thanks to Your Next Stamp for this opportunity to play with their newest release!  

Your Next Stamp

Monday, November 13, 2017

Buffalo Plaid

I've been noticing (and enjoying) the buffalo plaid trend I'm seeing this season.  This plaid will always remind me of the Woolrich plaid that my Dad wore when hunting!   I decided to make a Christmas card using it.


supplies: 2 shades of kraft, Schoolhouse Red, and green card stock, Impression Obsession Painted Stripes cling, VersaFine Onyx black inks, Tim Holtz mini Holiday Greens dies, Winnie & Walter In a Word: Merry cutaway, May Arts natural twine

I stamped a big striped background cling vertically, then horizontally, and trimmed the panel out to allow for some of my card base to frame it.  The rest are all die-cuts.  I glued the greens only at the top of each branch to allow the rest of it to stand out a bit from the card, and I used 2 shades of kraft to give a kind of shadow to my sentiment.

Here's another, changing up to red against kraft:


supplies: kraft, Schoolhouse Red and green card stock, Impression Obsession Painted Stripes cling, Hero Arts Red Royal ink, Tim Holtz Holiday Words die, Hero Arts wreath die from a 2016 My Monthly Hero card kit, jingle bells and Natural twine

Same process as above, just added different embellishments.

Thanks for stopping by - have a great week!

Saturday, November 11, 2017

Your Next Stamp New Release Blog Hop!

Hello again!  I'm here once more as part of Your Next Stamp's New Release Blog Hop!


Be sure to check out the entire Blog Hop - and leave comments at each stop, for a chance at a $25.00 gift certificate to the YNS Store!  You have until November 14 at 12 midnight EST to comment, and the winner will be announced on November 16 at the YNS blog!

Here are my cards using the delightful Merry & Bright stamp set and matching dies.


supplies: white and Surf Blue cardstock, design papers from Echo Park's A Perfect Winter pad, YNS Merry & Bright angel, sentiment, and matching angel die, Stitched Rectangle and Stitched Circle dies

I thought it would be fun to paper-piece her dress - and I used those same patterned papers as banners behind her.  This makes a nice flat card for mailing.

Next up - a really simple design, using the little snowflakes in the set to frame up a tag:


supplies:white cardstock, YNS Merry & Bright Santa and sentiment and matching Santa die, 2 red inks, markers to color, prisma glitter on his cuffs and hat, Stitched Tag, ribbon to match, adhesive foam squares to pop up Santa and tag

There's a new release sale, too in the YNS store!


Thanks so much for stopping by!

Your Next Stamp New Release preview!

I'm beyond thrilled to be asked to be a New Release Guest Designer at Your Next Stamp this month!

You can visit the Your Next Stamp blog NOW to see a preview of this newest release and for a list of blogs to visit to see it in action!

Here's one of the cards I made using my brand new goodies!  


supplies:  white, kraft, and Schoolhouse Red card stock, Simple Stories patterned papers, YNS Merry & Bright stamp set, matching die, Merry Everything die, and Merry & Bright Glitter Gumdrops, glittery silver snowflakes, prisma glitter

I simply stamped, colored, and then used the matching die to cut Mr. Reindeer out, then popped him above a white panel.  I pulled some design papers in the same colors to frame him out, and added the gorgeous die-cut Merry and some snowflakes, along with a gumdrop red nose!

Isn't this little reindeer adorable?  Be sure to visit the YNS Blog to see lots more cuteness, and come back again tonight at 10:00 pm for a Blog Hop!  And all the new products will be available at that time, too!


Friday, November 10, 2017

Five for Friday!

It's time for another Five for Friday post at Tammy Tutterow's blog!  Today I'm showing you her adorable Bee Any Sweeter cling stamp set - it comes with matching dies for the bumblebee!.


supplies: vellum, white, yellow, and black cardstock, Lawn Fawn Let's Polka 12" design paper, Tammy's Bee Any Sweeter cling stamp and matching dies, markers to color letters

I used vellum, yellow and black cardstock to piece the bee, popped it above the rest of the card, and fluffed the vellum wings outward for even more dimension.  I wanted more of the heart border to show around it, so this card measures 6 1/2" X 5 1/4".

I hope you'll visit Tammy's Blog to see what my talented sisters have done this time!

Thursday, November 9, 2017

Texas Snowman

This is my newest snowman stamp, called Big Howdy!   I saw a card using him by Pam  last week at our Simon Wednesday challenge, and, since one of our boys and his family are living in Texas, I ordered it right away, thinking to use it to make them some ornaments or tags.   The idea of a snowman in TX, (where my dil tells me it was recently 85 degrees) just makes me giggle......Here's my first play with it.


supplies: white and kraft card stock, dp from BoBunny Anthem papers, Printworks Big Howdy cling stamp, Zig markers, Avery Elle Banner & Wreath bird, Winnie & Walter In a Word Merry die and an unknown birch tree die given to me by my friend Carol

Wonder what they're talking about?  And one more:


supplies: white cardstock, various star and bandana prints, snowflake embossing folder, Printworks Big Howdy cling stamp, colored with Zig markers, sentiment from KaiserCraft BaseCoat Christmas clear set, May Arts natural twine

I lifted Pam's idea to have him holding a lasso of twine, and that was the perfect place to add my little sentiment!

Thanks for coming by!

Wednesday, November 8, 2017

Simon Says..........Snow White

wed-newchallenge-header

Happy Wednesday!  Welcome to another challenge at the Simon Says Stamp Wednesday Challenge Blog!


Our theme this week is "Snow White" - you can put some snow on your creation, use lots of white, or interpret this as you like!  The DT are playing with Reverse Confetti this week - I made 2 cards using their Snowflake Trio dies:


supplies: white and Simon's fog cardstock (for twig wreath used as snowflake base), foiled and glittered silver card stock, Reverse Confetti Snowflake Trio die, Impression Obsession Wooden Plank cling stamp, Hero Arts Soft Granite ink, Simon's Stitched Rectangle and Chisolm Wreath die, Tim Holtz Holiday Words dies, white seam binding bow, light blue gems

I cut the smallest of the snowflakes from foiled and glittered silver card stock, and arranged them on the Chisolm Wreath, then added a bow and glued the wreath onto my planked background, edged in silver, then added my sentiment.

Here's a closer look - it sure is a sparkler!


Here's one more card, white on white this time, and it uses all of the snowflakes in this set:


supplies: white and white glitter cardstock, Snowflake Trio dies, another Tim Holtz Holiday Words die, Swiss Dot embossing folder, pearls, adhesive foam squares, white twine

Now it's your turn.  As always, we have another $50.00 gift voucher

50dollar_voucher_600px

to the amazing Simon Says Stamp store for 1 lucky random winner of this week's challenge!