Showing posts with label Crafter's Edge. Show all posts

Friday, March 3, 2023

From the Scrap Basket

 I've collected 6" paper pads almost as long as I've been making cards, (it was a habit I got into when I quilted and collected fat quarters of fabric), and they took up lots of space in my craft room.  Recently my good friend and fellow cardmaker Mary Anne encouraged me to organize them.  I went through each little pad and ripped out patterns that still appealed to me, then threw away what was left.  It took me a good 4 days, but when I was finished, I had reduced and organized those papers into baskets holding papers I knew I would use.  And now I can find something lots faster than before!  I organized them into florals, dots, stripes, text, ginghams, plaids, hearts, and more.  I guess this is my version of spring cleaning!

There were some really lovely florals, so I chose one with a dark brown background, then found some dots and solids that would go with it.  I got 2 cards from this 6"square floral paper, with enough left to make another.  

Here's the first.


supplies: cream cardstock, unknown pink and green solids, a floral print, and a dot print, Tammy Tutterow/Crafters Edge Beautiful Succulents 3 flower dies, Tammy Tutterow/Spellbinders leaf from Pom Pom Posies, yellow button, Altenew Creative Edges Lace die, Honey Bee Bitty Buzzwords sentiment

Here's card #2, pulling out the yellows from the pattern this time.  


supplies: Cream and Green Apple cardstock, brown floral and a pale yellow tone on tone floral scrap, Simon Picnic Floral embossing folder, sentiment from (retired) Summer Garden, (retired) PTI daisy die, brown brad, Pretty Pink Posh leaves from Spring Foliage dies

I had lots of fun picking and choosing.  The embossing folder works nicely with the paper, as they both feature daisy-like flowers prominently.

Does this mean I'll never buy another paper pad?  I doubt it, but at least for now I'm going to try and use up what I have.  I encourage you to do some organizing, too!  

Thanks so much for visiting me today - enjoy your day!

Friday, April 3, 2020

A Basket of Posies

It's April, and we are in need of some color!  Spring is progressing here, but not quite fast enough for me, so I made myself a little basket of what might be primroses!


supplies: all Tammy Tutterow Designs goodies: Crafter's Edge Posey Basket, and Posey Flowers, sets 1 - 4, sentiment from her Happy Grams #4 stamp and die set, kraft cardstock, and Doodlebug Designs Rainbow pads in ginghams, dots, stripes, florals, tiny yellow button centers, vintage photo distress ink to edge basket parts

My basket measures about 4 1/4" wide by 5 1/2" tall, and I made it into a card by tracing just the shape of the body of the basket, scoring it at the top, and gluing it to the top of the back of my woven basket.  I used the smallest flowers and leaf from the die sets, which are really made for cutting fabric for quilting, etc, but work just as well using paper.  

Here's a closer picture to show you all the darling little patterns in these Doodlebug pads.  I used both front and reverse of the papers.


If you'd like to see these die sets used for a similar card I made about a year ago, please click HERE.

It was a dreary day when I made this, but I spent some happy hours putting it together.  I hope you are finding some happy hours, too, during this challenging time.  Be well!

Thursday, July 11, 2019

Some Paper Flowers

Today I decided to make a little bouquet of Tammy's Beautiful Succulents.   I chose cardstock in summery colors: 2 corals, 2 yellows/golds, 2 oranges, and a cream, then cut out 1 of each of the 4 sizes of the succulent dies.  The leaves are from another of Tammy's sets, called Posey Flowers 4.


I also pulled out yellow/gold buttons from my stash and a little PTI daisy die, long retired, to surround the buttons, 


I used some adhesive foam strips to separate the layers of each flower, then inserted wire through my button and down through the layers, leaving about 6" of wire, which was then wrapped with floral tape.  I pulled all the petals upward, held them tightly in a bud, and then let them relax.  I added a single leaf to each flower, securing it to the flower with glue dots.


Once I had done the first couple of flowers, the process got easier, and it took me just an afternoon to get these 7 flowers completed.  In case you're wondering about size, these came out at just under 3" in diameter, without the leaves.


Because these are something a bit out of the ordinary for me, I'd like to enter my bouquet into my friend Virginia's Show & Share for July.


These are addictive - I'll be making more of them.  Hope you enjoy these, and maybe think about making a bouquet for yourself!  Thanks for stopping by!

Saturday, June 22, 2019

Tammy's Posies

It's the time of year when I normally have jars of flowers in the house, fresh-picked from my garden.  This year, between the rain and nibbling deer, I haven't been able to do that so much.  So I thought I'd make a paper version!


supplies: white cardstock, Doodlebug papers, old PTI jar,stems, and sentiment, Tammy Tutterow Posey Flowers from sets 1 - 4, Paper Smooches Fab Frames die, natural twine, enamel dots

We have a sunny day today, a little on the cool side, so I think I'll go outside and forage to see if I can find anything blooming!  Enjoy your weekend!

Friday, April 12, 2019

A Spring Wreath

We're home from Florida and I'm able to use all my supplies again here at home!  I've been itching to try Tammy Tutterow's Crafter's Edge fabric dies with some felt (up 'til now I've been using papers), and here is my first play, a little 9" twig wreath.


supplies: twig wreath, Tammy's Beautiful Succulents 3 for the flowers, and a leaf each from the Foliage and Posey Flowers 4 fabric cutting die sets, Taylored Expressions Avocado, Cotton Candy, Lilac, and an unknown pale yellow, pale green buttons, and some pale green hand-dyed binding to wrap the wreath.

Here's a closer look at the flowers:


All of my supplies were what I had on hand.  At some point I may replace the binding with a green gingham ribbon, if I can find the right shade.   I simply cut out the flowers and leaves on my Spellbinders Platinum machine, using a metal shim, and secured the flowers together with a button center, then sewed a leaf or 2 to each.  After wrapping my wreath, I used a course twine to sew the flowers and leaves on, adding a glue dot to the leaves on each end to hold them to the wreath and prevent them from flopping over while hanging.

It was nice to bring a little spring inside while we're waiting for it to arrive outside!  Thanks for stopping by!

Thursday, March 14, 2019

Daffodil Thanks

It's March, the month of daffodils.  They are such a happy flower and represent this season perfectly!  So here is this year's addition to my annual daffodil cards, featuring Tammy Tutterow's fabric dies from Crafter's Edge.


supplies: white, several yellows, and Green Leaf card, gingham from Sunny Studio, Tammy's Posey Flowers Set 1 (2 smallest flowers), stems and leaves from Heart Stems and Sweet Tulip dies, PTI Mix & Mat dies,  (retired) Simon Friendship Blooms sentiment, tiny enamel hearts, adhesive foam squares to pop up flowers

I cupped the flowers as I put them together; hopefully they resemble daffodils to you......


Can you see the little Doodlebug enamel hearts that I added to the centers of my flowers?  These tiny beauties add such a charming touch!

Sunday, February 24, 2019

Just a Note

Here's a card using another couple of Tammy Tutterow dies from Crafter's Edge.  The flower is actually a set of dies called Beautiful Succulents 3, but don't they make a pretty flower, too?


supplies: cream, kraft, black,and sage green card, music dp, Tammy Tutterow's Beautiful Succulents 3 and Foliage fabric cutting dies, Hemstitch Rectangle die, sentiment from Wplus9 Doodle Buds, adhesive foam squares

I cut 2 of each of the middle-sized and 1 of the smallest dies, then separated the layers with adhesive foam squares and fluffed the petals.  I added a die-cut black circle as the center.

Thursday, February 7, 2019

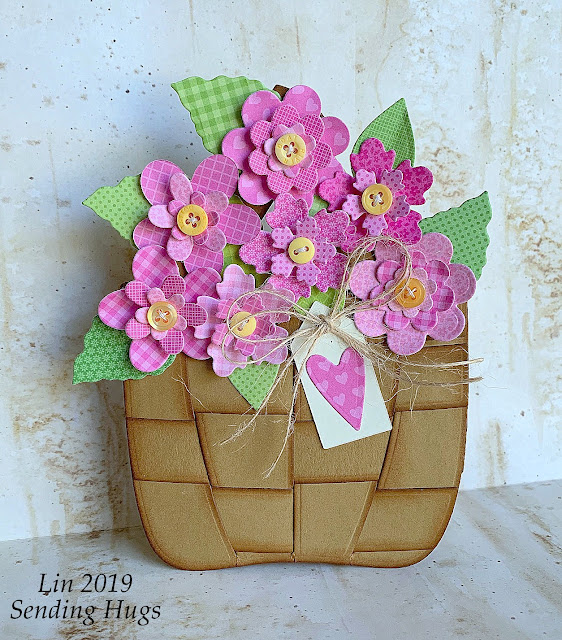
Pink Poseys

Here's another creation using some of Tammy Tutterow's dies from Crafter's Edge.


supplies: kraft and cream cardstock, lots of pink and green prints from Doodlebug and Sunny Studio paper pads, Vintage Photo distress ink, Tammy's Posey Basket, Posey Flowers Sets 1, 2, and 3, small yellow buttons, natural twine

The Basket die set cuts several pieces so that you can weave your basket.  I die-cut the pieces from kraft and then sponged each of the edges with distress ink to make them show up a bit better.  There are 2 long handles on this basket - for this card they provided a base to attach my flowers, so you don't see much of them.   The little tag and heart are also part of this die set.  I made this into a card by attaching a traced basket shape to the back of my woven basket, scoring the back about 3/4" down from the top and then gluing that section only to the back of my woven basket.  


I filled my basket with some 2- and 3-layer die-cut flowers, mixing up the tiny patterns, and adding little yellow buttons into their centers.  The finished card measures about 4 1/4" wide by 5 3/4" tall, so it will need its own envelope.  But if you bring the flowers down more over the basket, I think you could adjust this design to fit into an A2 envelope.

What a fun project this was to pull together!  These dies are designed primarily for use with fabric or felt, but as you can see, they translate nicely for paper, too.  Thanks for stopping by today.

Monday, January 28, 2019

Tammy's Poseys

I am beyond thrilled that Tammy Tutterow is starting up a new design team to showcase her newest venture with Crafter's Edge!  I received her products today and couldn't wait to dive in and play!  Her products with Crafter's Edge are made mainly to work with fabric, felt, wool, etc, which jives nicely with my quilting background.  But being away from home right now I used what I have here, which is paper, and made a card using just one of her TEN new die sets.  I love how it turned out!


supplies: white card, dps from Lawn Fawn Watercolor Wishes paper pad, Crafter's Edge Posey Flowers Set 1, Tim Holtz Doily embossing folder, Doodlebug Spring sprinkles for flower centers, Tammy's From Hand and Heart Etched Metal Embellishment, natural twine

The dies cut like a dream - in fact they can cut through up to 6 layers at one time, (perfect for quilt appliques) and they work in most standard die-cutting machines.


Tammy also has several variations of these darling etched metal embellishments, and this one worked perfectly for my design!  Here's a closer look at it - it's about 3/4 " wide by 1" long.  There are 5 different designs of the metal tags.


I'm really looking forward to playing with more of Tammy's products - hope you'll give them a closer look, too!