Showing posts with label felt. Show all posts

Tuesday, June 10, 2025

Felt Stitch and Create: Sunflower Bloom!

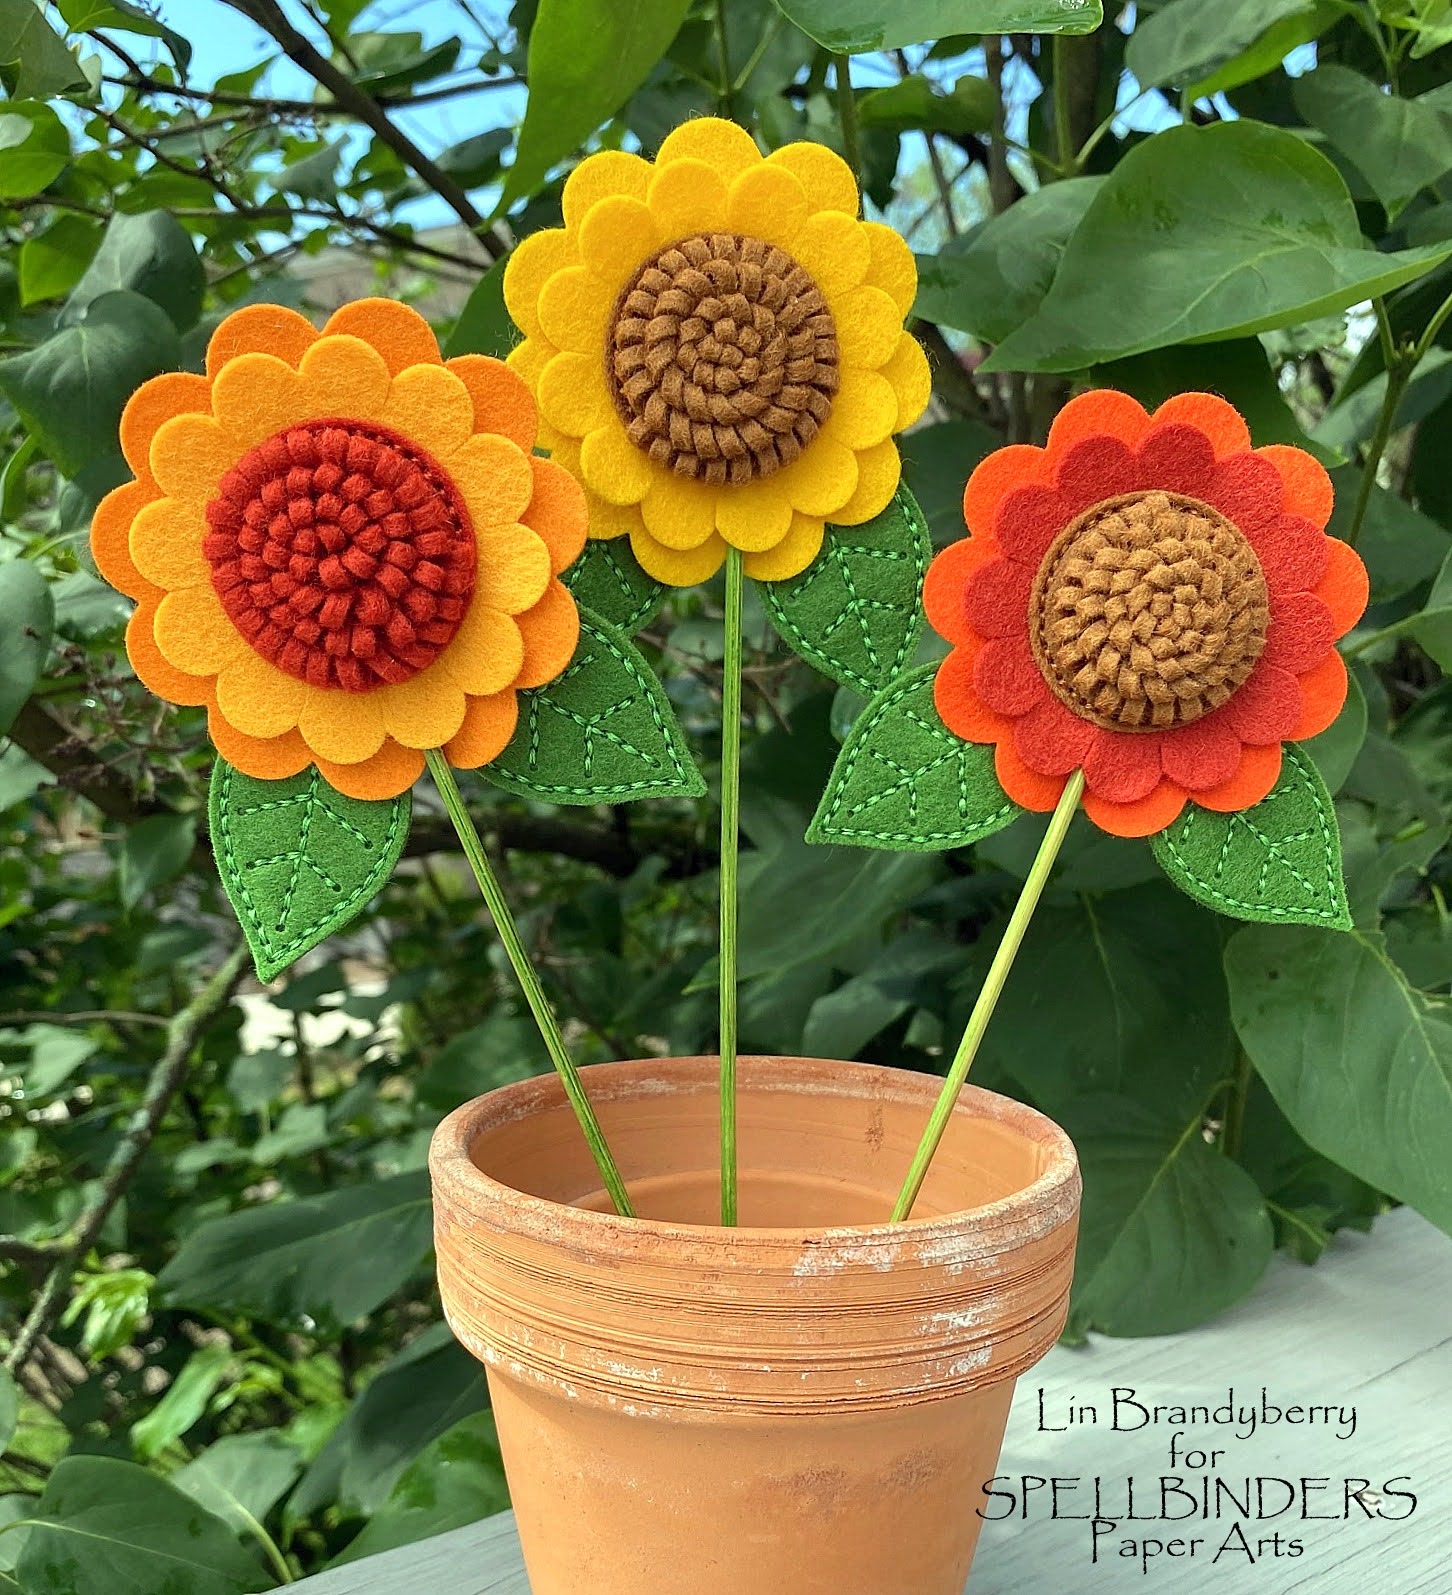
 I have some projects to share today from Nichol Spohr's Summer Felt Stitch and Create Collection.  I worked with the Sunflower Bloom dies.


supplies:  various warm colors of wool felt, Sunflower Bloom dies, 3 strands of matching embroidery floss, wooden skewers, inked with mowed lawn distress ink

For maybe the last 10 years or so, we've bought a packet of mixed sunflower seeds for the back of our garden, and have been delighted with the variety, so I tried to recreate some of those flowers, along with a traditional yellow/gold sunflower that we're all familiar with.

Here's a closer look at the flowers.


The flowers themselves have very little stitching, just enough to hold the layers together.  As I was doing so, I inserted a wooden skewer, sponged with mowed lawn distress ink, to make the stem for each flower, then tacked on the leaves behind.  Nichol included an innovative die to make the centers; it's easy to use and gives a fun dimension to your flowers!  You just cut it out, fold it in half, roll it up, and glue it to the center of the flower.

Did you know that there are pink sunflowers?  I have yet to see one for real, but I've seen many pictures of them.  That's what I made next, but I was out of brown felt, so the center for this one is yellow.  Which shows you that these really don't have to be sunflowers at all - make them in any color you want!


supplies: pink, yellow, and green wood felt, Sunflower Bloom dies, 3 strands of matching embroidery floss

Glue a pin on the back of this, and add it to your jacket!

HERE is a link to a tutorial video that Nichol made.

Nichol also designed a Beehive, a Strawberry, and an Apple as part of this Summer collection - I hope you'll give them a look, too.

Thanks for stopping by!

Tuesday, March 25, 2025

A Felt Bunny!

 Nichol Spohr and Spellbinders have a new Spring Felt Collection, and I was tickled to be able to play with the Felt Carrot Companion set!


As you can see, the set makes this cute bunny and a carrot.  Nichol's dies are made to be used with felt, and I was lucky to have these colors still on hand from past projects.  

Here's a closer shot.


Nichol's dies include some to make a little bow for around the bunny's neck, but you know me and gingham, I thought this thin pink ribbon worked perfectly.  I also added my own flowers at her ear, using some Spellbinders flower and leaf dies, and used adhesive black pearls for her eyes.  The carrot tops are really cute with their fringes!  I tied some twine through them for a little country feel.

Nichol also designed a second set called Cozy Cluck, a sweet hen.  I look forward to what she has coming for us in the future!  These little felt projects are a nice break from cardmaking.

Thanks for stopping by - enjoy your day!

Saturday, November 16, 2024

Felt Forest Fox

 Nichol Spohr has designed a delightful suite of felt stitching products with Spellbinders, which she calls her Felt Stitch and Create Collection!  I was thrilled to get the adorable Felt Forest Fox!  I made 1 sample, and then styled her 2 different ways with paper accessories.


supplies: Felt Forest Fox dies, brown, cream, black, and peach felt, 3 strands of embroidery floss to match, 2 layers of Warm & Natural quilt batting

I used wool felt that I have here at home.  Nichol gives wonderful directions on how to assemble this sweet fox HERE, and they were very helpful.   I especially liked how she showed us how to bring the eyes to life with a bit of sparkle and those adorable little lashes.  With eyes like these, of course this is a little girl!  I had a paper bow in my stash, so I just popped it on as I was taking my pictures.

Here's another with flowers instead of the bow.  Just some ideas on how to personalize these.......


supplies: Felt Forest Fox dies, brown, cream, black, and peach wool felt, 3 strands of embroidery floss to match, 2 layers of Warm & Natural quilt batting

I really enjoyed this process.  So much so that I started another with some cheaper felt that I have, but abandoned that quickly, as it shredded pretty easily.  Spellbinders has a nice grouping of ten 8 X 12" Merino wool felt sheets in various colorways to work with Nichole's other stitching kits.

If you're wondering, the fox measures a bit over 4" wide by 5+" tall.  So it could be done 1-layered and added to a card, if you so wish.  I may try that next, since I'm out of felt!

Be sure to look at the rest of Nichol's collection; there's a star-shaped snowman, an owl, a reindeer, some gingerbread people, plus more!

I also wanted to let you know about the current Spellbinders Early Black Friday sale, which will last until November 28 - it's huge and there are lots of savings to be had!

Friday, August 18, 2023

Poshta Design Sewing Kit Essentials Introduction!

Here I am again to showcase Poshta Design's introduction to the Sewing Kit Essentials being released tomorrow, Saturday, August 19!


Today's items include:

Sewing Kit Essentials Scissor Keeper Die (retails for $32)
Sewing Kit Essentials Needle Book Die (retails for $50)
Sewing Kit Essentials Thread Bobbin Die (retails for $6)
(not shown) Sewing Kit Essentials Floss Drop Die (retails for $4)

Here are my makes, starting with the Scissor Keeper.


supplies: Sewing Essentials Scissor Keeper dies, Cascade and Dahlia Blossom felt and floss (from Trick or Treat color story), my own pink button

I was SO impressed with the engineering for the closure of this scissor keeper - there are tiny magnets sewn into the body and the closure!  And I really love the combination of these 2 colors; they are scrumptious!  I haven't done this lazy daisy stitch for eons, and you can see how my stitching improved as I went on.  There's a little die included in this set that gives a guide for stitching, as well as 2 flower dies, 1 of which I used here.

Next is the Needle Book and the Thread Bobbin.


supplies: Sewing Essentials Needle Book and Thread Bobbin dies, Dahlia Blossom and Cascade felt and floss (from the Trick or Treat color story), my own ribbon, button, and white cardstock and floss

Here you can see both flowers on the cover of my book.  The die set also includes large and small pockets and an inside page die, plus more, to accessorize the book.  Here you can see the inside page with a small pocket and needle channels.

supplies: Sewing Essentials Needle Book dies, Shortbread felt (from the By the Bushel color story) and Dahlia Blossom felt and floss (from Trick or Treat color story), white cardstock and floss

I love how these turned out!  The scissors case measures about 5 1/2" from tip to top, and the Needle Book is 3" by 3 1/2 " closed.


Lizzie is doing a $50 gift certificate giveaway over on her blog HERE, the winner chosen from comments there.  Winner will be announced on Saturday, Aug 19 at 9 am.

Many thanks to Lizzie for inviting me to play with her wonderful designs!  I thoroughly enjoyed doing so!  

Once again, everything you see, plus the autumn and Halloween items I showed you in the past 2 days, will be available for sale at Poshta Design tomorrow, August 19 at noon Eastern time.  

Thursday, August 17, 2023

Poshta Design New Halloween Product Introduction!

Welcome back for Day 2 of Poshta Design's introductions for the new release on Saturday, August 19! Today I'll be showing you the Halloween products.


Here are the new products in the Halloween release:

Gingerbread Friends Skeleton Details Die (retails for $18) (to be used with previously released Gingerbread die)
Poison Apple Details Die (retails for $20) (to be used with yesterday's Autumn Apple die)
Eerie Apothecary Die (retails for $32)
Trick or Treat Color Story (Inkwell, Dahlia Blossom, Clementine, Gecko, and Cascade) (retails for $53)

Here are the Gingerbread Friends Skeleton Details dies.  They start with the older Gingerbread Friends basic die and then you can add these new bones!  How fun!  I made some ornaments for a Halloween tree, or just to hang on a gift.  They'd also make a great banner in different colors, wouldn't they?


supplies: Gingerbread Friends and Skeleton Details dies, Trick or Treat Color Story felts and flosses (Inkwell, Dahlia Blossom, and Clementine), my own white felt and floss

Next up is the Poison Apple die.  You use yesterday's Autumn Apple Die as your base, adding on this new die.  I had fun with the colors and couldn't resist adding some sequin eyes (which are included in the Trick or Treat color story pack).


supplies: Autumn Apple die, Poison Apple Die, Dahlia Blossom pink felt and sequins from Trick or Treat color story, Pea Pod felt and floss and Gingersnap felt and floss from Autumn Apple color story

And finally, here are the Eerie Apothecary dies.  This is a large set of dies that includes 3 sizes of bottles, with either a stopper or a cork closure, and 3 shapes of labels with fun details for them.


supplies: Eerie Apothecary dies, Cascade, Clementine, and Inkwell felts and flosses (from the Trick or Treat color story), Gingersnap and Shortbread felts and flosses (from By the Bushel color story) and my own white felt and floss

And here they all are together, once again, to give you an idea of the various sizes.  The largest bottle measures a bit over 4 1/2" tall by about 2 1/2" at its widest point.  The skeletons are 4 14" tall by 3 14" wide.


Lizzie is doing a $50 gift certificate giveaway over on her blog HERE, the winner chosen from comments there.  Winner will be announced on Saturday, Aug 19 at 9 am.

Thanks for your visit; I'll be back again with the last installment of the new release tomorrow, and then everything will be available at Poshta Design on Saturday, August 19 at noon Eastern time.

Wednesday, August 16, 2023

Poshta Design New Autumn Product Introduction!

I am so honored to share that I will be Guest Designing with Poshta Design for the new release this week!  I had the best time playing with my new goodies, and was VERY impressed with the quality of  everything in the kits.  Let's get started!

Today is the introduction of the Autumn products!  Fall is a favorite season for me, one that I look forward to each year, and Lizzie has it well-represented in this release!


The new products being released on Saturday, August 19 are:

Autumn Apple Die (retails for $38)
Mighty Acorn die (retails for $32)
Statement Alphabet dies (retails for $14, $17, or  $20, depending on the letter, or the whole set for $375)
By the Bushel Color Story: Red Currant, Pea Pod, Gingersnap, Shortbread, and Weathered Moss (retails for $53)

Here are some photos of what I made with this release:


supplies: Autumn Apple die, Mighty Acorn Die, By the Bushel color story felts and embroidery floss (Red Currant, Pea Pod, Shortbread, Gingerbread, Weathered Moss), Clementine felt and floss from upcoming Trick or Treat color story pack, and my own orange felt, wooden buttons, twine, a cinnamon stick

The oak leaves are part of the Mighty Acorn set.  I used matching floss for one cluster, and a contrasting floss for another, then sewed them together in groups of 2 with a wood button and some twine.  The Autumn Apple die can make a whole apple, a sliced apple, like I made here, plus a candied apple.  For my whole apple, I cut off the stem and substituted a piece of cinnamon stick, just for something different! (and it smells good, too!)

How fun are these Statement Alphabet letters?!


supplies: Statement Alphabet dies, By the Bushel (Weathered Moss, Red Currant, and Gingersnap) and upcoming Trick or Treat Color Story (Clementine) felts and flosses, Mighty Oak leaves, my own wooden heart button and floss

These letters are 4 1/2" tall.  I stitched 2 of each letter together with matching floss and they are quite sturdy, ideal for Christmas ornaments, package attachments, or personalized banners!  And, being a card maker, they will come in handy for cards, too!  1 letter fits nicely on an A2 size card.

This is the first time I've worked with Lizzie's designs, and I am so impressed with everything about them!  The felt is wool, and cuts like a dream with the dies.  She has thought of so many fun details, like the extra stitching on the acorn cap, and the seeds on the apple slice!  Her color story packs include a group of 5 felts, flosses to match, and a darling little container that contains sequins and seed beads to match, all packaged beautifully! It was truly a joy to play with these!  

There are inspiration guides that clearly give directions for constructing everything, including detailed pictures.  Not having stitched on felt in quite awhile, they were very helpful to get me going again.  


Lizzie is doing a $50 gift certificate giveaway over on her blog HERE, the winner chosen from comments there.  Winner will be announced on Saturday, Aug 19 at 9 am before the release goes live.

We're not done yet!  I'll see you tomorrow for a Halloween release, and on Friday for the Sewing Kit Essentials goodies!  As I mentioned, everything will be available on Saturday, August 19 at Poshta Design.

See you again soon!

Friday, April 12, 2019

A Spring Wreath

We're home from Florida and I'm able to use all my supplies again here at home!  I've been itching to try Tammy Tutterow's Crafter's Edge fabric dies with some felt (up 'til now I've been using papers), and here is my first play, a little 9" twig wreath.


supplies: twig wreath, Tammy's Beautiful Succulents 3 for the flowers, and a leaf each from the Foliage and Posey Flowers 4 fabric cutting die sets, Taylored Expressions Avocado, Cotton Candy, Lilac, and an unknown pale yellow, pale green buttons, and some pale green hand-dyed binding to wrap the wreath.

Here's a closer look at the flowers:


All of my supplies were what I had on hand.  At some point I may replace the binding with a green gingham ribbon, if I can find the right shade.   I simply cut out the flowers and leaves on my Spellbinders Platinum machine, using a metal shim, and secured the flowers together with a button center, then sewed a leaf or 2 to each.  After wrapping my wreath, I used a course twine to sew the flowers and leaves on, adding a glue dot to the leaves on each end to hold them to the wreath and prevent them from flopping over while hanging.

It was nice to bring a little spring inside while we're waiting for it to arrive outside!  Thanks for stopping by!

Tuesday, November 21, 2017

Five for Friday!

Hello!  Here's my contribution to Tammy Tutterow's Five for Friday post on Friday of this week.


supplies: Cotton Candy and Slate cardstock, a floral plank design paper from My Mind's Eye, Tammy's Hello There cling and Bitty Posies dies, pink and grey Zig markers to color, pastel felt, pastel pearls

I stamped the Hello There directly onto my patterned paper, then colored in the thicker letters with markers.  That panel was framed in slate, then affixed to a pink card.  In Tammy's stamp, there are tiny clusters of flowers where you see my felt ones, and I didn't think I could color them to show up against the patterned paper, so I opted to cover them with some of her darling Bitty Flowers cut from felt and centered with pearls.

I hope you'll visit Tammy's Blog to see what my talented sisters have done this time!

Monday, August 29, 2016

Share Joy Challenge #50

I have a card today that I'd like to enter into the Taylored Expressions Share Joy challenge.  I used the sketch along with some fall colors, pulling them from the floral paper:


supplies: ivory cardstock, dps in autumn tones, Taylored Expressions Bloomers 3 (flowers), Bloom Where You're Planted (leaves) and grateful dies, TE felts in butter, carrot, and tiffany, and PTI Hawaiian Shores, Simon Stitched Rectangle and Circle dies, sequins to match

I love these kinds of sketches, because it means I can use some of my collection of design papers!

Here's our inspiration - you can use either the sketch or the photo inspiration, or both.  

Monday, July 11, 2016

Kathy's 30 Day Coloring Challenge with Hero Arts Friends

Welcome to a blog hop as part of Kathy's 30 Day Coloring Challenge!  Kathy loves to color, and she is hosting her FIFTH coloring challenge!  The premise of the challenge is to color something every day, even if it's for five minutes - it doesn't matter what you color or what medium you use.  

From 2009 - 2012, Hero Arts put together classes of 4 to 8 "Hero Hostesses" for a 4-month term.  Our job was to make people feel welcome in the Hero Arts Flickr group, and to contribute our work using Hero Arts stamps.  There ended up being 36 of us before the program was discontinued, and as we were a kind of crafting sorority,  Kathy was the one who coined "sista" as the name we called each other.  We have had loads of fun together, meeting up in real life many times.  I treasure each of these ladies, and have a soft spot in my heart for each of them and Hero Arts.

Fast forward to 2016.  Kathy has asked us, along with some special guests, to participate in a blog hop for her current Coloring Challenge.  And Hero Arts has generously contributed TWO $25.00 shopping sprees, chosen from all those who comment!!

You should have come from my friend Virginia Lu's blog, Yes, Virginia.  If you are just happening across my blog today, and want to see the blog hop order, you can start at Kathy's blog, The Daily Marker. 

Here's the card I made, using a Hero Arts stamp that was introduced about the time I was a Hostess in 2009.  Sadly, it's retired now.  I paired it with some pretty plaid design paper and added a felt and button flower:


supplies: white, dark rose, and a gold shimmer cardstock, Lawn Fawn Perfectly Plaid dp, Hero Arts Wallpaper Flower woodblock stamp, K5185, Spectrum Noir markers to color, Wink of Stella clear marker, Simon Says Stamp Painted Hugs die, My Favorite Things Flashy Florals flower die, leaf die from Simon's Single Roses die set, Taylored Expressions Cotton Candy and Split Pea felt, yellow button, Scrapbook Adhesives foam squares


I've been hoarding this pretty plaid, but this occasion is a special one, so I pulled the colors from it to color my stamped panel, and my medium of choice was alcohol markers.

Hero Arts is giving away TWO $25.00 shopping sprees, randomly selected from the blog comments along the hop.  You have a week to comment, until July 18, at 12:00 midnight, and the winners will be announced July 19 on Kathy's blog.

Now, hop on over to Kathy Wade's blog, Wading in Creativity.  Enjoy, and we hope that you'll play along in Kathy's Coloring challenge, too!  Feel free to jump in anytime from now until August 5  - everyone is welcome!  You don't even have to make a card, just do some coloring and have fun with it!

Wednesday, May 18, 2016

Simon Says........Fun with Felt!

wed-newchallenge-header

Happy Wednesday!  It's time for another challenge at the Simon Says Stamp Wednesday blog!


This week we have a really fun challenge!  We're calling it Fun with Felt, and the Design Team are showcasing Simon's exclusive Spring Plush dies!  I had the best time playing with my Plush Charmed Heart die set, and made 2 stuffed hearts, one in pastels, one in brights, and a gift card holder!


Here they are a little closer if you want to see the details.  All of the elements are sewn down, I didn't see a need for any glue.  The hearts measure about 4" at the most, and a bit less when stuffed lightly like they are here, so they can be attached to a card if you wish.  Or you could add a pin to the back and wear them on a coat ........ they are the perfect size!  They'd also make an adorable pin cushion or a gift embellishment, or a Christmas tree ornament - just add a ribbon or floss or twine at the top while you're stitching the front and back together.....


supplies: Simon Plush Charmed Heart die, Taylored Expressions Black Licorice, Split Pea, Flamingo, Carrot, and Butter felt, and a turquoise from my own collection, DMC embroidery floss to match, some tiny buttons, a tiny amount of polyester stuffing


supplies: Simon Plush Charmed Heart die, Taylored Expressions Marshmallow, Avocado, and Cherry Blossom felts and a pale gold from my own collection, DMC embroidery floss to match, pink and gold adhesive pearls (which may or may not stay there - so far, so good!), polyester stuffing

There are lots of other elements in this die set, too, a scalloped edge, a heart, a star, and a ruffled flower, plus a smaller heart flourish that you can use to add more stitching.  I just couldn't stop playing with these dies, so here is one more that I left flat and adhered to a simple card front. This makes a fun gift card holder, and shows a way to use that scalloped edge die in this set!


supplies: white cardstock, dp from Teresa Collins Carolina Breeze paper pad, Simon's Plush Charmed Heart dies, Taylored Expressions Butter, Heather Grey, and Avocado felt, matching embroidery flosses, Simon Painted Hugs die

This one used the scalloped die included in the set to make my pocket.  I used some glossy accents to secure my sentiment to the pocket, and double-sided tape to secure the heart to the card.

For 2 more examples of this set, please click HERE and HERE.  And if you'd like to see some other ideas for using felt, I've started a Felt Pinterest Board.

Now it's your turn - I can't wait to see what you create!  We have another $50.00 gift voucher

50dollar_voucher_600px

to the amazing Simon Says Stamp store for 1 lucky random winner of this week's challenge!


Simon Says Stamp


Tuesday, April 26, 2016

Another Charmed Heart

I wanted to play again with my new Charmed Heart dies and felt, and here's the result of a fun afternoon!


supplies: Simon's Charmed Heart dies, my own red and turquoise felt, cream lace and embroidery floss, red buttons

I'm running out of felt big enough to cut out the body of the hearts, so I dug into my stash from eons ago and came up with this red felt from some little craft kit that I never used.  So glad I saved the felt, though.  Then, since it was red, I decided to try and add lace to the edges.  My next problem was finding a 3rd color.  This turquoise was really the only thing that I liked with it - I'm out of white/cream felt, and I didn't have any pinks that worked with that red.    So I kept my color scheme fairly simple this time.

This makes me think of something Southwestern, for some reason.  The lace was fairly easy to attach, but I think you need to use lace that is already gathered on one edge........the other laces I previewed didn't go around the curves very well.  These flower dies are not part of the set - I wanted something a bit bigger.  Therefore, in order to attach them, I used buttons in their centers and stitched them down at one time.

I'd encourage you to give any of these plush stitching dies a try - it's nice sometimes do make something besides a card!  Thanks for stopping by, as always.  

Thursday, April 14, 2016

Charmed Heart

I just ordered one of the new die sets from Simon's latest Stitched Plush Spring release, and I have a heart to share with you today!


supplies: Simon Plush Charmed Heart dies, Taylored Expressions Marshmallow, Avocado, Cherry Blossom, Orchid, and PTI Harvest Gold felts, DMC embroidery flosses, thin silk ribbon, polyester stuffing

This heart die has everything you need to make lots of stuffed hearts.  Besides the flowers that you see today, there are also a small star, heart, ruffled flower, and a scalloped die.  What do I do with this, you say?  These hearts could be Christmas ornaments, gift attachments, and if you add something scented inside, like potpourri or an oil, they could be attached to lingerie hangers to prettify your closet!  Or you could sew a pin on the back and wear it on a coat.   Add a magnet to the back and put it on your fridge!  And you don't have to use felt - use paper and put it on the front of a card.  I'm sure you can think of some other fun uses for it!

When I decided to add the little ribbon bow, I discovered that you could use ribbon for your stitching on these dies, an idea that I will be trying next.  I know I'll be making lots of these now and way into the future!  Thanks for stopping by!

Wednesday, March 16, 2016

Simon Says.........Cute and Cuddly

wed-newchallenge-header

It's Wednesday and that means a new challenge at the Simon Says Stamp Wednesday Challenge Blog!


Our theme this week is Cute and Cuddly, and my teamies and I are working with Simon Says Stamp products!

Here's my first card, in remembrance of those 1-piece jammies that our boys wore when they were toddlers.   


supplies: white and bright blue cardstock, Simon's Bear Necessities stamps and dies, a scrap of fabric and tiny gold buttons, Spellbinder's Scalloped Rectangle die, sentiment banner from My Favorite Things Blueprints 20 dies, a paper from My Favorite Things Dots & Stripes Sorbet paper pad, Lil' Inker Stitched Stars die

I couldn't find a paper to make his jammies, so I dug out some of my old quilting scraps and searched for something small-scale.  Using a tip from my friend, Heather, I attached it to some cardstock with double-sided tape, then die cut it - no fraying!  I added some tiny buttons, and then attached it to the bear's body, which I stamped, colored, and die-cut first, so that his face was peeking out of his jammies.  

This next card uses most supplies from Simon's March Card Kit, and I added some felt for the cuddly factor:

supplies: Simon's white, surf blue, and green apple cardstock, Echo Park Spring design papers, My Kind of Peep stamps and dies, Painted Hugs die, colored with distress inks, Stitched Rectangles dies, Butter and Cherry Blossom felt

This one will go to our grandkids for Easter!

Now it's your turn!  I can't wait to see what you do this week!  We have a $50.00 gift certificate for one random winner of our challenge!

50dollar_voucher_600px

Simon Says Stamp

Do you use Instagram?  If you do, we'd love you to add #ssswchallenge to your challenge entry uploads so we can see them on there, too!